Track Status
An important piece of information in every volunteer record is the volunteer's Status. The term status describes the volunteer's overall relationship with your organization. Every volunteer record in Volgistics must have a Status selected in the Status field on the Core tab of their record and a volunteer can only have one Status at a time.
Your Volgistics account comes with some default Statuses that describe some common terms used to track a volunteer's progress through the volunteer lifecycle (such as the recruitment, onboarding, active, and inactive phases). You can learn more about how these default Statuses are usually used in the Status Names section below.
You can also create custom Statuses if the default Statuses do not work for your organization. You can learn how to do this in the Add a New Status section below.
View or Change Current Statuses
View or Change an Individual Volunteer's Current Status
Follow these steps to view or change a volunteer's current Status:
- Choose Volunteers from the menu.
- Locate the volunteer record you want to work with and click their name.
-
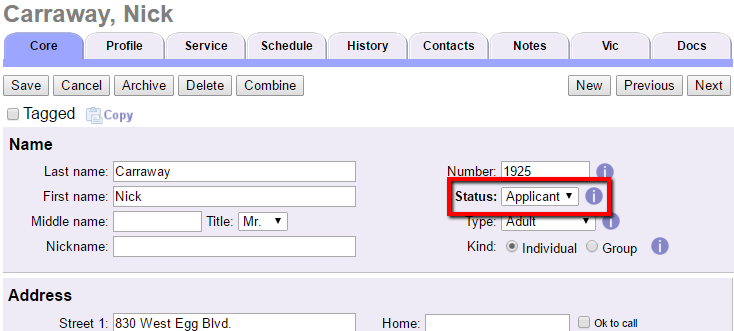
The volunteer's current Status will appear on the Core Tab of the record.
-
If you need to change the volunteer's Status, select a new Status from the dropdown list.
- Click the Save button.
Caution!
Your account may have a Status (or Statuses) set to remove the volunteer's schedule. For example, your account may be set to remove the volunteer's schedule (both past and future) if the volunteer is changed to an Inactive Status because this Status means the volunteer will no longer be serving. If the Status you select in step 3 will remove the volunteer's schedule, you will see a dialog box like this one:
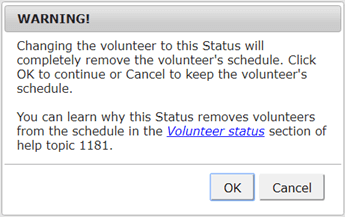
If you are absolutely sure you want to completely remove the volunteer's past and future schedule, click the OK button and then click the Save button to keep the change. If you are unsure, click the Cancel button and review the information in the Volunteer status section of Scheduling Ground Rules.
View the Current Status for Multiple Volunteers
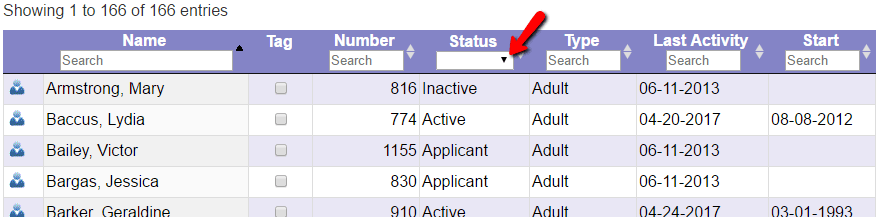
You can also add the Status field to the columns that show when more than one volunteer record is listed on the Volunteers page. You can find instructions in Choose Which Fields Show on Volunteers Page.
When the Status field appears for multiple volunteers, you can select a Status from the dropdown in the column heading to filter the page to show just the volunteers with the Status you select.
View or Change an Individual Volunteer's Status Dates
Whenever you change a volunteer's Status on the Core tab, Volgistics automatically makes a date entry on the History tab of the volunteer's record. The grid shows the type of date entry, what the Status changed to, and the date the change was made. If the volunteer has other date entries (such as Checklist or Award dates), the Status dates always appear at the top of the list. In the image below, the volunteer was given an Active Status on April 11, 2023 (04-11-2023).
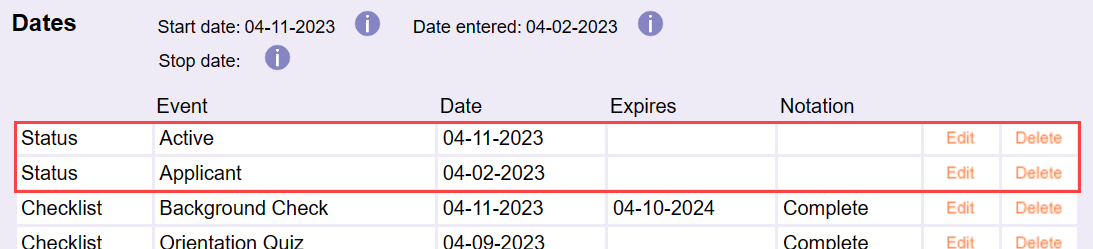
The automatic Status date entries default to the current date when you change a volunteer's Status from the volunteer's Core tab. If necessary, you can click the Edit link to the right of the date entry on the History tab to enter a different date. You can also add a new date entry that will change the volunteer's current Status on the Core tab. For example, if the volunteer in the image above was given an Inactive Status date more recent than 04-11-2023, the volunteer's Status on the Core tab will change to Inactive.
Similarly, editing a Status date entry can change the volunteer's current Status. For example, for the volunteer in the image above, if the Applicant Status date of 04-02-2023 was edited to be 05-20-2023 the volunteer's current Status would be changed to Applicant because 05-20-2023 is more recent than the Active Status date recorded (04-11-2023). Remember that changing a volunteer to some Statuses may remove their schedule! See the Caution box at the bottom of the View or Change an Individual Volunteer's Current Status section above for more details.
Generally, it's a good idea not to delete the automatic date entries created when you change a volunteer's Status on the Core tab because they enable Volgistics to provide you with important information about volunteer participation over time. If you make a Status date entry accidentally, you can click the Delete link to the right of the entry to remove the item. If a volunteer only has one Status date entry, the Delete link will not appear because every volunteer must have a Status.
The Status date entries are available in the Stock reports that come pre-built in Volgistics as well as in custom reports you create. One stock report that shows Status dates is the Volunteer Date History (stock) report found under the Volunteer List reports. You can select to have the report only include Status date information at the bottom of the Include tab when you run the report.
Status Names
Volgistics provides four volunteer Status categories by default:
- Prospect
- Applicant
- Active
- Inactive
These categories apply well to most volunteer programs. Here's what each Status category means:
Prospect
Prospective volunteers are people who have expressed an interest in volunteering, or you want to recruit. Typically, these are people who call or stop by to ask about volunteer opportunities so their records may be incomplete and contain only their names and contact information. If a volunteer comes onboard, her record can be fleshed out with more details.
Information about prospective volunteers is like gold; these individuals may be the future volunteer strength of your agency! You can limit recruitment email messages to just the volunteers with the Prospect Status.
Applicant
Applicants are people who have started the process toward becoming a volunteer. Normally this means they have submitted an application form. (Applicants differ from Prospects in that Prospects have only expressed an interest in volunteering while Applicants have taken action toward becoming a volunteer.)
Active
Active volunteers are those who have completed your induction process and are currently contributing members of your volunteer force.
Inactive
Inactive volunteers are formerly active volunteers who are no longer contributing members of your force. This category usually includes volunteers who are inactive for any reason: they moved, went back to work, resigned, were terminated, and so forth.
If volunteers have the Inactive Status for a certain length of time, you may want to move their record to the archived section of your database. Because archived records have more limited functionality compared to non-archived records (they cannot receive email messages, be scheduled for assignments, login to VicNet or VicTouch, etc.), archived records cost less on a record-by-record basis.
Often, volunteers start as a Prospect, then progress to Applicant, Active, and eventually Inactive Statuses. What prompts you to add a volunteer to the database and/or change her Status is up to you. The main point is that you should use the Status field to track a volunteer's current stage in the volunteer lifecycle.
Tracking Statuses in this way is important for many reasons:
- It enables you to send messages and run reports that include only a certain group of volunteers such as those with the Active Status.
- It allows you to measure the current strength of your volunteer program. (How many active volunteers do we have?)
- It allows you to identify potential volunteers and encourage them to apply for a volunteer position at your agency.
- It allows you to identify individuals who have started the application process, but may need some encouragement to move things along.
- It allows you to restrict access to the optional VicNet portal and VicTouch time station modules based on the volunteer's Status. For example, you can allow volunteers with the Active Status to access the VicNet portal while restricting access for volunteers with the Applicant, Inactive, and Prospect Statuses.
Tip!
Due to today's fast-paced lifestyle, many volunteers no longer serve on a long-term basis. They may just serve for a day or they might serve for a short period like their spring break. In some cases they'll return and serve again, in others they will not. If your organization sees this trend, we recommend creating a custom Status (or Statuses) such as Episodic, Short-Term, One-Time, etc. The Add a New Status section below explains how to add custom Statuses.
Using a custom Status for this type of volunteer will make the counts on your Status Statistics reports more accurate, plus it makes it easer to track records you may want to archive or delete.
Set a Default Status
The Status field always has a default value. Each time you add a new volunteer record manually, or a new record is created by a different method and no Status is specified, the record is given the default Status. Think about why you usually create new volunteer records when deciding what your default Status should be. For example, if you do not create volunteer records in Volgistics until you receive an application, set this to Applicant because most of the new records you create will be for applicants. Or if you do not make a volunteer record until someone is completely approved, setting the default to Active makes the most sense.
To set your account's default Status:
- Choose Setup from the menu.
- Select Field Options.
- Select Core tab.
- Click on Status.
-
Next to Default entry, choose the volunteer Status you want to appear on new volunteer records.
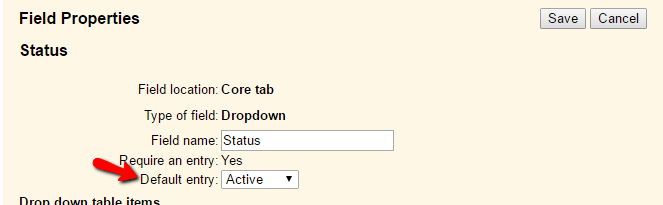
-
Click the Save button.
Add a New Status
You can add additional Statuses to suit your organization's needs. However, accounts cannot have more than eight different Statuses. The Active Status is built in to the system so there is not a way to change or remove Active as a Status choice.
When adding a Status, remember that you should use the Status field only to describe the overall relationship that volunteers have with your organization. You should not use the Status field to track the following things because there are more appropriate places in the system to track these items:
- Assignments. See Assignment Roles for instructions on tracking a volunteer's assignments.
- Volunteer Types (such as Adult or Junior). See Type and Flag Field Settings for information on tracking volunteer Types.
- Volunteer Affiliations (such as RSVP, Auxiliary etc.). See Type and Flag Field Settings for information on creating Flags.
- Archives. Whether or not a record is archived. Please see the call out box below for more information on this.
Archived as a Status
Some organizations may create a Status called Archived. This is perfectly fine, but keep in mind that giving a volunteer an Archived Status is not the same as actually placing the volunteer's record in the archived section of your database. Records in the archived section can have any of the Statuses that are set up in your account. While it might be helpful to create a Status of Archived, a volunteer record could have this Status in either the non-archived, or the archived, section of your account.
To add a new Status:
- Choose Setup from the menu.
- Select Field Options.
- Select Core tab.
- Click on Status.
-
Enter a new Status in the Add a new item field and click the Save button to the right.
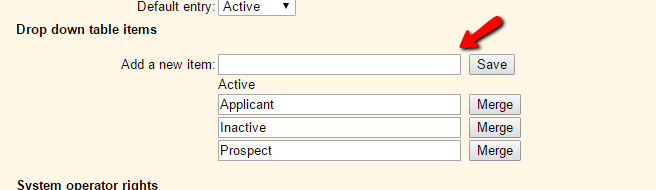
-
You can repeat step 5 until your account has a total of eight Statuses.
- Click the Save button at the bottom of the page when you're done adding Statuses.
When your account has eight Statuses, the Add a new item field will disappear. In this case, follow the steps in the Merge Statuses section below to remove one of the Statuses so another can be added.
Rename a Status
There may be times when you would like to rename a Status so it fits your organization better. When you do this, any records that had the Status you rename will now show the new name. For instance, if you rename Inactive to Resigned, any volunteer who had the Inactive Status on the Core tab (as shown in the View or Change a Volunteer's Current Status section above) will now show with the Resigned Status selected. Also, any date records associated with the Inactive Status (as shown in the View or Change a Volunteer's Status Dates section above) will now be associated with the Resigned Status.
To rename a Status:
- Choose Setup from the menu.
- Select Field Options.
- Select Core tab.
- Click on Status.
- Place your cursor to the right of the Status name you would like to change and backspace to delete the letters.
- Enter the new name for the Status.
- Click the Save button at the bottom of the page.
Please note: There is not a way to change the name of the Active Status, nor can it be merged into any other Status.
Merge Statuses
Every volunteer record must have a volunteer Status. For this reason, it is not possible to delete a Status (deleting a Status could potentially leave some volunteers without a Status). If you have a Status you no longer need, merge it with another Status instead of deleting it. This ensures that no volunteer records are left without a Status, while also removing the Status that was merged from the Status list.
As with renaming a Status, merging one Status into another will make the remaining Status appear on the volunteer record. For instance, if you merge Inactive into Resigned, any volunteer who had the Inactive Status on the Core tab (as shown in the View or Change a Volunteer's Current Status section above) will now show with the Resigned Status selected. Also, any date records associated with the Inactive Status (as shown in the View or Change a Volunteer's Status Dates section above) will now be associated with the Resigned Status.
Caution!
Merging a Status can also remove Status date records in certain circumstances. While it may also change a volunteer's current Status, the change won't remove their schedule entries. Please be sure you have read and understand the information in the Important Information About Merging Statuses section below before combining Statuses.
To merge Statuses:
- Choose Setup from the menu.
- Select Field Options.
- Select Core tab.
- Click on Status.
-
Click the Merge button next to the Status you would like to merge into another. If the Merge button does not appear, the Status is set as the default Status. In this case, you will need to select a different default Status in order to merge the Status into another.
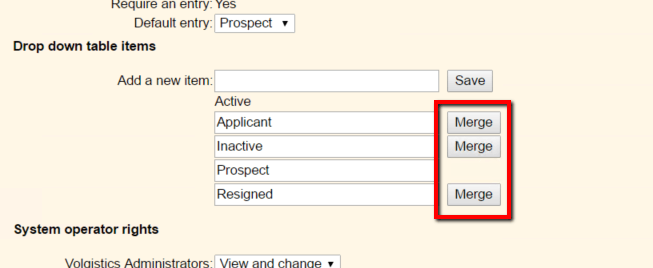
-
After you click the Merge button, you will see a warning message. See the Important Information About Merging Statuses section below for more information on the warning. If you'd like to merge the Statuses, click the OK button. To continue without merging the Statuses, click the Cancel button.
-
Select the Status you would like to merge the item into from the dropdown list.
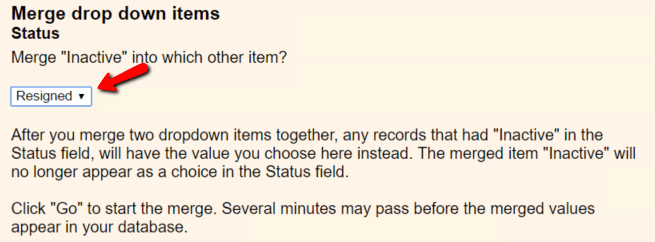
-
Click the Go button.
Several minutes may pass before you see the change on volunteer records. Please note: There is not a way to merge the Active Status into another Status.
Important Information About Merging Statuses
Merging Statuses may delete Status date entries from the volunteer's History tab. Please take time to review the information below before merging Statuses.
Because many organizations use the Status to track things such as recruitment statistics, the system deletes Status dates if the merge makes two date records with the same Status in a row. For instance, let's say a volunteer has the following Status dates recorded on her History tab:

If the organization decides the custom Passed Status is not necessary, and they merge Passed into Active, the volunteer would have an Active Status date on March 22, 2017 and another on May 17, 2017 without having a date for a different Status in between. So if the organization runs a Status Statistics (stock) report and relies on the Became Active count to show how many volunteers started serving each month, the same volunteer would count in the March and the May totals. If this happened to a majority of records in your database, it will make a drastic impact on your onboarding statistics. To prevent situations like this, the system deletes the most recent date so the volunteer's Status date history will now look like this:

Now the volunteer will only count in the onboarding statistics once.
The system does not delete Status dates for the same Status if there is a date for a different Status between the two. For instance, if a volunteer had a Passed Status date on April 30, 2015, an Inactive Status date on June 11, 2016, and an Active Status date on May 17, 2017. In this case, if the Passed Status is merged into the Active Status, her date history would look like this:

In this case, the volunteer's Status date history was not altered when Statuses are merged because the result does not leave two Active Status dates in a row.
Related Help
- VicNet Ground Rules
- Search Based on Status Dates
- Archived Versus Non-Archived Records
- Change Start Date
- Inactivate Volunteers Without Recent Activity
- Search Based on Current Status
- Search Based on Past Status
- VicTouch Ground Rules Settings
- Years of Service Settings
- Start and Stop Date Settings
- Start and Stop Dates
- Statistics Report - Status Statistics (stock)