Import Volunteer Records
There are two options to move your current volunteer records into your Volgistics account: the built-in Import Utility and our Jump-Start service. The Import Utility program is a do-it-yourself option that allows you to transfer most of the volunteer information at no cost. With the Jump-Start service, you pay a one-time fee of $500 and we perform the import for you.
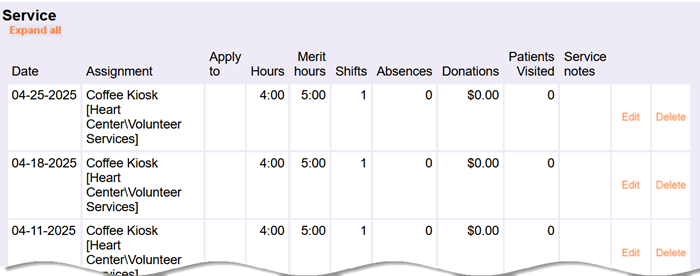
Both options can take volunteer information from spreadsheet files, or tab or comma delimited CSV files, and move the data to volunteer records in your Volgistics account. The main difference between the two options (other than price) is the Import Utility cannot import child records related to the volunteer, but the Jump-Start service can. One example of a child record is the dates, Assignments, and hours for volunteer service information.
Another example is the date history for things such as Status, Award, and Checklist dates.
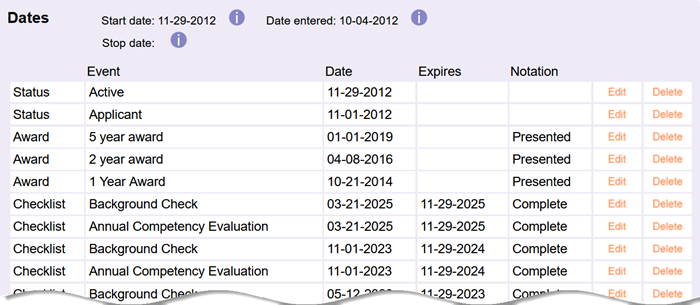
If you want to import child data, you'll need to use the Jump-Start service instead of the built-in Import Utility.
Import Utility
The Import Utility always creates new records for each volunteer imported. It cannot be used to add information to a volunteer record that is already in your Volgistics database. Imported volunteer records are sent to the Applications tab of your Volgistics Mailbox initially and you must receive them into your database. Receiving the records places a temporary tag on the records allowing you to work with the group.
Source File Requirements
In most cases, the source file for the volunteer information to import will be a spreadsheet file because these files naturally have a table format with rows and columns. Each volunteer's information will be in separate rows and the columns are used for the field information. The Import Utility program accepts xls, xlsx, text, and csv file formats. Your source file needs to be flat - - meaning it only has one worksheet (or tab).
The List of All Fields help topic shows which fields the Import Utility program can import. Some of the fields require specific formatting in your source file. Here's some things to keep in mind when creating your source file:
- Archived Records. To import records to send to the archived section of your database, make two separate source spreadsheets. One with the records to archive, and one with records for the non-archived section. Import the records to archive first and then send the group of tagged records to the archived section. Then do a second import with the records for the non-archived section.
- Site Level Access. If Site-Level Access is in use, make a separate spreadsheet for the volunteers at each Site. If a volunteer serves at multiple Sites, only put them on one of the spreadsheets. After you import the spreadsheet for a Site, add the Site to the tagged records then clear the tags and import the next spreadsheet. You'll need to add the additional Sites individually to the volunteers who serve at multiple Sites.
- Dates. The preferred format for dates is forward slashes between the month, day, and year (mm/dd/yyyy) and the year should use all four digits. If the account has day, month, year selected for the date settings, your source file should also have the dates recorded in dd/mm/yyyy format. The Import Utility program can also bring in dates with hyphens (mm-dd-yyyy) and periods (mm.dd.yyyy) as separators.
- Date Active and Date Inactive. If your source file contains Active or Inactive Status dates for years in the future, you must convert the source file to CSV format to have the year imported accurately. Source files in Excel (xls or xlsx) will not import date information for future years accurately.
- Service Hours. Service hours for the life hour total entries should be formatted as whole numbers and decimals without commas. For example, twenty two hours and 45 minutes should be 22.75 and one thousand four hundred hours and 30 minutes should be 1400.5.
- Checkboxes. Checkbox fields should use Boolean values in the source file. Accepted values are True (checked)/False (unchecked), Yes (checked)/No (unchecked), Y (checked)/N (unchecked), and 1 (checked)/0 (unchecked). If the source file's cell is blank or it is not an accepted value, the checkbox is left unchecked regardless of the field's default settings.
- Dropdown Lists. Importing information into dropdown list fields can create new entries if the source file contains entries for the field that do not match the current entries for the field in your account. For example, if your Type field contains entries for Adult, College, and Youth, and your source file has volunteers with High School listed as their Type, after the import your Type field will have entries for Adult, College, High School, and Youth.
- Flags. Your source file should have one column for each field being imported. The exception to this is Flags because a volunteer can have multiple Flags on their record. For Flags, make a separate column in your source file for each Flag and populate the cells in the column with the name of the Flag if the Flag applies to the volunteer in the row. In the example source file below, after the import Al Truism will have the Donor and Blue Team Flags and Phil Anthropy will have the CPR Certified and Green Team Flags.

Import Records
To use the built-in Import Utility, the System Operator performing the import must have access to Setup on the Volgistics menu. To navigate to the Import Utility:
- Select Setup from the menu.
- Go to Account Management.
- Select Import Volunteers.
- Drag and drop your source file to the selection area, or click Choose to select and open the file.
- Click the Next button in the lower right corner.
- Use the Select Field dropdowns to choose the Volgistics field to route the source file column to.
- Click the Next button in the lower right corner.
- The Review Field Mappings pane shows a preview of the mapped information and the fields. If a problem is detected between the import data format and the mapped field, expand the Data Validation Warnings section to learn more about the problem and which source file rows are triggering the warning. Click the Previous button once to rework the mapping or click twice to cancel the import so you can update the source file.
- If you do not see problems in the Review Field Mappings area, click the Begin Import button
Fixing Incorrect Field Routing
To make it easier to see which Volgistics fields have been used already, fields are disabled in the Select Field dropdown after you make a selection. So if you made a mistake such as routing the Last Name column to the First Name field, there's not an apparent way to just correct it. You'll need to select None in the Select Field dropdown for both fields, and then select the correct fields.

When your import is complete, proceed to the Receiving Records for the next step.
Jump-Start Service
The Jump-Start service can use xls, xlsx, and csv file formats. Each volunteer's information will be in separate rows and the columns are used for the field information.
You can upload multiple source files for different information about your volunteers. Each row for a volunteer must include a unique key or identifying number. The image below shows an example of how Jump-Start files may look. The left file has the basic volunteer contact information and the right file has service dates for the volunteers. In the example, the first three rows of service dates from the right file will be put on Bea Stowel's volunteer record because the rows have Bea's volunteer number (89213). The second three rows of service dates from the right file will be put on Phil Anthropy's volunteer record because the rows have Phil's volunteer number (45233).

The List of All Fields help topic shows which fields the Jump-Start service can import. Some of the fields require specific formatting in your source file in order to be imported.
- Service Hours. Service hours for individual date entries should be formatted as whole numbers and decimals without commas. For example, two hours and 45 minutes should be 2.75 and six hours and 30 minutes should be 6.5.
- Checkboxes. Checkbox fields should use Boolean values in the source file. Accepted values are True (checked)/False (unchecked), Yes (checked)/No (unchecked), Y (checked)/N (unchecked), and 1 (checked)/0 (unchecked).
- Archived Records. To import records to the archived section of your database, add a Date Archived column to your source file. If an imported record should go to the archived section, enter a date in the cell where Date Archived column and the row for the volunteer's information meet. Leave the cell blank for records that should not be archived.
When your source files are ready, use the Jump-Start Service page on our website to start the process. You'll fill out a form to get a request number, and then upload the files with your volunteer information. A Volgistics team number will review the information and let you know if the files can be used to import the volunteer information. The one-time $500 fee only is only required if you decide to move ahead with importing the information. We can review your information before the payment is made.
Our team will contact you when the Jump-Start is complete. Then the Receiving Records section shows how to accept the imported volunteer information into your account.
Receiving Records
Imported volunteer records are initially held as pending records on the Applications tab of your Volgistics Mailbox. You'll need to receive the records into your account in order to work with them. When you receive pending records, it places a temporary tag on the record so you can work with the group to perform any of the actions shown in the Tag Functionality help topic. If your records were imported into an account that had records in it already, you should select Tags from the menu and click the Clear all tags at the top before receiving the imported records. This will prevent previously tagged records from accidentally being included in any actions you take with the tagged records.
Receiving imported records is essentially the same as receiving pending applicant records so if you need additional help with receiving or deleting the pending records, see the Receiving New Applicants and Delete New Applications sections of Receive Applications From Mailbox.
The number of records you can receive into your account is determined by how much space is available. For example, if you're still in the trial period, the account can only hold 50 non-archived records so if you imported more than 50 records you can receive up to 50 to work with during the trial and then receive the remaining records after you activate the trial with a service level high enough to accept the number of records you imported.
After you receive the records, you can view them on the Volunteers page. If you decide you want to redo the import, you can clear the account to remove the imported records. However, if you imported into an account that was in use or you already added Assignments to a new account, you should delete the imported records instead of clearing the account. See Delete Non-Archived Records and Delete Archived Records if you need help with deleting records.
Status Date Removal
If your imported data included start or stop dates or Status dates, there's a possibility the import could create two dates for the same Status without a date for a different Status between them. In this case, the system will remove the most recent Status date during the overnight maintenance cycle. This helps with keeping accurate statistics. The Important Information About Merging Statuses section of Track Status explains more.