Core Tab Overview
Every volunteer's record includes a Core tab where you record their basic information such as name, address, and other contact information. The tab also includes fields used for identifying or categorizing your volunteer records. For example, the Status, Type and Flag fields. This help topic explains how to use the fields on the Core tab.
There is a header at the top of the Core tab and below that the Core tab is organized into five or six boxes depending on the kind of record it is used for. Each box contains a related group of fields.
Note
The buttons and field options on the Core tab you see may differ from those shown below. Some fields appear only when you enable certain system features and some buttons depend on your operator rights. Contact your Volgistics Administrator if you have questions about what you see.
Header and Footer Buttons
The buttons at the top and bottom of the Core tab provide actions you can take with the volunteer record.

| Button | Purpose |
|---|---|
| Save | Click the Save button to update the Core tab after making changes. |
| Cancel | Click the Cancel button to leave the page or select a item from the menu. |
| Archive | Click the Archive button to send the volunteer record to the archived section. |
| Delete | Click the Delete button to remove the volunteer record from the database. See Delete Non-Archived Records for more information about what happens when records are deleted. |
| Screen With Verified First | Click the Screen With Verified First button to start the process of having Verified First perform a background screening on the volunteer. Verified First partners with Volgistics to provide an integration so you can order background screenings through them. This button will not appear unless you download the Verified First web browser extension. See Background Screening With Verified First for more information on how this works. |
| New | Click the New button if you want to create a new volunteer record. See Add a New Record Manually for more information. |
| Previous | Click the Previous button to move to the Core tab of the volunteer record listed alphabetically before the record you're currently viewing. If you've used any include filters, this will be the record before the current record on the filtered list. |
| Next | Click the Next button to move to the Core tab of the volunteer record listed alphabetically after the record you're currently viewing. If you've used any include filters, this will be the record after the current record on the filtered list. |
| Tag | Click Tag if you want to add the record to your list of currently tagged records. A tag is a temporary way to create groups of records so you can work with the records all at once. |
| Copy | Click Copy to copy key volunteer information to your computer's clipboard. See Clipboard Copy Overview for more information on how this works. |
Name (or Contact Name) Box
The fields in the Name box are for recording the volunteer's most vital information: their name, Status, Type, Kind, and optionally a record number. If the record is for a group, the Name box is renamed Contact Name. In this case, you record the information for the primary group contact in this box. If you also need to track contact information for secondary contacts for the group, Track Volunteer Contacts shows how to make a custom contact type.

Fields in the Name Box
| Field | Purpose |
|---|---|
| Last name | Enter the volunteer's (or group contact's) last name. It's best to use upper and lower case letters when you enter names. |
| First name | Enter the volunteer's (or group contact's) first name. |
| Middle name | If it's known, enter the volunteer's (or group contact's) middle name or middle initial. |
| Title | Use the dropdown list to choose the appropriate title, such as Mr., Ms., Mrs., Dr., etc. If the Title you want to select does not currently appear in the dropdown list, you can add it in Setup. The Dropdown List Customization and Maintenance help topic explains how to add new dropdown list items. |
| Nickname | If they have one, enter the volunteer's (or group contact's) preferred name or nickname. For example, a person with the legal name of Margaret may prefer to go by Peggy. |
| Number | Each record has an identification number. If you use VicTouch, this is the number the volunteer uses to sign-in and out at the VicTouch station. Numbers are not required for any other purpose except to identify records internally. If you leave the Number field blank, Volgistics will assign a record number for you. You can learn more about the Number field in the Volunteer Number Overview help topic. |
| Status | Use the Status field dropdown list to select the volunteer's (or group's) current Status. To learn more about using Statuses, see the Track Status help topic. |
| Type | If your organization has different types of volunteers, use the Type field dropdown list to select the type for this record. See Type and Flag Field Settings for more information. |
| Kind | Volgistics can be used for both Individual and Group records. Group records allow you to make one record in situations where you do not need to keep track of individual volunteer data. For example if a business is sending 20 volunteers to help with a park clean-up. If you will need to know how many service hours a specific group member contributed, or send an email message to a specific group member, they will need an Individual record. For more information about see Using Group Records. |
Group Box
This box will only appear if you select Group in the Kind field of the Name box. The Group box is used for recording information for the group's record.
Fields in the Group Box
| Field | Purpose |
|---|---|
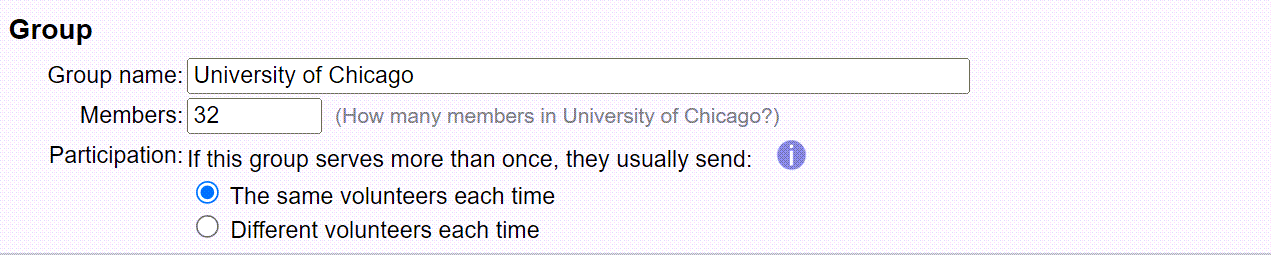
| Group name | Enter the group's name. |
| Members | If you know how many members this group has, enter the number of people who belong to this group in the Members field. For example, if the Savings and Loan Volunteers group has 20 members, enter 20 here (even if not all 20 members will volunteer). You can leave this field zero if you're not sure how many members the group has. Volgistics uses the Members field for totals on Statistics Reports as well as calculating the unduplicated volunteer count on service reports. |
| Participation | Choose the option that best describes how this group will participate if they will volunteer more than once for your organization. Volgistics uses this information in along with the Members field when it calculates the unduplicated volunteer count for service reports. Choose The same volunteers each time if the group will typically send the same people each time the group volunteers. For example, if 20 group members will serve once a month, and it will most likely be the same 20 people each time. Choose Different volunteers each time if the group will typically send different people each time the group volunteers. For example, if a large company commits to send 20 volunteers each month, but the majority of the people will likely be different each time. |
Address Box
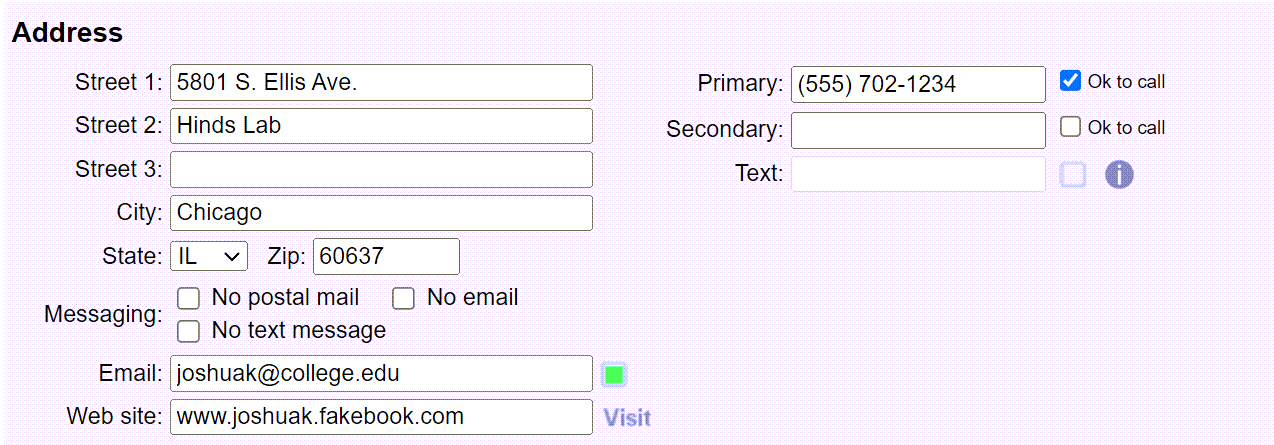
Use the fields in the Address box to enter the volunteer's (or group contact's) mailing address, phone numbers, email address, and website. If a volunteer has more than one address, use the Core tab for the address where they currently prefer to receive mail. Track Volunteer Contacts explains how to make a custom contact type to track additional addresses for the same volunteer.
Fields in the Address Box
| Field | Purpose |
|---|---|
| Street 1 Street 2 Street 3 | Enter the volunteer's (or group contact's) street address in these fields. Street addresses can have up to three lines. Some street addresses use just one line, such as: 123 Elm Street Others may require additional lines. For example: Bradford Arms Apartments 3416 North Broadway Apartment 1521 |
| City | Enter the city for the volunteer's (or group contact's) address. |
| State/Province | Use the dropdown list to choose the volunteer's (or group contact's) state or province. If the state or province you want to select does not currently appear in the dropdown list, you can add it in Setup. To learn how, see Add States or Provinces to Dropdown Lists. |
| Zip/Post code | Enter the volunteer's (or group contact's) zip or postal code. |
| Country | Use the Country field to choose a country if needed. If the country you want to select does not appear in the dropdown list, you can add it in Setup. Dropdown List Customization and Maintenance explains how to add new dropdown list items. If you don't need to use the Country field, you can hide as shown in the Field Customization and Configuration help topic. |
| Messaging | It's possible to prevent postal mail, email, and/or text messages from being sent for a record. This feature is useful in situations where you do not want a person who has been separated from your organization to receive mail, while still maintaining their record in your database. Check No postal mail if you want to prevent postal mail from being sent for this record. When you check No postal mail, this record will not be included in any address label reports you run in Volgistics. Check No email if you want to prevent email messages from being sent for this record. When you check No email, this record will not be included in any email you send from Volgistics. Check No text message if you want to prevent text messages from being sent for this record. When you check No text message, this record will not be included in any text (SMS) messages you send from Volgistics. Keep in mind that you cannot send text messages to volunteers unless your account has enabled text messaging, your volunteers have access to VicNet, and they have opted-in to receive these messages. Note that changing a record's Status field to Inactive is generally all you need to do to remove a person from routine mailings, email and text messages as long as you typically select to send mailings and emails to only records with the Active Status. In this case, it's normally not necessary for you to also check the No postal mail, No email or No text message checkboxes on a record. Instead, these checkboxes are intended for situations where you want to explicitly prevent mail, email, or text messages from being sent. For instance, in special circumstances such as a volunteer who is now deceased, or if a volunteer is separated from your organization for misconduct. |
| Enter the volunteer's (or group contact's) email address here. This is the email address where the volunteer will receive email you send through Volgistics. If you use VicNet, the person will use the email address entered here to login with. The icon that appears as a square beside the email address lets you know if the address is known to be a good or bad email address. If no information is available on this because messages have not been sent to the address yet, the square appears blank or unfilled. The color of the square indicates the address's validity. You can get additional information by placing your cursor over the icon. The Email Address Validity help topic explains more. | |
| Web site | For volunteers who have a personal web page, or profiles on web sites such as Facebook or X, you can enter their URL address here. You can enter the URL address for an organization's web site here for group records. When a valid web page address has been saved in this field, a Visit link to that web page will appear next to the field if the link has been enabled on the Web site field's properties page. To get to this page, choose Setup from the menu, select Field Options, Core Tab, and then Web site. When this link is enabled, clicking on it will take you to the URL address recorded in the Web site field. |
| Primary (Home) Secondary (Work) Cell Text Fax Pager Other | Enter the appropriate phone numbers for the volunteer (or group contact) in these fields. Volgistics provides fields for all common types of phone numbers. Depending on when you started your account, the Primary field may appear as Home, Secondary may appear as Work, and the other phone fields may be hidden by default. You can change the format for phone number fields if your geographic area uses a different format, or you need to add phone number extensions. Because text messaging can cost a volunteer money depending on their plan, there is not a way for System Operators to edit the Text field. If the phone number for this field needs to be updated, the volunteer must opt-out of messaging and then opt-in with the new number. The icon that appears as a square beside the Text field lets you know if the number is known to be valid or not. If no information is available on this because messages have not been sent to the number yet, the square appears blank or unfilled. The color of the square indicates the number's validity. You can get additional information by placing your cursor over the icon. See Text Number Validity to learn more. |
| Ok to call | Use the Ok to call checkboxes to show which of a volunteer's (or group contact's) phone numbers are okay to call for routine business. |
Flags Box
Use the Flags field to mark or "flag" this record for the specific category (or categories) it belongs to. To choose a Flag, select it from the dropdown list and then click the Add button. A record can have multiple flags if it belongs to multiple categories. The flags for a record are all listed in the Flags box, as shown here:

To remove a Flag from a record, click the orange Delete link next to the Flag name.
You can skip the Flag field if this record does not currently need any flags.
See Type and Flag Field Settings for information on adding or removing Flags from the list.
Sites Box
If you use Site Level Access, the Site box appears on the Core tab. The Site box does not appear on the Core tab otherwise. You use the Site field to choose the Site (or Sites) this volunteer serves at. Site-Level Operators and Multi-Site Level Operators will not be able to see the volunteer until the Site they are limited to is selected on the volunteer's Core tab. Assign Volunteers to Site explains other ways a volunteer can be assigned to a Site.

Statistics Box
The Statistics box on the Core tab displays key statistical information about the selected volunteer or group. You don't actually enter anything in the Statistics box. Instead the Statistics box summarizes important statistics (such as service hours and years of service) based on other information entered elsewhere in the volunteer's record. The Statistics box gives you a snap-shot of this volunteer's or group's participation.
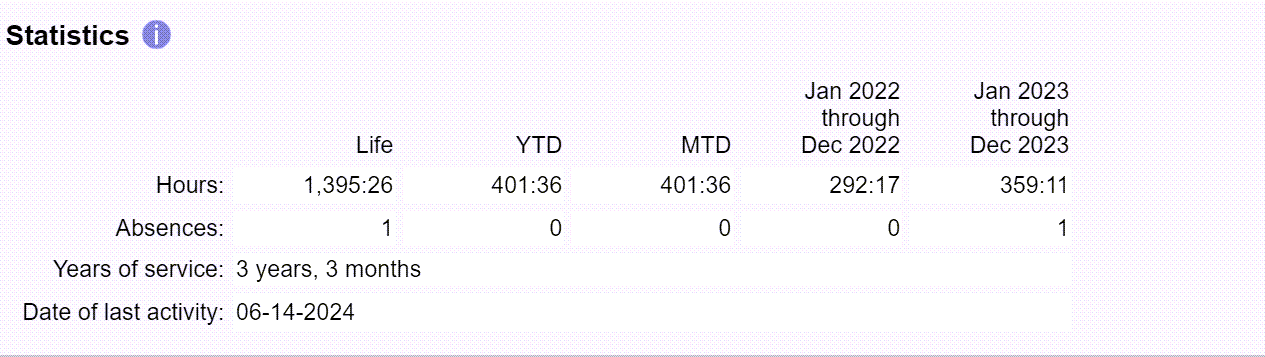
You can find information on how these fields are determined in the following help topics:
You can also find information on how to customize the Statistics box in the Statistics Settings help topic.