Using the Rich Text Editor
The rich text editor allows you to enter, customize, and format content throughout your Volgistics account. This help topic explains how to use the rich text editor and the different formatting options it provides.
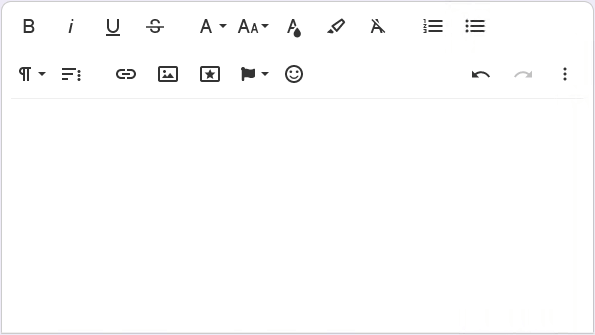
Before we jump into explaining the individual options in the editor, let's first give a brief overview of the editor itself. The rich text editor will appear as a white box that has two parts. The top part is a toolbar where you'll find all the formatting options you can use to customize the content you enter into the editor. The bottom part is the space where you can actually enter your content.
To add formatting to the content of the editor, simply click the icon for the desired formatting option.
Note
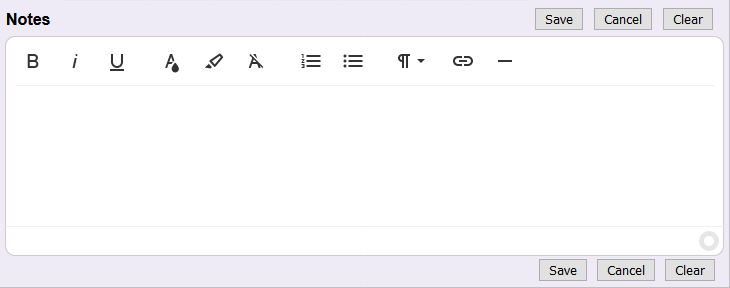
Not all formatting options will be available in all parts of your account, so the rich text editor may look a little different depending on what content you are working with. For instance, when you are sending an email or VicMail message to your volunteers, you'll have many different formatting options you can use for your message. The majority of the images from this help topic are taken from the editor used for sending email and VicMail messages for this reason. On the other hand, the rich text options available on the Notes tab of a volunteer record will be more limited like this:
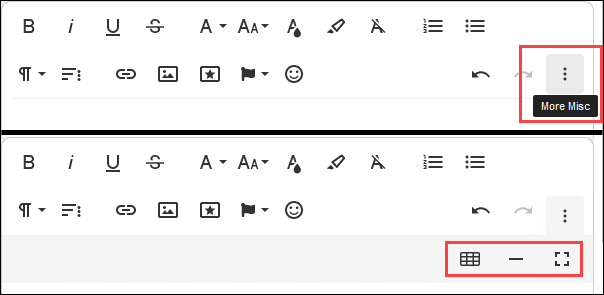
Additionally, some formatting options may not be found in the main toolbar and will appear in expanded menus or toolbars instead:
However, if you do not see a particular option in the rich text editor toolbars, then that option is not available for the field or setting you are working with.
Some text fields in your account may have a limit on the amount of information you can enter. These fields will include a circular indicator at the bottom right of the text editor. The circle will gradually fill as you enter more text and formatting to help you gauge your total usage of the available space in the field.
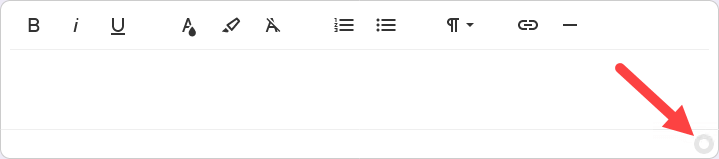
Once you have entered the maximum amount of content into the field, the gauge will show as completely filled. You'll also see a message next to the gauge that says "Max size reached." At this point, you will no longer be able to enter any more text or formatting to the field.

Expand a collapsed section below for information on using a particular rich text feature.
Bold, Italic, Underline, & Strikethrough

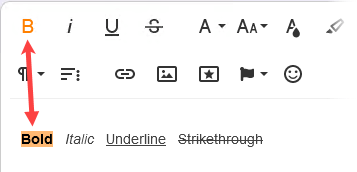
To add emphasis to text, you can apply the bold, italic, underline, and/or strikethrough formatting. These options can be applied by highlighting the text you'd like to format and then clicking the icon for the desired formatting option. Or you can click the icon for the desired formatting option and then begin typing. The selected formatting option will be applied to any text you enter until you deselect the option in the toolbar. You can apply as many of these formatting options to your text as you'd like. For example, you could make text both bold and underlined. Simply click all the options you'd like applied to your text.
When you select text with formatting applied or when the text you are entering has formatting applied, the corresponding formatting options will be highlighted in the toolbar.
If you've inadvertently added formatting to text and would like to remove it, highlight that text and then click the highlighted icon for the formatting you'd like to remove. Once you've deselected the formatting option, its icon will no longer be highlighted and the text you had highlighted will no longer have that formatting applied to it.
You can also remove all formatting from text using the Clear Formatting option described below.
Font Family, Font Size, Text Color, & Background Color

In areas of Volgistics where you can customize the typeface, font size, text color, and background color behind text, the rich text editor will have the settings outlined in the screenshot above. The default selections for the font styles are:
Font Family: Roboto
Font Size: 14
Text Color: Black
Background Color: White
If you'd like to change the style for a particular selection of text, highlight that text, click the icon for the type of style you'd like to change and select the desired option.
Font Family & Size
The rich text editor offers a variety of common font families and font sizes for you to use. Font families include: Arial, Comic Sans, Courier New, Geneva, Georgia, Helvetica, Lucida, Muli, Roboto, Tahoma, Trebuchet, Times New Roman, and Verdana. Each available font family will have its name displayed in the corresponding font to give you a preview of what it will look like applied to your text. Font sizes range from 8 pixels up to 72 pixels.
Text & Background Color
You will also be able to choose from a variety of preset text and background color options. If you have a particular color you'd like to use that isn't included as a preset option, you can use the HEX Color field to enter the corresponding hex code and click the OK button to apply that color instead. If you have applied a text or background color that you wish to remove, highlight that text, select the icon for the type of color you'd like to remove, and click the trash can icon.
Clear Formatting

The Clear Formatting option allows you to completely remove all text formatting you've applied. This option will remove the bold, italic, underline, and strikethrough formatting, and it will also reset the font family, font size, text color, and background color to their defaults. To clear the formatting applied to text, highlight that text and click the Clear Formatting button.
Ordered Lists & Unordered Lists

The rich text editor allows you to add two different kinds of lists. Ordered lists automatically number each item in your list, while unordered lists are simple bulleted lists. To add a list, position your cursor where you'd like the list to appear in the text and then click the Ordered List or Unordered List button. This will automatically indent your cursor and add the first list marker. Enter the first item in your list and press the Enter key to move to the next item. You can continue doing this until you are finished with your list.
Once you have entered your last list item, press Enter to go to the next item and then click the Ordered List or Unordered List button to start your next line of text outside the list and in the normal position. Alternatively, after you've reached the last item in your list, you can press the Enter key to start the next list item and then press it again to end your list.
If you'd like to remove an ordered or unordered list while keeping the text in the list, highlight the list and click the Ordered List or Unordered List button in the toolbar.
Paragraph Format

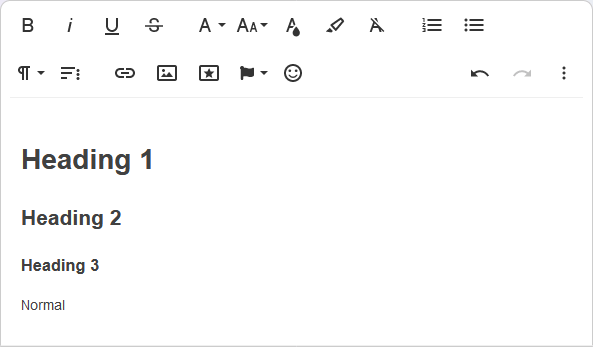
The Paragraph Format options let you add different kinds of headings to your content. Headings come in three levels that vary in size. The first level is Heading 1 and is the largest heading. The next level is Heading 2 which is slightly smaller, and the last level is Heading 3 which is smaller still. These heading levels can be useful for separating your content into sections and subsections. For example, you could use Heading 1 for the title of your content, Heading 2 for the sections in your content, and Heading 3 for subsections in the content. You'll also be able to select the Normal paragraph format in these options which should be used for the main body of your content.
To apply a paragraph format to your content, highlight the text you'd like to apply the formatting to, click the Paragraph Format button, and select the format you'd like from the dropdown.
Tip!
When you use the Enter key to add a line break to your content, the rich text editor will automatically apply extra space between the original line and the new line. This is done to help break up your content and make it more readable. However, there may be cases where you do not want to include extra spacing with a line break (such as when you are adding a sign-off to your email). You can add a line break without extra spacing using Shift + Enter (pressing the Shift and Enter keys at the same time).
Paragraph Alignment (More Paragraph)
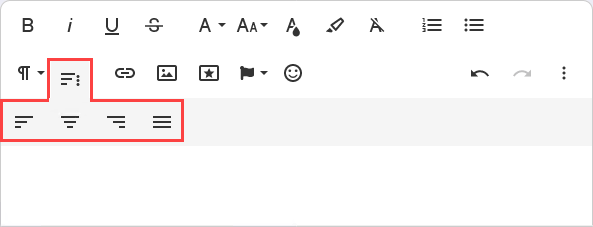
The paragraph alignment options are found under the More Paragraph icon. Clicking this icon will bring up a new toolbar that will let you choose how you'd like to align the selected content. By default, content will be set to Align Left, but you'll also have the option to Align Center, Align Right, or Align Justify. To change the alignment of your content, highlight the content you'd like to change, click the More Paragraph icon, and select the alignment option you'd like to apply.
Insert Link
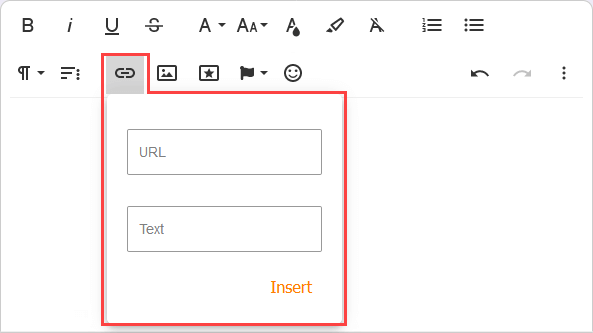
With the rich text editor, you can insert clickable hyperlinks for webpages into your content. To do this, place your cursor where you'd like to add the hyperlink and click the Insert Link icon to bring up a small dialog box where you can enter information for your link. In the URL field enter the web address for the page you'd like to link to. In the Text field, enter the text you'd like to use for the clickable link. Then click the Insert button. A hyperlink will be added to your content based on the information you entered.
Alternatively, you can turn text you've already entered into a hyperlink. To do this, highlight the text you'd like to make into a hyperlink and click the Insert Link button. The Text field will already be populated with the text you highlighted, so all you'll need to do is enter the web address you would like to link to in the URL field and click the Insert button.
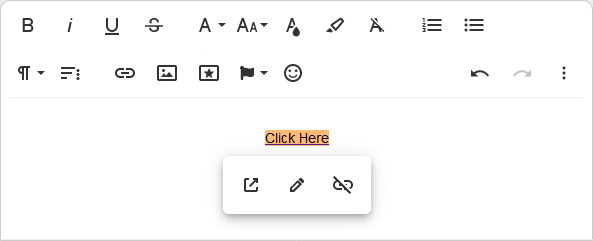
Once a hyperlink has been added to your content, you will be able to interact with it, modify it, or remove it if necessary. To do this, highlight the hyperlink or place your cursor in the hyperlink text. This will bring up a small toolbar next to the hyperlink with options as described below.
-
Open Link.

The Open Link button will open the URL you entered for your link in a new browser tab. You can use this to test to make sure your link works properly and goes to the page you intended.
-
Edit Link.

The Edit Link button will reopen the hyperlink dialog box with the information that you previously entered for the hyperlink so that you can make changes to the URL or link text.
-
Unlink.

The Unlink button will remove the hyperlink and leave behind the text you entered for the link.
Insert Image

The rich text editor includes options for adding images to your content. At this time, the ability to add images is limited to email and VicMail messages that you send from the Out Box tab of the Mailbox. To add an image, place your cursor where you'd like to insert the image and click the Insert Image button. This will bring up a small dialog box where you can indicate which image you'd like to use, and this can be done in a couple of ways.
The first method is to upload an image from your computer. This will be the default option when you click the Insert Image button.
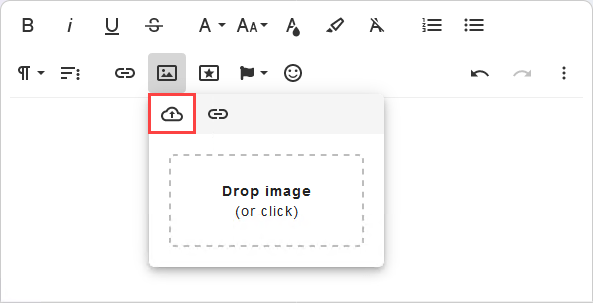
To upload an image, you can drag and drop the image into the Drop image box. Alternatively, you can click on the Drop image box to bring up a file explorer where you can select the image you'd like to add to your content.
The second method is to insert an image using a URL. This method will only work for images that already exist on the internet (such as on your website). To use this option, select the By URL tab in the Insert Image box, enter the URL for the image you'd like to add to your content, and click the Insert button.
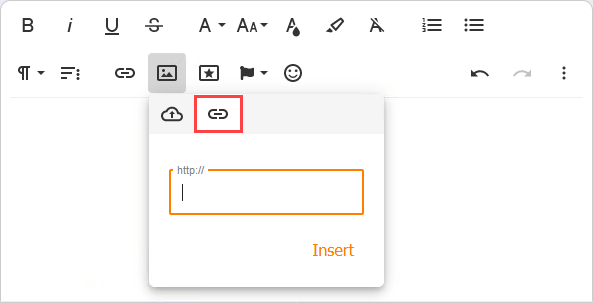
You can get the URL for an image by opening the webpage that image appears on, right-clicking the image, and then selecting the Copy Image Link, Copy image address, or similar option (the name of this option will vary based on the browser you are using). Then you can paste that information into the By URL field and click the Insert button.
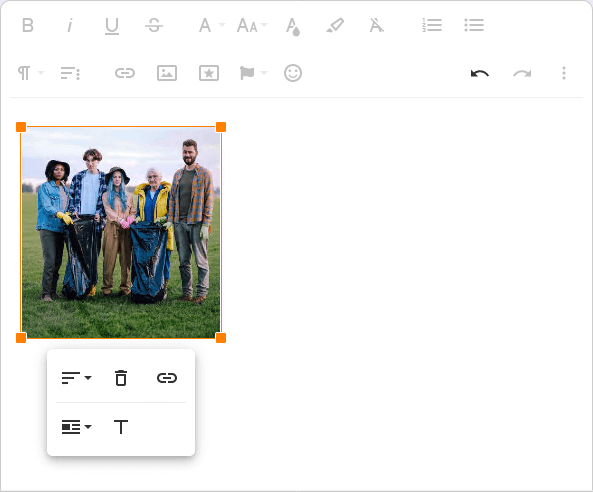
Once you've added an image to your content, you can make further adjustments to it. To do this, click on the image to select it. This will highlight the image with a border, and you can resize the image by clicking on the corners of the border and dragging until the image is the desired size. Selecting the image will also bring up a special image toolbar with options for modifying the image. Below is a breakdown of each of the options in the image toolbar.
-
Align.

The Align options let you choose whether your image should be aligned to the left, to the right, or in the center of your content.
-
Remove.

If you decide that you do not want the selected image to be included in your content, you can click the Remove button to delete the image.
-
Insert Link.

This option lets you turn your image into a hyperlink. This way when a volunteer clicks on the image, they'll be directed to the webpage you choose to link to. To set up your image as a link, click the Insert Link option, enter the URL you'd like the image to link to, and click the Insert button. Once you've added a link to your image, three new options will appear in the image toolbar: Open Link, Edit Link, and Unlink. These all function the same way as the corresponding options in the Insert Link section above.
-
Display.

The Display options allow you to choose whether the text in your content should break at the selected image or wrap around the selected image. If you choose the Break Text option, the image will appear in its own space, so any text entered around the image will appear either above or below it. This will be the option selected by default when you enter your image. If you select the Inline option instead, the image will be displayed alongside the surrounding text content. For example, if you align your image to the left, you can enter text to the right of the image and have it wrap around the image if needed.
-
Alternative Text.

The alternative text (or alt text) for an image is a word or phrase that describes the nature or content of that image. Typically, this is not visible to the individuals viewing the image, but in cases where the image cannot be rendered, the alternative text will show up in place of the image to let the viewer know what was supposed to be there. Additionally, alternative text can be used by screen readers to give context to individuals with visual impairments. Volgistics will not automatically add alternative text to your images, but you can use the Alternative Text option to add this manually.
Insert Logo

This option allows you to easily add your organization's logo to your content. You can do this by placing your cursor in the editor where you'd like it to appear and clicking the Insert Logo button. Please note that this option will always insert your account's display graphic. If you do not have a display graphic uploaded for your account, the Insert Logo option will be hidden in the toolbar. You can learn more about adding your logo to Volgistics the Upload Logo help topic.
Once you've inserted your logo into your content, you can make adjustments to it by selecting the logo image. This will highlight the logo and bring up a special image toolbar. This toolbar functions identically to the toolbar described in the Insert Image section above.
Insert Placeholder

When you send mass emails or VicMail messages from Volgistics, you can add placeholders to personalize the message for each recipient. For example, you can use a placeholder in your message greeting so that each recipient sees their own name in the message. Placeholders can be used in messages that you send manually from the Mailbox and also in messages that are sent automatically by the system (like Schedule Reminder messages). There are many kinds of placeholders, and you can learn more about these in the Personalize Messages With Placeholders help topic.
To add a placeholder to your message, place your cursor in the location where you'd like the placeholder to appear, click the Insert Placeholder icon, and select the placeholder you'd like to add. This will automatically insert the corresponding placeholder code into your message. Alternatively, if you know the code for the placeholder you'd like to add, you can enter this into your message manually.
Emoticons

When you are sending emails or VicMail messages manually from the Out Box, you'll have the option to insert emoticons (or emojis) into your message. You can do this by placing your cursor in the location you'd like to add your emoticon, clicking the Emoticons icon, and selecting the emoticon you want to add. There are a variety of emoticon options and these appear in several tabs within the emoticons dialog box.
Undo & Redo

When you are making alterations to content in the rich text editor, you may make a change that you do not want to keep or that you made by accident. The rich text editor will keep track of recent changes you've made, so that you can revert or reinstate changes. You can click the Undo button to revert your changes one-by-one, starting with the most recent change you made. Also if you use the Undo option and accidentally revert a change, you can bring that change back by clicking the Redo button.
Insert Table

This option is used to create tables in your content. This option is only available when sending email or VicMail messages from the Out Box tab of the Mailbox. To add a table to your message, place your cursor in the location where you'd like the table to appear, click the Insert Table icon (this may appear in the More Misc toolbar), use your mouse to hover over the grid of cells to select the number of rows and columns you'd like in your table, and click. Now that table will be added into your message and you can begin entering information.
Once the table has been added to your message, you can make changes to it using the special table toolbar. You can access the toolbar by selecting a cell in your table. Each of the options in this toolbar is described below.
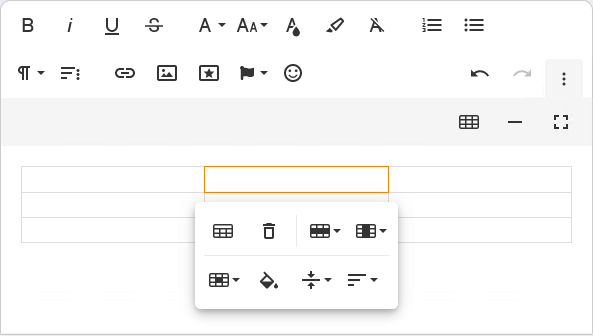
-
Table Header.

This option will add a new row at the top of your table for the purpose of adding headers for each table column.
-
Remove Table.

If you decide that you do not want to include the table in your message, select this option to completely delete the table.
-
Row.

With this option you can choose to add rows to or remove rows from the table. You'll have the option to insert a row above the currently selected row, insert a row below the currently selected row, or delete the currently selected row.
-
Column.

Similar to the Row options, this will let you choose to add or remove columns in your table. You can add a column before the selected column. You can add a column after the selected column. Or you can delete the selected column.
-
Cell.

These options allow you to split and merge cells. If you have multiple, adjacent cells selected, you can use the Merge cells option to combine these into a single cell. If you have a single cell selected, you can choose to split that cell either vertically or horizontally using the Vertical split and Horizontal split options.
-
Cell Background.

You can use this option to add background colors to the cells in your table. Simply select the cell you want to apply a background color to, click the Cell Background button, and select the color you'd like. There are a variety of preset options to choose from, but if you'd like to use a specific color, you can enter the corresponding hex code and click the OK button instead. If you want to remove the background color from a cell, select that cell, click the Cell Background button, and click the Clear Formatting button (the trash can icon).
-
Vertical Align.

Use the vertical align options to choose whether the content of the selected cell(s) should be aligned to the top of the cell, the middle of the cell, or the bottom of the cell. Content will be middle aligned by default.
-
Horizontal Align.

Use the horizontal align option to select whether the contents of the selected cell(s) should be aligned to the left, aligned to the center, aligned to the right, or justified. Table cells will be aligned to the left by default.
Insert Horizontal Line
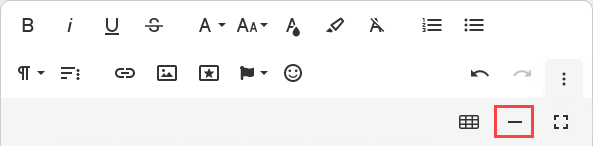
To add a horizontal line to your content, place your cursor in the location you'd like to add this feature and click the Insert Horizontal Line button. The horizontal line will extend across the entire width of your content, so this is a great way to break up your content and create distinct sections.
You can remove a horizontal line by placing your cursor immediately below the line and pressing the Backspace key on your keyboard.
Fullscreen
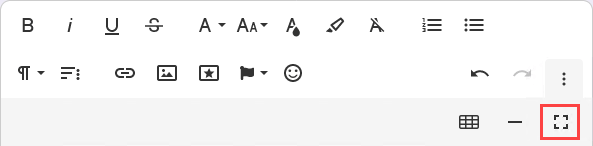
If you'd like more space to work with the rich text editor, you can expand the editor so that it uses your whole browser window by clicking the Fullscreen button. Once you're finished working in fullscreen mode, you can return the rich text editor to its normal size by clicking the Fullscreen button again.