Save Volunteer Information Locally
Saving Volunteer Information Locally
While your volunteer data is safely and securely stored in the Volgistics system, it is still a good idea to regularly save this data to your computer. This way you have a record of your information should you need to refer back to it or transfer that information to another platform such as a donor management system.
You can export all your volunteer data and save it locally using the Data Export option in the Account Management portion of Setup. Please note that this means only System Operators with access to Setup will be able to use the data export feature. If you do not have access to Setup, you can use the Reports page in your Volgistics account to generate reports with your volunteer data and save the report files locally instead.
With the data export tool, you can choose to export all of your archived and non-archived volunteer data into an Excel spreadsheet file and/or export all of the documents stored on the Docs tabs of your volunteer, Coordinator, Site, Place, and Assignment records. If you choose to export documents, this will include the PDF version of volunteers' completed application forms. Accounts that include the VicDocs document storage feature in their service will also receive documents uploaded by System Operators or submitted with application forms. In addition, accounts that have both VicDocs and the VicNet portal will receive any documents uploaded by volunteers or Coordinators in the portal.
The data export process involves four segments or processes, and we will also explain how to open the files with the saved information. Expand a collapsed form section below to view the section you're interested in.
Export Data from Volgistics
The first thing you'll need to do is initiate the data export process from inside of your Volgistics account. To export your data to save it locally:
- Choose Setup from the menu.
- Expand Account Management.
- Click the Data Export link.
-
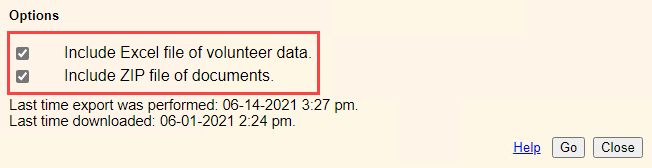
In the Options section, check the boxes for the items you'd like to have included in the export file. You can choose to include just an Excel file with your volunteer data, just a ZIP file of all your documents, or both the volunteer data file and documents.
-
Once you've selected which information to include in the export, click the Go button.
- Click the OK button on the confirmation dialog with details about how to proceed.
See the Access Message with Link section below for information on the next part of the process.
Tip
Options Section is Missing
If the system is already working on exporting data for your account, you will not see the Options section. Instead, you will see this message:
"There is already a data export in progress. Please wait for the emailed link, or try again later."
This means that you have already requested a data export and it is currently being generated. It will be sent to the email associated with your System Operator record shortly.
Access Message with Link
After you initiate the data export in your Volgistics account, the next part of the process will be completed outside of the system. This section of the help topic explains the steps to get the message the system sends.
- Go to the email account associated with the email address you use to log in to Volgistics.
- Look for an email message from team@volgistics.com with the subject Data export file. The time it takes for the export file to be produced and the email message to be delivered will vary depending on how much information is in your account. If you have a large account with a lot of VicDocs documents, it may take 15 minutes or more for the email message to be delivered. Remember to check your spam or junk mail folder if you do not see the message.
- Click on the link in the message to go to the login page to proceed with downloading the exported files. You can also copy the URL address for the link if you want to paste it into your web browser.
Please Note: For security, the link only remains active for five days. If your link has expired, export the data from Volgistics again to get a new link. See the Download Exported Files section below for help with the next part of the process.
Download Exported Files
The next part of the data export process requires you to verify your login information and then download the actual files that were sent to you.
-
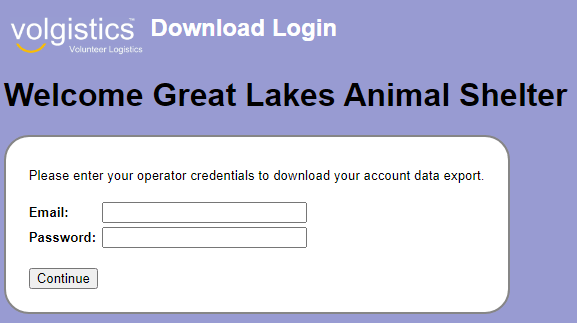
After clicking the link (or copying and pasting it), you'll be taken to a login page that looks something like this.
-
Enter the email address and password associated with your Volgistics System Operator record (the ones you use to log in to your account normally). The account number is not necessary because the link is specific to your account.
- Click the Continue button.
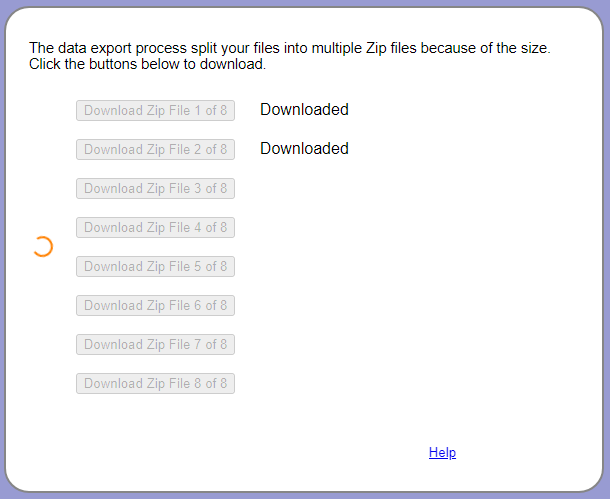
- If the credentials were entered correctly, you'll see a page with a Download Zip File button. Click the button to start the file download.
If your account has a large number of VicDocs documents, you'll see more than one Download Zip File button. Click the button at the top of the list to start the first file download. While that file is downloading, the other buttons will be disabled to avoid overwhelming your web browser.
See the Save Files Locally section below for information on the next part of the process.
Save or Copy Files Locally
When you download a file it is usually placed in your downloaded folder. The location of this folder varies depending on the web browser you're using, and how the browser is set up to handle downloaded files. In some cases, your web browser might be set up to ask if you'd like to save the file when you open the file. In other cases, you can drag and drop downloaded files to the local location where you want to save the file.
If you are unsure of how to retrieve your downloaded files, you should contact your organization's IT department or consultant. You could also use online resources to look for your answer.
Protect Your Downloaded Information!
When you save volunteer information to your local system, it is no longer protected by Volgistics' built-in security. Because of this, we highly recommend adding protection to the files to protect your volunteers' personal identifiable information (PII). Protection could include adding password protection to the files or encryption. If you're unsure of how to protect your locally stored volunteer data, see your organization's IT team or consultant.
Also, remember to delete the downloaded files from your downloads folder after you save the files locally. The downloads folder provides another point of access to the information so please be sure to complete this additional step.
Open Saved Files
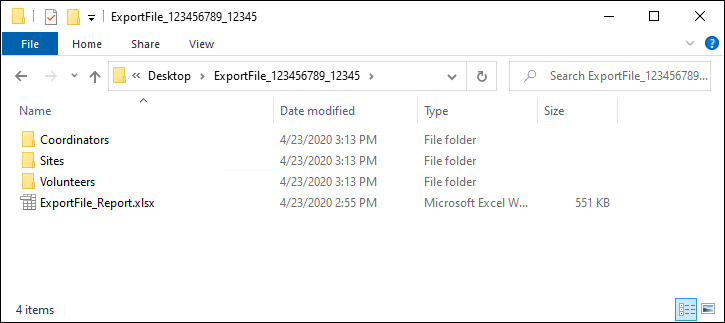
All of the files included in the export will be contained in ZIP files that you can save and extract on your computer. If you included the Excel volunteer data file, this will be found in the root of the ZIP file with the name ExportFile_Report. If you chose to export documents, these will be organized into separate folders for Volunteers, Coordinators, and Sites in the root of the ZIP file. If your download was broken up in to more than one ZIP file, the Excel data file will be in the first ZIP you downloaded.
Due to the large quantity of volunteer data included in the ExportFile_Report Excel file, volunteer data will be separated into multiple sheets (or tabs) within the file. You can typically find and access these different sheets at the bottom left side of the Excel window similarly to what is shown in the Excel Spreadsheet Report File Structure help topic.
Within the Volunteers folder, you will find sub-folders for each volunteer that had documents stored on the Docs tab of their record, and each volunteer folder will include all files stored in the corresponding record. The same is true for the Coordinators folder.
If you store any documents in your Site, Place, or Assignment records, these documents will be found in the Sites folder. Documents are organized into folders using the same hierarchical structure that you see on the Assignments page of your account shown here:
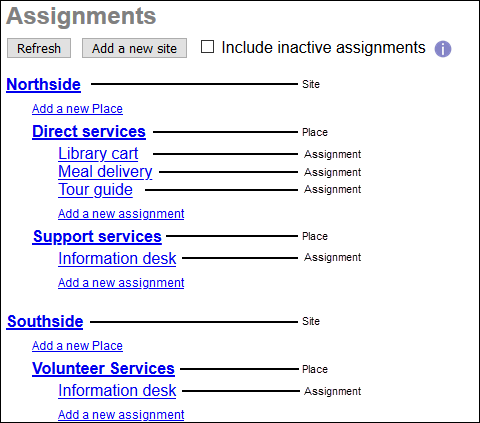
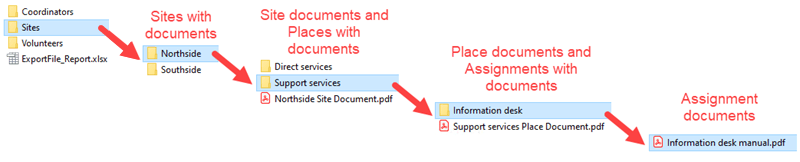
Each Site that has documents or that has a Place or Assignment under it with documents will have its own folder within the general Sites folder. Any documents uploaded to a Site will appear in that Site's folder. If any Places within a Site have documents, these Places will appear with their own folders under that Site and those folders will contain any documents stored on the Docs tab of those Places. Additionally, if any Assignments under that Place have documents, each of those Assignments will have their own folder within that Place's folder where their documents can be found. Below is an outline of what this portion of the export file might look like:
Volgistics will also help you keep track of when you've exported your volunteer data. Each time a System Operator in your account performs a data export or downloads a data export file, an entry will be added to your account's Event Log. Additionally, a date and time will be recorded for these events on the same page where you request the export under the Options section:
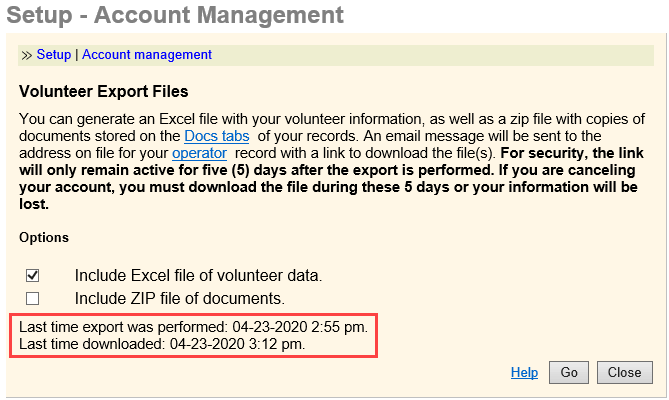
The Last time export was performed date and time will correspond to the last time a System Operator actually completed the export process in your account. If this date is within the last 5 days, that file will still be available using the link that was emailed to the System Operator that requested the export. If this date is more than 5 days ago, that export file will no longer be available and a new one would need to be generated using the steps above. The Last time downloaded date and time will correspond to the last time a System Operator used the emailed link to log in and download the export ZIP file.
Related Help
- Documents Tab of Mailbox
- Docs Tab for Volunteers
- Docs Tab for Coordinators
- Docs Tab for Sites, Places, and Assignments
- VicDocs Overview
- Upload Documents in VicNet
- Document Uploads on Application Forms