Mailbox In Box Tab
Sort Information in the Mailbox
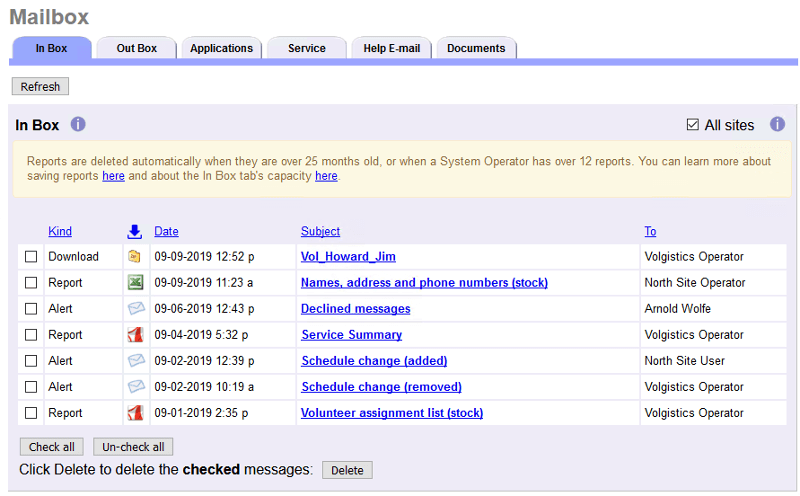
The Mailbox's In Box tab is the tab initially displayed after you select Mailbox from the menu. The In Box tab is used for managing incoming messages such as reports, alerts, and document zip files. Messages are identified by kind, format, date received, subject, and the System Operator to whom they were directed.

This help topic reviews some of the basic features of the In Box tab. Expand a collapsed section below to learn more about the feature you're interested in.
Capacity
The In Box tab is not intended for long term storage. These rules apply to how long items remain on the In Box tab:
- Alerts are deleted from the In Box tab 180 days after they are received.
- Upload Alerts are deleted from the In Box tab 180 days after they are received.
- Infected File notices are deleted from the In Box tab 5 days after they are received.
- Downloads of documents are deleted from the In Box tab 5 days after they are received.
- Reports are deleted from the In Box tab 25 months after they are generated.
- System Operators are limited to 12 reports each. Once the 12 report limit is reached, when the operator generates a new report the oldest report run by the operator is automatically deleted.
If you need to save an item such as a report or download, you will need to save it to your local computer, network, or storage device before it is deleted. To save reports on your local system, see the Saving Reports Locally section of this help topic. To save a download of documents, see the Downloads section of this help topic.
Alerts
Alerts received on the In Box tab are identified with the following icon:

Depending on your account setup, you could receive five different types of alert messages. These are generated for the following events:
- Subject: New application. Alerts generated when an applicant submits an online application form. To enable these alerts, see the Alerts section of the Main Setup Page Settings topic for application forms.
- Subject: Application shift shortage. Alerts generated when an applicant isn't able to submit one of your forms because there weren't enough shifts available for them to select. This can happen when you require applicants to select a certain number of shifts when applying. Learn more about this in the Schedule Fields portion of the Customize Application Form Content help topic.
- Subject: Schedule change (added). Alerts generated when a volunteer adds him or herself to the schedule through self-scheduling. For information on adding these alerts, see the Self-scheduling alerts section of the Self-Scheduling Rules help topic.
- Subject: Schedule change (removed). Alerts generated when a volunteer removes him or herself from the schedule through self-scheduling. For information on adding these alerts, see the Self-scheduling alerts section of the Self-Scheduling Rules help topic.
- Subject: Declined messages. Alerts generated when a Coordinator or volunteer opts-out of all email communication and text messages from your organization through the link at the bottom of an email message. For information on adding these alerts for volunteers, see the Add Volunteer Message Descriptions help topic. For Coordinators, see the Add Coordinator Message Descriptions help topic.
- Subject: Opt-out of text messaging. Alerts generated when a Coordinator or volunteer opts-out of text messaging by texting STOP or changing their selection in the VicNet portal.
Upload Alerts
If you allow volunteers and Coordinators to upload documents through VicNet, you can optionally choose to have alerts sent to the In Box when particular types of documents are uploaded. You can choose which Document Types to send alerts for in your account's Documents Tab settings. Upload Alerts are identified with this icon:

The Subject of an Upload Alert will indicate what Document Type was uploaded, and the To column will indicate which volunteer or Coordinator uploaded the document. You can click the Subject to see more details about the document upload. The message will include a link to the volunteer or Coordinator's record and include the name of the document that was uploaded.
If you want to view all documents uploaded to volunteer or Coordinators, use the Documents tab or your Volgistics Mailbox.
Please note: Documents uploaded by System Operators and uploaded on applications do not generate upload alerts. Only documents uploaded by volunteers and Coordinators generate these alerts.
Infected Files
When you, a volunteer, or a Coordinator upload VicDocs files, the system scans the document to check for viruses. If the scan shows a file may have a virus, the document is deleted to protect the system. When this occurs, you will receive an Infected File notice on the In Box tab. Infected File notices are identified with the icon shown below:

The Subject of the alert shows the name of the file that was infected. Click on the Subject to learn more about the record the upload attempt was made for. The following help topics have more information about where documents can be uploaded:
- Docs Tab for Volunteers
- Docs Tab for Coordinators
- Docs Tab for Sites, Places, and Assignments
- Upload Documents in VicNet
- Document Uploads on Application Forms
Downloads
Zip files of downloaded VicDocs documents may be received on the In Box when a System Operator performs an action such as deleting a volunteer record or deleting a Site, Place or Assignment record. The zip files allow you to save the documents associated with records that are deleted from your Volgistics account.
Downloads are identified with the following icon:

The first part of the Subject of the download message shows the type of record that was deleted, and the second part of the subject has the name of the record that was deleted. The chart below shows the abbreviations used for the types of records.
Abbreviations
| Abbreviation | Record Type |
|---|---|
| Asgmnt | Assignment |
| Coord | Coordinator |
| Place | Place |
| Site | Site |
| Vol | Volunteer |
Please Note:
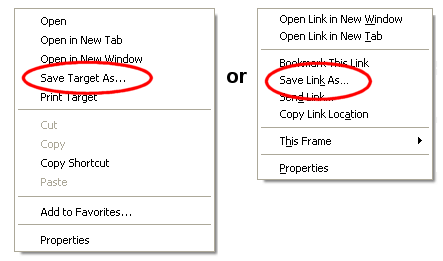
The zip files for downloaded documents are only kept in Volgistics for 5 days after the record the documents were on is deleted. If you wish to keep the documents permanently, you will need to save the file locally before it is deleted. In most cases, you can do this by simply clicking on the Subject of the notification. Another option to download the file is to right-click on the Subject of the notification and then select Save link as..., Save target as... or Save as... from the menu.
Reports
Reports received on the In Box tab can be in Microsoft Excel format, or PDF format. Excel files appear with the following icon:

PDF files are identified with the icon shown below:

You can find information on how to run reports, plus a listing of pre-made reports, in the Stock Report Overview help topic. You can also customize your reports in Volgistics. You can find information on how to create a custom report template in the Create Custom Reports resource.
If you have requested a report file and the system is still working to compile the information, you will see a message by the Refresh button indicating there is a report pending. This message will indicate how many reports are currently pending for your entire account.

These could be reports initiated by a Site-Level Operator or Multi-Site Level Operator other than yourself so you may not actually see the report files on the In Box tab when they are completed. The Site Level Access and the In Box Tab section below explains more about this. If you remain on the In Box tab, you will need to Refresh the tab to see pending reports that have completed since you visited the tab.
Saving Reports Locally
As noted in the Capacity section of this help topic, the In Box tab is not intended for long-term storage. To save a report file to your local computer (or flash drive or other storage medium), right-click on the Subject of the report on the In Box tab and then select "Save target as...," "Save link as..." or "Save as..." from the prompt.

Then follow the steps to save the file to a local storage location. You can also save reports by opening them in Excel or Acrobat Reader and then using the program to save the report.
There is not a way to save Alerts locally without copying and pasting them into a spreadsheet or word processing document.
Refreshing the In Box Tab
The In Box tab will show an up-to-date view each time you select Mailbox on the Volgistics menu. If you're on the In Box tab and you want to update the view without leaving the tab, click the Refresh button in the top left corner of the In Box tab.
Sorting the In Box Tab
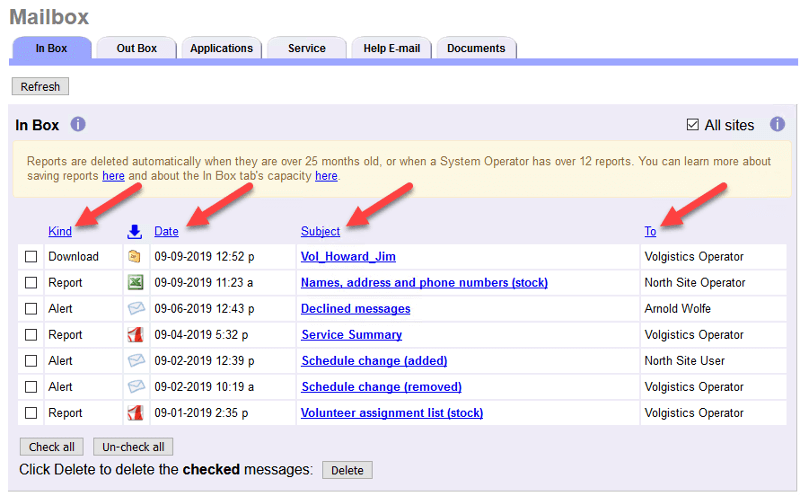
By default, the In Box tab is sorted by the Date column with the most recent items at the top.
As your In Box tab receives more items such as alerts, reports, and downloads, it may become difficult to find an item you're looking for. To help you with this, Volgistics allows you to sort the In Box by the Kind, Date, Subject and To columns. Just click on the column heading to sort the In Box by that column's information.

Deleting In Box Items
To delete an item from the In Box tab, check the box next to the item you'd like to delete and then click the Delete button. You can clear out your entire In Box at once by clicking the Check all button and then the Delete button.
If you'd like to delete multiple items but not all of them, you can check the boxes for a range of items. To do that, check the box for the first item in the range, hold down the Shift key, and then click on the last item in the range you want to select. All the items in the range will be checked for you.
Please note. . .
- The Delete buttons are located at the bottom of the tab so if your account has many items, you will need to scroll to the bottom of the tab to locate the buttons.
- The In Box tab is shared by the System Operators in your account so if you don't recognize an item, you may want to check with the operator listed in the To column before you delete the entry.
Site Level Access and the In Box Tab
If an organization uses Site Level Access and a System Operator is logged in as a Headquarters Operator, the In Box tab will have a checkbox for All Sites in the upper right corner. If this box is checked, the Operator will view reports generated by Headquarters as well as reports generated by Site-Level Operators and Multi-Site Level Operators. If the All Sites box is un-checked, only reports generated by Headquarters will be displayed on a Headquarters Operator's In Box tab.
Users logged in as Site-Level Operators (Operators assigned to a single Site) or Multi-Site Level Operators (Operators assigned to multiple Sites that can switch between those Sites) will not see the All Sites checkbox on the In Box tab. Site-Level Operators will only see reports generated at their Site, and Multi-Site Level Operators will only see reports generated at the Site that they are currently associated with.