Dropdown List Customization and Maintenance
Dropdown lists (also known as look-up tables) have a pre-defined list, or table, of entries that you can choose from when entering data. Dropdown lists have a down-arrow attached to their right edge and a list of entries appears when you click the down-arrow.
Examples of dropdown lists include:
- The Title, Status, State, and Type and Flags fields on the Core tab
- The Gender field on the Profile tab
- The Assignment field on a service entry
Many of the dropdown fields are created by you in the Setup pages. However, some fields (such as the Assignment dropdown) are created by the system from the information in your account. In this case, to change the list you will need to make the change on the Assignment page. This help topic deals with the type of dropdown lists created in Setup.
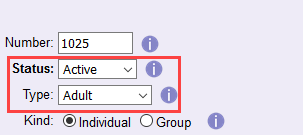
Fields with dropdown lists look like this:
Occasionally you may need to maintain these tables by adding new entries, correcting the spelling of an entry, merging entries, or deleting entries. To perform any of these functions, you first need to know two things:
- The name of the field you would like to customize.
- The name of the tab that contains the field.
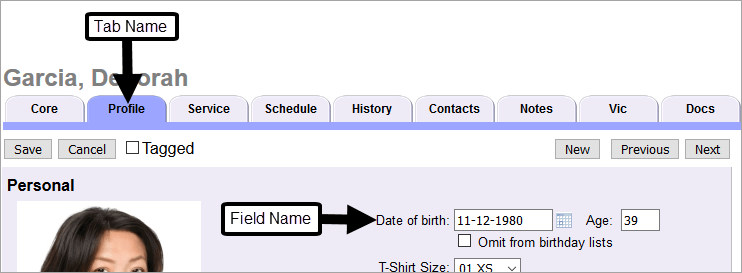
For example, the Date of birth field is located on the Profile tab on volunteer records. The list of all fields includes all of the fields in the system along with the tab the field appears on. The image below gives an example of how the Date of birth field is located on the Profile tab of volunteer records:
To Manage a Dropdown List
- Choose Setup from the menu.
- Expand Field Options. A list of all the tabs in Volgistics appears.
- Select the tab that contains the dropdown list you'd like to edit. A list of all the fields located on this tab appears.
- Click the field you would like to customize. The Field Properties window opens.
-
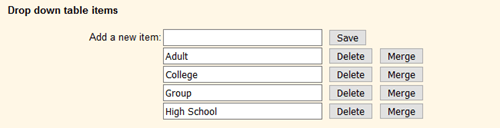
Use the Drop down table items section to manage the dropdown list.
The Status field is a unique and important field so we recommend reviewing the information in the Important Information About Merging Statuses section below if you'll be merging items in the Status dropdown list.
Add a New Dropdown List Entry
To add a new item to the dropdown list for the field:
- Choose Setup from the menu.
- Expand Field Options. A list of all the tabs in Volgistics appears.
- Select the tab that contains the dropdown list you'd like to edit. A list of all the fields located on this tab appears.
- Click the field you would like to customize. The Field Properties window opens.
- Type your new entry into the Add a new item field.
- Click the Save button.
- Repeat steps 5 & 6 for any other new entries you need to make.
- Click the Save button at the top or bottom of the page to exit.
Controlling the List's Sort Order
The list of items in the dropdown fields are sorted alphabetically by default. So a list for a field called Education Level may appear as:
Associates
Bachelors
Doctorate
High School
Masters
You may want to sort the list to have the lowest level of education at the top and more advanced degrees at the bottom. In this case, you will need to add a two digit number to the front of each entry like this.
01 - High School
02 - Associates
03 - Bachelors
04 - Masters
05 - Doctorate
Change a Dropdown List Entry
To change or edit a dropdown list entry:
- Choose Setup from the menu.
- Expand Field Options. A list of all the tabs in Volgistics appears.
- Select the tab that contains the dropdown list you'd like to edit. A list of all the fields located on this tab appears.
- Click the field you would like to customize. The Field Properties window opens.
- Edit the item to make the needed changes.
- Click the Save button at the top or bottom of the page to exit.
Caution!
When you're changing a dropdown list that is currently in use, keep in mind that simply renaming a dropdown list entry may cause problems on volunteer records that already have a selection for the field. You should only make minor name changes to dropdown entries if the field is already in use. If you need to completely rename an entry for a field already in use to mean something completely different than the current entry, you should merge entries together, or delete the current entry then add a new one.
Merge Dropdown List Entries
Occasionally you may need to combine two or more dropdown list entries together. For example, you may discover that two different entries in the Type field actually have the same meaning (e.g. Junior and Jr.). Follow these steps to merge two dropdown entries:
- Choose Setup from the menu.
- Expand Field Options. A list of all the tabs in Volgistics appears.
- Select the tab that contains the dropdown list you'd like to edit. A list of all the fields located on this tab appears.
- Choose the field you would like to customize. The Field Properties window opens.
- Click the Merge button by the entry you'd like to merge into another.
- Select the entry you'd like to merge the current entry into from the dropdown list.
- Click the Go button to merge the entries. Click the Cancel button if you do not want to continue.
Volgistics will combine the first dropdown list entry you selected into the second one. For example, if you clicked the Merge button by Jr. in step 5, and you selected Junior in step 6, any record that previously contained the entry Jr. will now have the entry Junior instead. The old entry will no longer appear as an option in this dropdown field.
Note
Some dropdown lists may have special properties that do not allow you to merge two entries. For example, the Status dropdown list will not allow you to merge the Status set as the default into another entry.
Delete a Dropdown List Entry
You may want to delete an entry from the dropdown field completely. If a volunteer record has the entry you delete selected, the field will be blank after the entry is deleted. To delete a dropdown entry:
- Choose Setup from the menu.
- Expand Field Options. A list of all the tabs in Volgistics appears.
- Select the tab that contains the dropdown list you'd like to edit. A list of all the fields located on this tab appears.
- Click the field you would like to customize. The Field Properties window opens.
- Locate the entry you would like to delete.
- Click the Delete button.
The important thing to remember is deleting an entry from the dropdown list will also remove any instances of that entry from all volunteer records. Sometimes it is more appropriate to merge one dropdown list entry into another rather than deleting it. When you merge items, volunteers will still have something selected for the field instead of a blank.
Note
Some dropdown lists may have special properties that do not allow you to delete an entry. For example, the Status dropdown list will not allow you to delete a Status because each volunteer record must have a Status associated with it. In this case, you would need to merge the entry with another to eliminate it from the dropdown list.
Important Information About Merging Statuses
Merging Statuses may delete Status date entries from the volunteer's History tab. Please take time to review the information below before merging Statuses.
Because many organizations use the Status to track things such as recruitment statistics, the system deletes Status dates if the merge makes two date records with the same Status in a row. For instance, let's say a volunteer has the following Status dates recorded on her History tab:

If the organization decides the custom Passed Status is not necessary, and they merge Passed into Active, the volunteer would have an Active Status date on March 22, 2017 and another on May 17, 2017 without having a date for a different Status in between. So if the organization runs a Status Statistics (stock) report and relies on the Became Active count to show how many volunteers started serving each month, the same volunteer would count in the March and the May totals. If this happened to a majority of records in your database, it will make a drastic impact on your onboarding statistics. To prevent this, the system deletes the most recent date so the volunteer's Status date history will now look like this:

Now the volunteer will only count in the onboarding statistics once.
The system does not delete Status dates for the same Status if there is a date for a different Status between the two. For instance, if a volunteer had a Passed Status date on April 30, 2015, an Inactive Status date on June 11, 2016, and an Active Status date on May 17, 2017. In this case, if the Passed Status is merged into the Active Status, her date history would look like this:

In this case, the volunteer's Status date history was not altered when Statuses are merged because the result does not leave two Active Status dates in a row.