Documents Tab of Mailbox
Optimizing PDF Files
The Documents tab of the Volgistics mailbox has two purposes. The Attachments sub-tab is used to store attachments for email or VicMail messages, and documents that are linked to the VicNet Home page. The other sub-tabs are used to manage documents stored with the VicDocs feature.
To get to the Documents tab of the Mailbox:
- Select Mailbox from the menu
- Select the Documents tab on the far right side.
All accounts have Attachments and Volunteers sub-tabs. If your account's service level includes the VicDocs module, you may also see Coordinators, Sites, Places, and Assignments sub-tabs depending on your operator rights.
Attachments Sub-Tab
To get to the Attachments sub-tab, go to the Documents tab of the mailbox and then click the Attachments sub-tab if necessary.

The Attachments sub-tab has two purposes. It is used to upload and manage PDF or Microsoft Word (DOC or DOCX) documents so they can be used as attachments in messages to your volunteers or Coordinators. It is also used to upload files you want to link to the Home page in the VicNet portal.
The top section of the Attachments sub-tab is where you will see documents that have already been uploaded to the sub-tab. Attachment documents can be uploaded using the bottom section of the sub-tab as outlined in the Upload Documents section of this help topic. The top section will also show any documents included as attachments when you composed an email or VicMail message.
Open or Print Documents
In many cases you can just click on a document's file name to open the document. Your web browser will launch the program it needs to open the document. If your web browser's settings are not configured to recognize certain file types, those files may not open. In this case, you will either need to change your web browser's settings so that it associates the correct program with the file extension, or you can often save the document to your local computer and open it from the saved location. The Save Documents Locally section below shows how to do this.
Once the document has been opened with the appropriate program, you can send it to your local printer by using the print feature in whatever program you're using.
Many web browsers use built-in PDF viewers now instead of the Adobe Acrobat Reader program. This can sometimes cause trouble with opening PDF documents. In this case, you may need to disable the built-in viewer if you do not want to save the file locally. You can find more information on how to do this in the Cannot Open PDF File help topic.
Save Documents Locally
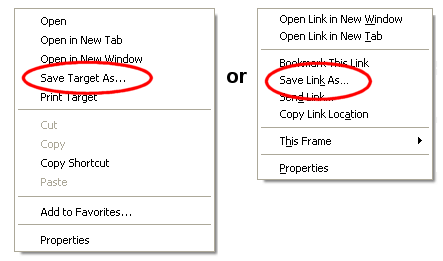
You can save uploaded documents to your local computer (flash drive or other storage medium) without opening the file if you wish. To do this, right-click on the name of the document and then select Save target as..., Save link as... or Save as... from the prompt.
Delete Documents
To delete uploaded documents, check the box in the column on the left side by each document you want to delete. If you want to delete all of the documents on the page, scroll down to the bottom of the top section and click the Check all button. If you'd like to delete multiple documents but not all of them, you can also check the boxes for a range of items. To do that, check the box for the first item in the range, hold down the Shift key, and then click on the last item in the range you want to select. All the items in the range will be checked for you.
Once the documents you want to delete are marked, click the Delete button. A dialog window will appear to make sure you want to completely delete the documents. Click the OK button to proceed or the Cancel button if you changed your mind and you would like to keep the documents.
There is not a way to recover documents after they have been deleted so please make sure you want to delete the documents before you proceed.
Sort Documents
By default the Attachments Sub-Tab is sorted based on the order the files were uploaded. You can change the view to be sorted by the Kind, File Name, Uploaded, or Linked? columns instead. Just click on a column heading to sort the view based on that column's information.

Files Linked to the VicNet Home Page
Documents with Yes in the Linked? column are files that currently have links from the Home page in VicNet. This allows volunteers and Coordinators to click on the file to open it when they are logged in to VicNet. Deleting these documents will cause the associated links to be removed from the VicNet Home page.
You can learn how to link documents to the VicNet Home page in the Document Link Boxes 1 - 4 section of Home Page Setup for VicNet.
Upload Documents
You can upload PDF or Microsoft Word (DOC or DOCX) documents to the Attachments sub-tab as long as the file is 10 megabytes or smaller. If you're uploading a PDF file, we recommend optimizing the file before uploading even if it is under the size limit. Optimizing reduces the file size, which has many advantages.
- It ensures your email messages will be delivered if the recipient's email provider limits file sizes.
- It allows your email messages to be processed faster, which could speed up delivery.
- The file will open faster when your volunteers or Coordinators view it.
The method you use to optimize the file will depend on the program you use to create it. If you're unfamiliar with optimizing PDF documents, you an learn more on our Optimize PDF Files blog post.
Here are the steps to upload documents to the Attachments sub-tab:
- Click the Choose File or Browse button in the bottom section of the sub-tab.
- In the dialog window that appears, select the PDF, DOC or DOCX file you want to upload then click the Open button.
- Click the Upload button. Once the upload is complete, your document will be listed in the Documents box at the top of the sub-tab.
Alternatively, you can upload new attachments when creating a new message to your volunteers or Coordinators. Include Email Attachments explains how to do this.
Document Storage Capacity
The number of documents you can store on the Attachments sub-tab of the Documents tab is based on the number of System Operators in your account's service level. The document storage capacity is 15 files, plus 5 additional files for each System Operator. For example, if your account's service level includes space for three System Operators, you would have space for 30 documents (15 + 15). Or if your account's service level includes space for five System Operators, you would have space for 40 documents (15 + 25).
Site Level Access and the Attachments Sub-Tab
If an organization uses Site Level Access and a System Operator is logged in as a Headquarters Operator (someone with access to All Sites), the Attachments sub-tab will have a checkbox for All Sites in the upper right corner. If this box is checked, the Operator will see documents associated with a specific Site in the account as well as documents that are not associated with any specific Site. If the All Sites box is unchecked, only documents uploaded by Headquarters Operators will show.
Users logged in as Site-Level Operators (someone associated with one specific Site) or Multi-Site Level Operators (someone who is associated with multiple Sites and can switch between them) will not see the All Sites checkbox on the Attachments sub-tab. Site-Level Operators will only see documents associated with their Site on the Attachments sub-tab. Multi-Site Level Operators will only see documents associated with the Site they are associated with at the time they are viewing the Attachments sub-tab.
Volunteers & Other Sub-Tabs
The other sub-tabs on the Documents tab are used to manage the documents uploaded to the Docs tab of volunteer, Coordinator, Site, Place, and Assignment records. All accounts will have the Volunteers sub-tab. The other sub-tabs will only appear if both of the following apply:
- The VicDocs module is included in your account's service level.
- Your System Operator rights allow access to the Docs tab of the record type. System Operator rights for the Docs tabs are set by your account's Administrator as shown in Documents Tab Settings.
All of the sub-tabs used for VicDocs are pretty much the same except for the differences noted in the box below. Because the sub-tabs are essentially the same, we will just use the Volunteers sub-tab as the example on how to use all of the sub-tabs. To get to the sub-tab, go to the Documents tab of the mailbox and then click the Volunteers sub-tab.

Special Options for the Volunteers and Assignments Sub-Tabs
Your volunteer records can be in the non-archived or archived section of your account. Also, an Assignment record can be active or inactive. Because of these differences, the Volunteers and Assignments sub-tabs have additional options that the other sub-tabs do not have.
The Volunteers sub-tab will have an option at the top right to show documents for non-archived volunteers, archived volunteers, or both non-archived and archived volunteers.

By default, the sub-tab will show the documents for just non-archived volunteers. If an option is selected that displays archived records, the names of the archived volunteers will appear in italics on the list.
Similarly, the Assignments sub-tab has an option at the top right to show documents for active assignments, inactive assignments, or both active and inactive assignments. By default the sub-tab will show documents for just active assignments. If an option is selected that displays inactive assignments, the names of the inactive assignments will appear in italics.
Filter Documents
You can filter the sub-tab to only show certain documents. To do this, click the Filter button in the top left corner. This will open a dialog box like the one shown below:
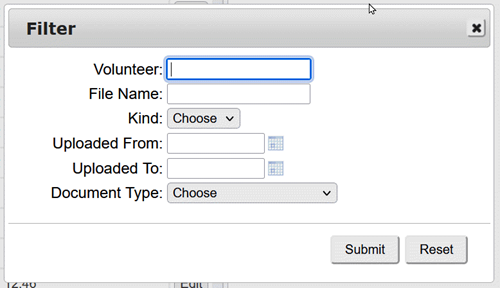
Here are the options for filtering the documents. Please note that you can use more than one option at the same time to refine the documents shown. The filtered view will only show documents that meet all of the requirements you select.
-
Volunteer: Type the last name of the volunteer record you want to see followed by an asterisk (*). The asterisk can also be used as a wildcard. For example, typing Wil* would bring up records for Wilcomb, Edward; Williams, Samantha; and Wilson, Jonathan. The wildcard can be used at the beginning of your search as well. For example, if you cannot remember a volunteer's last name, but remember their first name is John, you could search for *John to bring up all volunteers whose first name is John. You can also use more than one wildcard in the search. Searching for son would return records for Erickson, Brenda; Johnson, Evan; and Reynolds, Sonny.
-
File Name: Type the file you want to see followed by an asterisk(*). You can also use the asterisk as a wild card when searching by File name. See the examples under Volunteer above for the different ways asterisks can be used as wildcards in your searches.
- Kind: Use the dropdown to select which type of document files you want to have shown.
- Uploaded From: Enter a date to limit the sub-tab to just documents uploaded on or after a certain date.
- Uploaded To: Enter a date to limit the sub-tab to just documents uploaded on or before a certain date.
- Document Type: Use the dropdown to filter the documents to only those that have the selected Document Type.
Reset the Filter
If your view of the sub-tab is currently filtered, there will be a Reset Filter button to the right of the word Documents at the top left of the sub-tab.
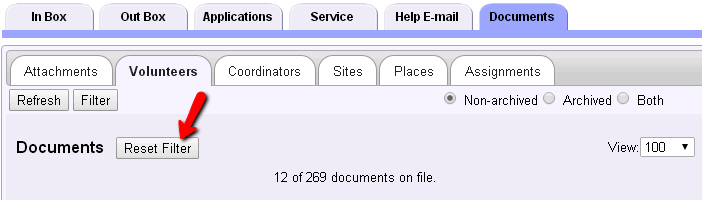
Click the Reset Filter button to return the sub-tab to the un-filtered view.
Number of Documents Shown
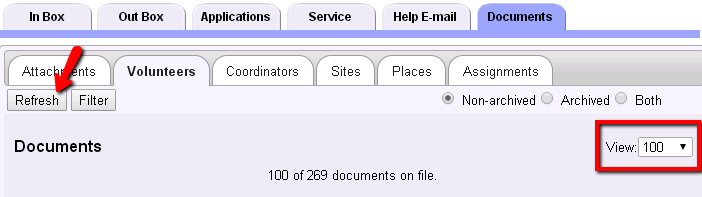
You can control the number of documents shown on the sub-tab. The view is set to the first 100 documents by default. Please note that as you increase the number of documents shown, the amount of time it takes for the web page to load will also increase.
To change the number of documents shown, select the number you'd like from the View dropdown list and then click the Refresh button in the top left corner of the sub-tab.
Sort Documents
By default the Sub-Tab is sorted according to the order the documents were added to your database. You can change the view to be sorted by the Volunteer, Kind, File Name, Document Type, or Uploaded columns instead. Just click on a column heading to sort the view based on that column's information.

Filtering & Sorting and the Number of Documents Shown
When you filter or sort a sub-tab, the action is performed on all documents that are currently uploaded. The results of your filtering or sorting may contain more documents than your View dropdown is setup to show. For example, if you have the View dropdown setup to show the top 25 documents, and you filter to see documents uploaded after a certain date, you may have more than 25 documents uploaded after the date selected. However, only the first 25 matches will appear because of the View dropdown restriction.
Open or Print Documents
In many cases you can just click on a document's file name to open the document. Your web browser will launch the program it needs to open the document. If your web browser's settings are not configured to recognize certain file types, these kinds of files will not open. In this case, you will either need to change you web browser's settings so that it associates the correct program with the file extension, or you can often save the document to your local computer and open it from the saved location. The Save Documents Locally section below shows how to do this.
Once the document has been opened with the appropriate program, you can send it to your local printer by using the print feature in whatever program you're using.
Many web browsers are using built-in PDF viewers now instead of the Adobe Acrobat Reader program. This can also cause trouble with opening PDF documents. In this case, you may need to disable the built-in viewer if you do not want to save the file locally. You can find more information on how to do this in the Cannot Open PDF File help topic.
Save Documents Locally
You can save uploaded documents to your local computer (flash drive or other storage medium) without opening the file if you wish. To do this, right-click on the name of the document and then select Save target as..., Save link as... or Save as... from the prompt.
If you want to save all of the documents that are uploaded, we also have a built-in data export feature that you can use instead of saving each document individually.
Rename Documents and Change or Assign Document Types
You can change the name that shows for an uploaded document, add a document type to documents without a type, or change the type recorded for a document. To do any of these things, click the Edit button on the right side of the row where the document appears. An Edit Document box will pop up. Edit or replace the document's name, or add or update the type, and then click the Save button to keep your changes. Click the Cancel button to close the window without making changes.
Please note: This will also change the document's name or Type on the Docs tab of the record where it is uploaded. For example, if you're on the Coordinators sub-tab and you change the name of a Coordinator's document, when you go to the Docs tab of that Coordinator's record the document's name will be changed there also.
The Edit button does not appear . . .
If the Edit button does not appear, it means your System Operator rights do not allow you to edit documents. Your operator rights are controlled by the Administrator of your Volgistics account as shown in Documents Tab Settings.
Delete Documents
To delete uploaded documents, check the box in the column on the left side by each document you want to delete. If you want to delete all of the documents currently in view on the sub-tab, scroll down to the bottom of the sub-tab and click the Check all button. If you'd like to delete multiple documents but not all of them, you can also check the boxes for a range of documents. To do that, check the box for the first item in the range, hold down the Shift key, and then click on the last item in the range you want to select. All the items in the range will be checked for you.
Once the documents you want to delete are marked, click the Delete button. A dialog will appear to make sure you want to completely delete the documents. Click the OK button to proceed or the Cancel button if you changed your mind and you would like to keep the documents.
Please note: This will also delete the document(s) from the Docs tab of the volunteer, Coordinator, or Site, Place, or Assignment records. Also, there is not a way to recover documents after they have been deleted so please make sure you want to delete the documents before you proceed.
The Delete button does not appear . . .
If the Delete button does not appear on the sub-tab, your System Operator rights do not allow you to delete documents. Your operator rights are controlled by the Administrator of your Volgistics account as shown in Documents Tab Settings.
Site Level Access and the Volunteers & Other Sub-Tabs
If an organization uses Site Level Access and a System Operator is logged in as a Headquarters Operator (someone with access to All Sites), each sub-tab will have a checkbox for All Sites in the upper right corner. If this box is checked, the Operator will see documents associated with a specific Site in the account as well as documents that are not associated with any specific Site. If the All Sites box is unchecked, only documents uploaded by Headquarters Operators will show.
Users logged in as Site-Level Operators (someone associated with one specific Site) or Multi-Site Level Operators (someone who is associated with multiple Sites and can switch between them) will not see the All Sites checkbox on the sub-tabs. Site-Level Operators will only see documents associated with their Site on the sub-tabs. Multi-Site Level Operators will only see documents associated with the Site they are associated with at the time they are viewing the sub-tab.
Optimizing PDF Files
Related Help
- Home Page Settings
- Include Email Attachments
- Save Volunteer Information Locally
- Docs Tab for Volunteers
- Docs Tab for Coordinators
- Docs Tab for Sites, Places, and Assignments
- Print, View, or Save a Completed Application
- Documents Tab Settings
- VicDocs Overview
- Upload Documents in VicNet
- Document Uploads on Application Forms