Use Barcode Reader for VicTouch Check In
VicTouch accepts keyboard input, and barcode readers simulate keyboard input. This means that you can use barcode readers, instead of manual PIN entry, when volunteers sign in and out at VicTouch.
Why Use Barcodes?
If volunteers frequently forget the PIN they use to sign in at VicTouch, or if you're looking for a way to make the sign-in process easier, one option would be to attach barcode labels to volunteer name badges, and have them use a barcode scanner instead of manually entering their PIN. There are several pieces to making this process work, and we'll break them down in this help topic.This may seem like a small convenience, but volunteers will be grateful that they don't need to memorize another number.
Keep in mind that this only replaces the PIN entry for volunteers--they'll still need to complete the rest of the sign in and sign out processes. Also note that with the many ways to launch VicTouch, using barcodes will probably only work if VicTouch is running on a computer. You may be able to get it to work on a tablet or smartphone, but you'll need to adapt these instructions to fit your use.
The Barcode Reader
There is a wide variety of barcode readers available, as well as a wide range of prices. For the use outlined in this help topic, you'll need a scanner that can read 1D barcodes using the Code 39 (or Code 3 of 9) format, which is a very standard use. This means that nearly any barcode reader you find will be up to the task. It's a good idea to get a recommendation from your organization's IT department or to read online reviews for the model you're considering.
Most barcode readers are identified by computers as generic input devices, and don't require any specialty software to be installed. If you use Windows on your VicTouch station, the drivers will probably be installed automatically when you connect the barcode scanner. If you have any trouble installing it or getting it to work, check with your organization's IT department.
Installing a Barcode Font
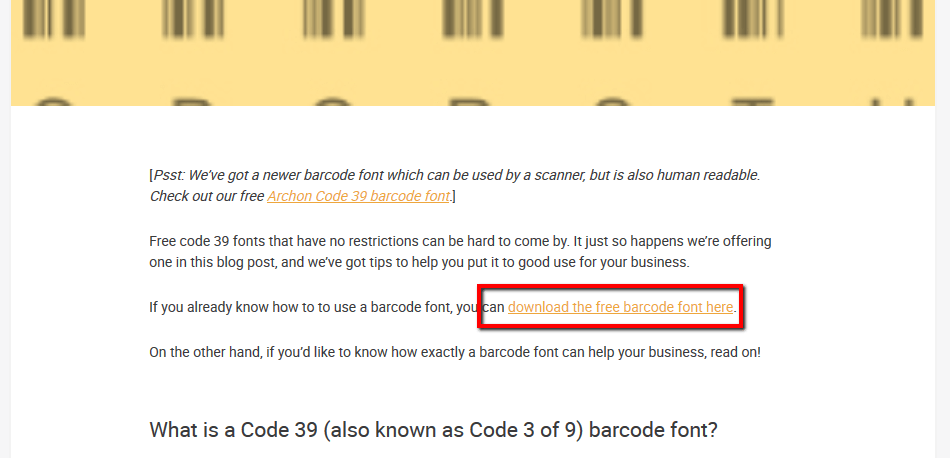
To create barcode labels, you'll need a barcode font installed on the computer you're using. For this example, we used a free code 39 barcode font. To install it:
- Visit https://www.inflowinventory.com/blog/free-barcode-font-code-39-3-of-9/.
-
Click the download link in the top section to download the font to your computer.
-
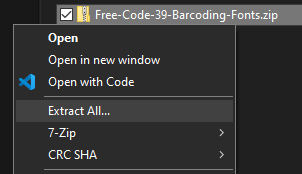
Extract the contents from the zip file.
-
In the Free-Code-39-Barcoding-Fonts folder, open the Fonts folder.
-
Right-click on the file named free3of9, and choose Install.
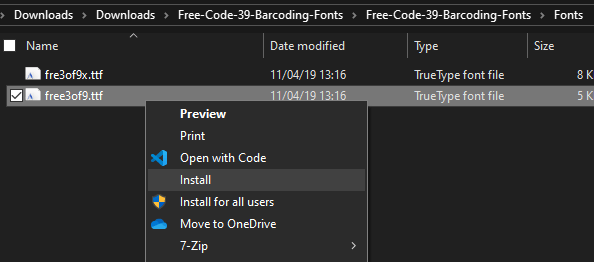
Depending on your network environment, you may not be allowed to install fonts. If you're not able to complete this step, check with your organization's IT department.
Like barcode readers, there are a variety of barcode formats as well. For the example we chose the code 39 format because it's widely used, easy to work with, and there are free fonts available. But you can use any format you like, as long as you can find the right font and your scanner supports it.
Creating a Report in Excel Format
Next, you can generate a Volunteer List report template in Excel format inside Volgistics. This will be used as a source file for the mail merge later in this process. To do this:
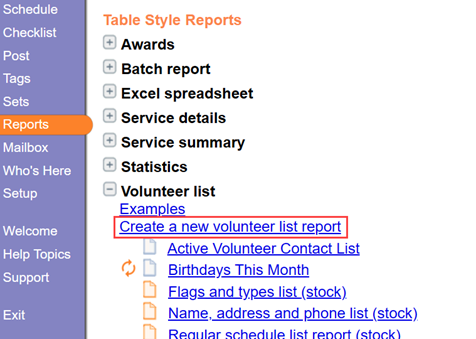
- Choose Reports from the menu.
- Expand Volunteer list.
-
Click Create a new volunteer list report.
-
On the Options tab, choose how you would like the report to be sorted, and leave the other checkboxes blank.
-
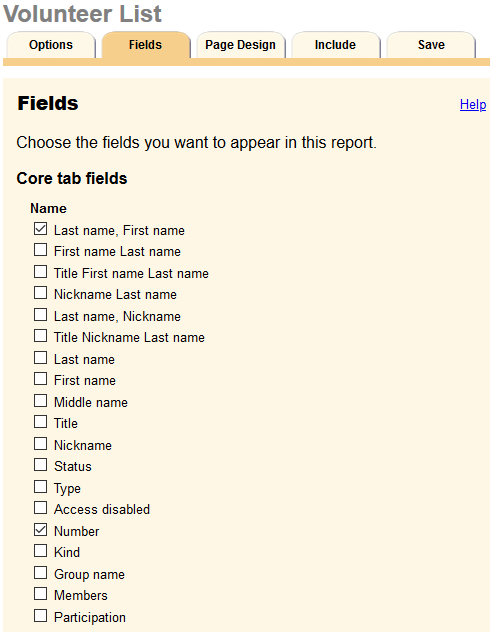
On the Fields tab, check your preferred name format along with Number.
-
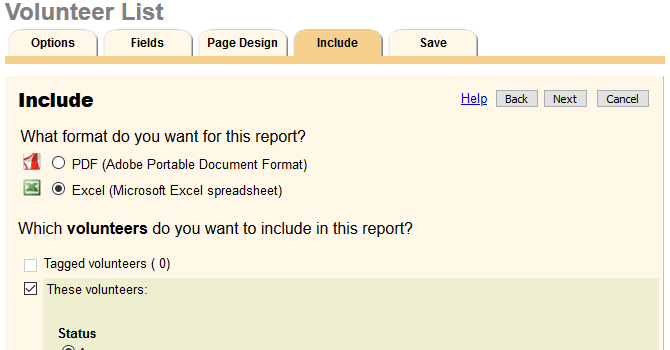
On the Include tab, choose to run the report in Excel format and choose the volunteers you would like to include.
-
On the Save tab, enter a name for the report template.
- Click Save and Run.
- Click Run Now and the report will appear in your Mailbox shortly.
-
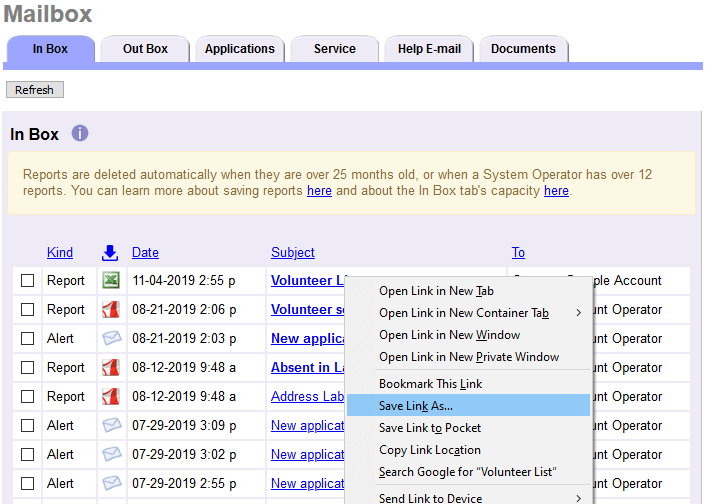
Once the report appears, right-click on the subject and choose Save link as... or Save target as... to save the report to your computer.
This report is close to the format you'll need to print the barcodes, but it still needs one additional column. In order for a Code 39 barcode to be valid, the encoded number must begin and end with an asterisk. We can add this with a formula, by following the steps below. If you're using a different barcode format, you'll need to use a different formula.
- Open the Excel file you downloaded.
-
If a "PROTECTED VIEW" message appears, click Enable Editing. You can learn more about Protected View on Microsoft's website.

-
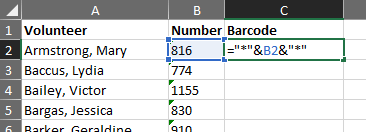
In the first blank column, enter a heading like Barcode.
- In the second cell we need to enter a formula, which will add an asterisk to the beginning and end of the volunteer Number. For this example, column C is our blank column, and column B contains the original Numbers. Type the following formula, and press Enter:
\=""&B2&""
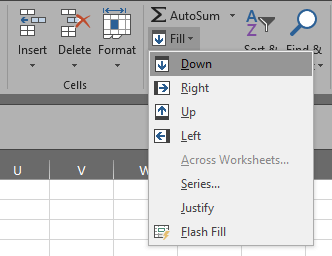
- Scroll to the bottom of the report, and select the last cell in the formula column that has a corresponding Number.
- Scroll back up to the top, then SHIFT+click the cell with the original formula.
-
Use the Fill Down function in Excel (CTRL+D) to copy the formula to the remaining cells in the column.
-
Save your changes, and close Excel.
Setting up the Mail Merge
Now that the report has the correct values for the barcode, we can create a mail merge document in Microsoft Word that will insert the values from the spreadsheet. To do this:
- Open Word and start a new blank document.
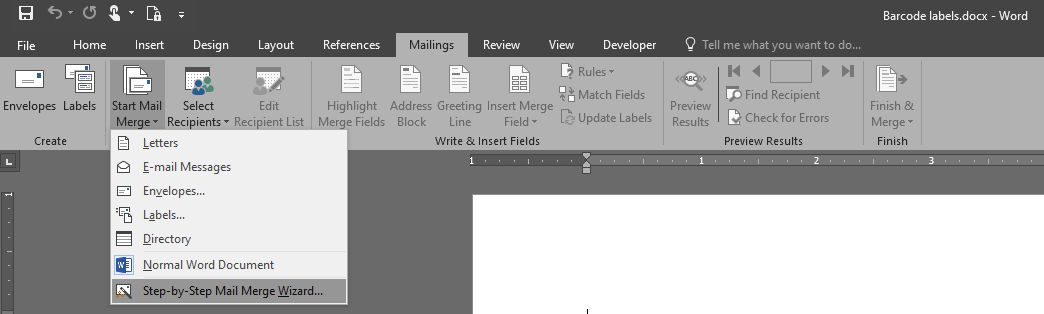
- Select the Mailings tab in the ribbon.
-
Click Start Mail Merge and then Step-by-Step Mail Merge Wizard...
-
For the document type, select Labels, then click Next.
- Choose Change document layout and click Next.
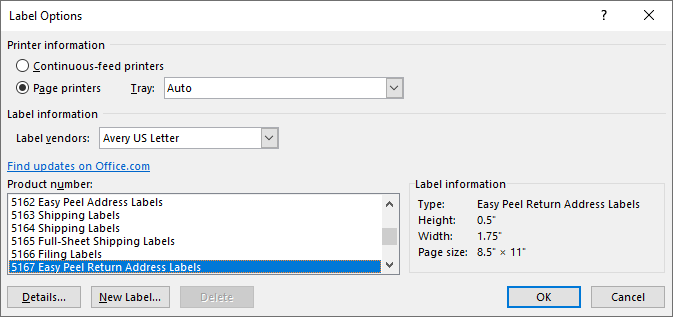
-
On the Label Options window, choose the label format you're working with. Avery 8160 and 5160 are popular mailing labels, while 5167 and 8167 are popular for return address labels. We're using Avery 5167 labels for the example.
-
When you're ready, click OK, and then click Next.
-
Select Use an existing list and then click Browse... to select the Excel file you worked with in the previous section.
-
On the Select Table window, click OK.
- On the Mail Merge Recipients window, click OK.
- Click Next.
Next, you can begin adding merge fields into the labels. Focus on just the first label, then use the Update all labels button to apply the change to the remaining labels. Here's what we did for the example:
-
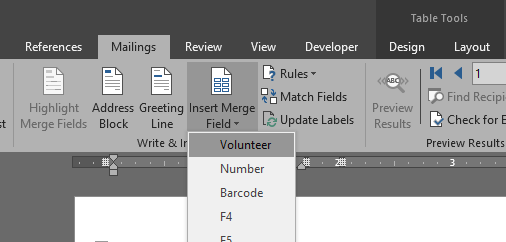
Click the down arrow under Insert Merge Field, then click Volunteer (this is the name field).
-
Press Enter on your keyboard.
- Click the down arrow under Insert Merge Field, then click Barcode (this is the custom field we made in Excel).
- Press Enter on your keyboard.
- Click the down arrow under Insert Merge Field, then click Number.
- Since we're using return address labels, we reduced the font size for the top and bottom lines to 5 points, and the middle line to 30 points. We also removed the spacing between the lines, and centered all three. With our scanner, we found that 24 points was the minimum size for it to read consistently.
- Set the barcode line font to the Free 3 of 9.
- Click Update all labels to apply the change to the remaining labels.
-
Click Next to preview the labels with data from the spreadsheet. Go back and make corrections if needed.

-
Click Next.
- Load the label sheets in your printer, then use Print to print them.
Scanning In
Once you have barcode labels for your volunteers, you can attach them to their name badges or other ID cards volunteers already have. Also, be sure to attach the barcode scanner to the VicTouch station. At the VicTouch PIN entry page, volunteers simply scan the barcode instead of manually entering their PIN. They won't need to remember their PIN, and longer PINs become less frustrating.