Launch VicTouch in Kiosk Mode
One of the most secure methods for launching VicTouch (the sign-in station for your volunteers) is to set up a desktop shortcut to start the module in kiosk mode. This allows you to launch VicTouch without a System Operator entering their credentials. It is also important for security because it prevents volunteers and others from doing things such as using the web browser controls to navigate to other websites or shutting down the web browser window.
Once you have the shortcut created, all you'll need to do is double-click the icon, and VicTouch will come right up. You could even add the shortcut to the computer's Startup folder so VicTouch will start automatically anytime the computer is rebooted.
The Edge, Chrome, and Firefox web browsers can be used to launch VicTouch in kiosk mode. Edge comes preinstalled on computers with the Windows operating system. Chrome is available for free from Google, and Firefox is available for free on Mozilla's website. Please note: The exit code used to shutdown VicTouch may not work in some versions of Firefox in kiosk mode. You should keep this consideration in mind when deciding which web browser to use for kiosk mode.
If you are using a desktop computer with a touchscreen monitor for your VicTouch sign-in station, it'll be easiest to have a keyboard and mouse connected to the computer while you complete the steps in this help topic. Once the method to launch VicTouch has been configured, the keyboard and mouse can be removed to provide security.
VicTouch on Mobile Devices
If you want to set up a locked down kiosk using a mobile device, you'll need to set this up a little differently. Apple tablets have a feature called Guided Access and Android devices have a feature called App Pinning that can be used like a kiosk mode. There is also an app called SureFox that offers some additional security features for setting up a VicTouch kiosk on a mobile device. You can learn more in Options to Launch VicTouch.
To set up VicTouch to launch using a desktop shortcut, you'll start by configuring your VicTouch settings and retrieving your VicTouch URL, and then you'll create the shortcut on your computer's desktop.
Section 1 - Set Up Account for VicTouch and Copy the VicTouch URL
- If you are setting up multiple VicTouch sign-in stations, you will only need to complete Section 1 once.
- If you are a member of an IT team who is setting up VicTouch for the volunteer department, you will need to have an Administrator for the account complete these steps, or allow you to access the account so you can complete the steps. Once Section 1 has been completed, you will not need to use the Volgistics account anymore to complete the setup process.
The first step is to set up VicTouch so that a login is not required and then retrieve your VicTouch URL. Here's what you'll need to do:
- Log in to Volgistics.
- Choose Setup from the menu.
- Expand VicTouch.
- Click Ground Rules.
-
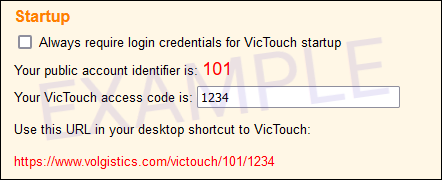
Locate the Startup section pictured here:
-
Be sure the Always require login credentials for VicTouch startup checkbox is NOT checked.
-
If you'll be making the shortcut and you're on the computer that will be used for the sign-in station, you can copy the URL for VicTouch to your clipboard.
If you will not be making the shortcut, or are on a different computer, note the URL address. Be careful to make sure the public account identifier and the VicTouch access code are correct.
The URL will have this format: https://www.volgistics.com/victouch/[public account identifier]/[access code]
-
If you've made any changes, click the Save button.
- If you are working at the computer where you'll be setting up the shortcut, select Exit from the menu and close the web browser window.
Now you'll be able to create a desktop shortcut to launch VicTouch in kiosk mode using the steps in Section 2 - Create a Desktop Shortcut. And after creating your shortcut, you can set up VicTouch to launch automatically when your computer starts using the steps in Section 3 - Create a Windows Startup Folder Shortcut.
Section 2 - Create a Desktop Shortcut
Now that you have your VicTouch URL, you can create your desktop shortcut. Follow these steps to set this up:
-
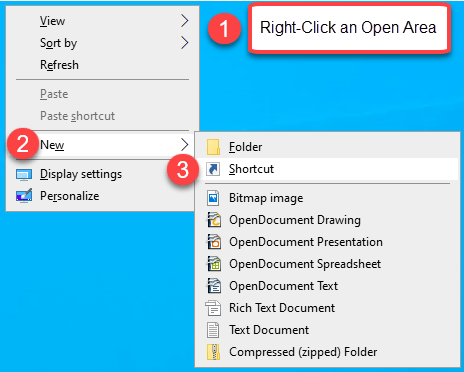
Right-click an open area on your computer's desktop, point to New, and click Shortcut.
-
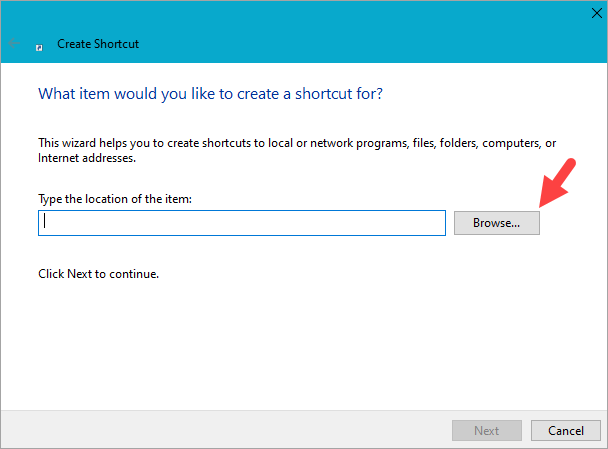
Click the Browse button in the Create Shortcut window.
-
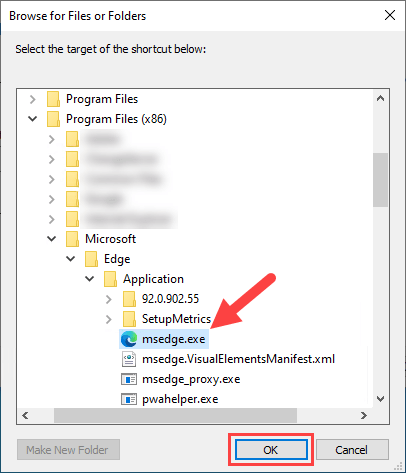
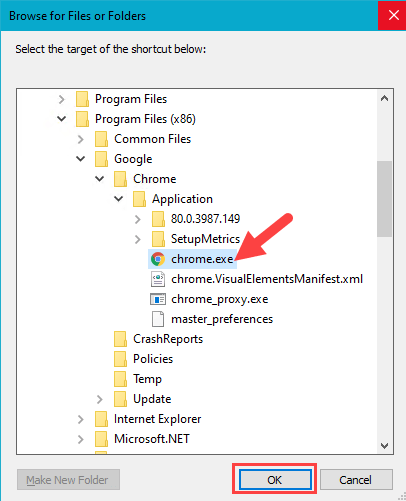
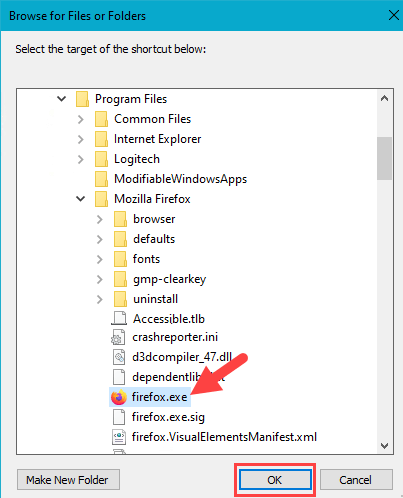
Navigate to the location of the executable file for the web browser you're using. When you locate the program, click on the name of the file and then click the OK button. Depending on your Windows settings, you may or may not see the file extension (.exe) behind the name of the file.
Edge. The Edge program file is usually located at: C:\Program Files (x86)\Microsoft\Edge\msedge.exe
Chrome. The Chrome program file is usually located at: C:\Program Files (x86)\Google\Chrome\chrome.exe
Firefox. The Firefox program file is usually located at: C:\Program Files (x86)\Mozilla Firefox\firefox.exe
-
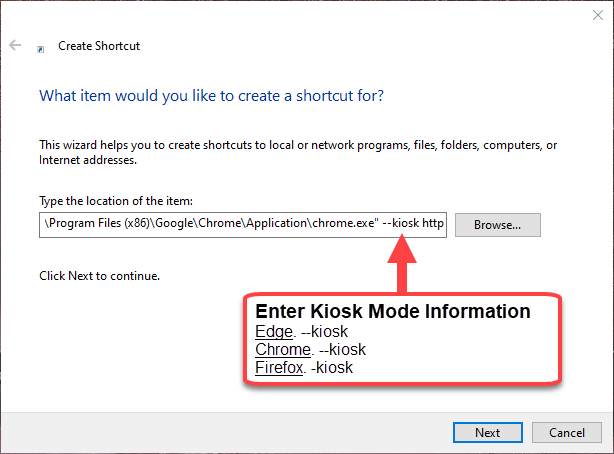
Before clicking the Next button, you will need to enter the information to start kiosk mode.
Edge. For Edge, add --kiosk (with a space before and after) after the msedge.exe file name, and then paste or enter your VicTouch URL (from step 7 in Section 1) after this.
Chrome. For Chrome, add --kiosk (with a space before and after) after the chrome.exe file name, and then paste or enter your VicTouch URL (from step 7 in Section 1) after this.
Firefox. For Firefox, add -kiosk (with a space before and after) after the firefox.exe file name, and then paste or enter your VicTouch URL (from step 7 in Section 1) after this.
-
Click the Next button on the Create Shortcut window after you put in the kiosk mode information and your VicTouch URL address.
- Enter VicTouch Kiosk or something similar in the Name field.
- Click the Finished button.
If you are setting up multiple VicTouch sign-in stations, follow these same steps on each computer that will be used for VicTouch.
If you'd like to set up VicTouch to launch automatically when you start or reboot your computer, go to Section 3 - Create a Windows Startup Folder Shortcut. Or you can skip to Section 4 - Launch VicTouch if you need help with launching VicTouch after you create your shortcut(s).
Section 3 - Create a Windows Startup Folder Shortcut
Once you've created your desktop shortcut, you can copy it to your Windows Startup folder to have VicTouch launch automatically whenever this computer is started. You can add your shortcut to the startup process using these steps:
-
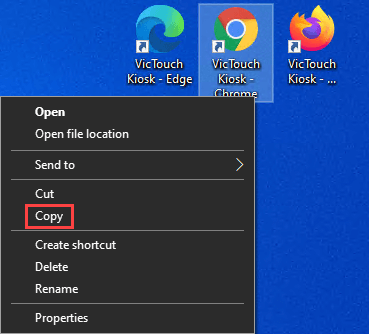
Right-click your desktop shortcut and Copy it.
-
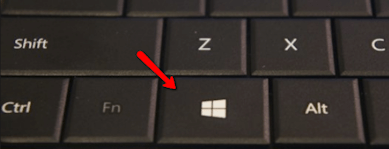
In Windows, the Startup folder is hidden. One way to get to this folder is to hold down the Windows key on your keyboard and then press the R key. The image below shows the Windows key:
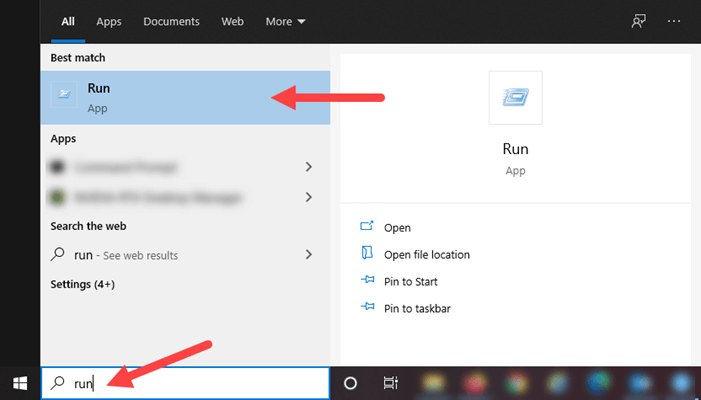
Alternatively, you can use the Windows search feature to search for run and select the Run app.
-
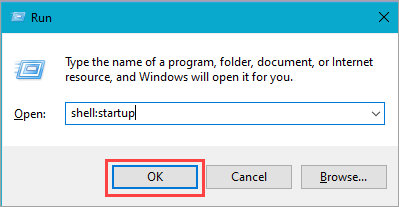
Enter shell:startup in the Open field of the Run dialog box, then click the OK button.
-
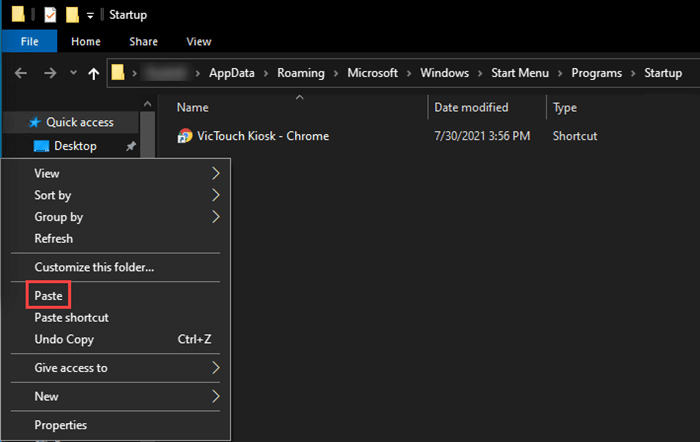
Right-click in the Startup folder area and Paste your shortcut.
Now whenever you start or reboot this computer, VicTouch will launch automatically in kiosk mode.
Section 4 - Launch VicTouch
Once you have a shortcut to launch VicTouch, you're ready to start VicTouch in kiosk mode. All you'll need to do is double-click the desktop shortcut you created in Section 2 above.

If you also followed the steps in Section 3 to set up VicTouch to launch automatically, you can start VicTouch by rebooting your computer.
Section 5 - Troubleshooting
If you find that you still need to enter your account credentials when you start VicTouch, repeat Section 1 and make sure the box is un-checked in front of Always require login credentials for VicTouch startup. Be sure to click the Save button before exiting the page.
If you entered the account's VicTouch URL address manually, make sure the address is entered exactly as it is shown on the VicTouch Ground Rules page. Do not use the URL address shown in the picture or steps in Section 1. That is an example address that will not work for your account.
Check to be certain the public account identifier (not your Volgistics account number) and VicTouch access code in the URL address are the same as the ones shown in your account. A simple mistake in the way you type the link will cause it to fail. To prevent errors in entering the information, we recommend that you copy and paste the URL address if possible. This will help eliminate many minor typographical errors.
Related Help
- Update Web Browser
- VicTouch Overview
- Getting Started with VicTouch
- Options to Launch VicTouch
- Launch VicTouch with Android App Pinning
- VicTouch Sign-In with QR Codes
- Use Barcode Reader for VicTouch Check In
- Use Apple's Guided Access