Getting Started with VicTouch
VicTouch is an optional module that serves as a volunteer timeclock. Volunteers can clock-in and clock-out using their PIN to have their service hours automatically posted to their volunteer records. In addition to this primary functionality, the module also includes options for volunteers to manage their schedules, review their past service, and receive messages from you.
The VicTouch module is completely optional, so it is up to your organization to decide whether VicTouch is useful for your specific needs. Typically, this module works best for organizations that have volunteers who serve on-site. This way they can setup a kiosk in a centralized location where volunteers can check-in and check-out. Organizations where volunteers serve off-site or at various locations may not find VicTouch to be as effective, but it can still be useful. It's possible to let volunteers sign-in using their own smartphones if it isn't possible to set up a sign-in station away from your facility. If your account does not already include the VicTouch module, you can add it to your service level at any time through the Store using the steps provided in the Change Account's Service Level help topic.
1. Set Ground Rules
First, you'll need to configure the general settings for VicTouch which are found on the Ground Rules setup page. Here you configure which volunteers are allowed to use the module, how to record service hours, and how to handle volunteers that forget to sign-out. To access these settings:
- Choose Setup from the menu.
- Expand VicTouch.
- Click Ground Rules.
Below we'll go through each of the settings you should configure on this page. We have skipped some settings that appear on this page to focus on the items that are most important to get VicTouch up and running. If you want to learn more about the other settings on the page, see the VicTouch Ground Rules Settings help topic.
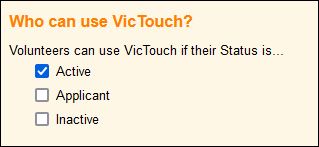
Who can use VicTouch?
In this section, you can choose which volunteers are allowed to sign-in at VicTouch based on their Status. Check the boxes for the Status(es) that should be allowed to use VicTouch.
Rounding
In this section, you can configure how service is recorded for volunteers. You can choose to have hours posted without rounding (the exact number of hours and minutes the volunteer served) or you can choose to round the hours.
If you do not need to track exact hours and minutes and would prefer numbers that are easier to work with, you can choose to round service hours posted through VicTouch. When you choose this option, you can choose to round to the next interval or the nearest interval, and you can choose intervals of 5, 10, or 15 minutes. The next interval always rounds the volunteer's service up, while the nearest interval rounds up or down based on which interval is closest.
For example, if you choose to round to the nearest 15 minute interval and a volunteer was signed-in for 3 hours and 5 minutes, the system automatically rounds that value down to just 3 hours since that is the closest 15 minute interval.

If volunteers forget to sign-out
When volunteers sign-in to serve, they may not always remember to return to VicTouch to sign back out. You can use these settings to handle those scenarios. The system automatically signs-out volunteers if they have not done so manually, and you can control how much time must pass before that happens and how many hours volunteers are given when they are signed-out this way. Also when a volunteer forgets to sign-out, you can optionally have that entry posted for auditing.
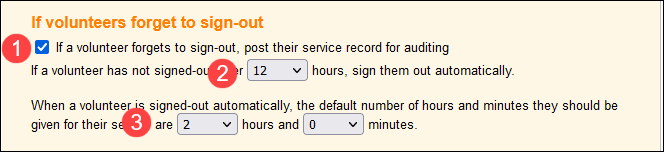
- First, choose whether you want to audit service entries that are posted as a result of a volunteer forgetting to sign-out. When an entry is posted for auditing, it appears on the Service tab of the Mailbox for your review.
- Next, choose how much time must pass before a volunteer is signed-out automatically. Here you are essentially telling the system at what point a volunteer should be considered as forgetting to sign-out. Tip: You should pick a number of hours that is longer than your longest volunteer shift so volunteers are not signed-out automatically before they've actually completed their service.
- Choose how many hours a volunteer should be given when they are signed-out this way.
Remember to click the Save button when you're done configuring these settings.
2. Select Theming
The default color scheme for the VicTouch time clock is a white background and black text. If you'd like something different, you can set the theme to match your organization's color palette or choose from one of over 25 professionally designed default themes. To set the theme:
- Choose Setup from the menu.
- Expand VicTouch.
- Click Theming.
See the Customize Themes for VicTouch help topic if you need help with the settings on the page.
You can preview how your selections look right on the same page that you make your color choices, but if you want to get a true sense of the appearance you can preview VicTouch as a volunteer.
Your VicTouch screen can also show your organization's logo. You can choose whether to include your logo on the PIN screen setup page. To upload or change the logo that is selected, use the Display Graphic section of the logo upload page of your account.
3. Configure Check-In Sequence Settings
The next step is to configure the sequence volunteers go through when they sign-in and sign-out at VicTouch. These settings let you choose what shows on each screen volunteers see as they proceed through the check-in and check-out sequences. You can access these settings like this:
- Choose Setup from the menu.
- Expand VicTouch.
- Click Check-In Sequence.
This page shows all the screens that volunteers may see when they sign-in or sign-out. This provides you with a bit of customization, but for the purposes of getting you started with the module, there are two main things you need to configure here: the Assignment selection screen setup and the Service measures & notes setup.
Let's start with the Assignment selection screen setup. When volunteers clock-in at VicTouch, they can choose what task they are there to perform, and the list of Assignments they choose from depends on how you configure these settings. To set these up:
- Select Assignment selection screen setup from the Check-In Sequence page.
- If you'd like volunteers to choose which Assignment they are serving in, check We want volunteers to indicate their assignment when they sign-in. If you do not want volunteers to select Assignments at VicTouch, uncheck this box.
-
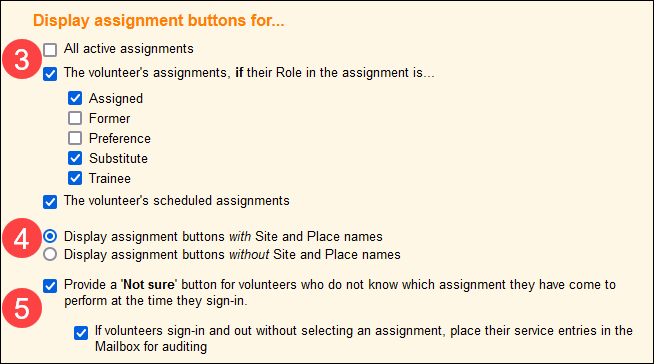
Under Display assignment buttons for..., choose which Assignments volunteers can select. Below is a brief summary of the options. You can learn more about these in the VicTouch Assignment Selection Settings help topic as well.
-
Check All active assignments if you want volunteers to choose from all of your active Assignments regardless of whether they have Roles in them.
-
Check The volunteer's assignments, if their Role in the assignment is... if you want volunteers to only choose from the Assignments they have particular Roles in. Then check the boxes for the Roles volunteers should have in an Assignment in order to sign-in for it.
-
Check The volunteer's scheduled assignments if you want volunteers to choose from Assignments that they are scheduled for on that day.
-
-
Choose whether you want Assignment names to include the associated Site and Place names.
-
You can optionally give volunteers the ability to sign-in without selecting an Assignment by giving them a Not Sure option. If a volunteer does not see the Assignment they are actually serving in or they are not certain which Assignment they are serving in, they can select the I'm not sure option instead. If they choose this option, their service is recorded without an Assignment. If you'd like to give volunteers this option, check Provide a 'Not sure' button for volunteers who do not know which assignment they have come to perform at the time they sign-in.
If you give volunteers this option, you can also choose to have the resulting service entries posted for auditing.
-
Click the Save button.
Please Note
Volunteers can also sign-in for any Assignment that has the Sign-in option checkbox checked. This checkbox is found on the Assignment tab of each Assignment record. When this box is checked, that Assignment appears as an option for all volunteers at VicTouch, regardless of whether they meet the criteria you've configured on the Assignment selection screen setup page.
You should only check this box for Assignments that you want to be available for ALL volunteers at VicTouch.
For example, if you have an organization-wide event that any volunteer can participate in, you could check this box for that event's Assignment(s). But you would NOT check this box for an Assignment that only certain volunteers should be allowed to sign-in for.
Next, let's look at the Service measures and notes setup. By default, VicTouch only tracks the hours volunteers serve when they clock-in and clock-out. However, if you collect other kinds of service information or want volunteers to provide a short description of their service, you can optionally let volunteers enter service measure information and service notes. If you do not need to collect this kind of information through VicTouch, you can skip the rest of this section.
Service measures let you track other numerical service information in addition to the hours volunteers serve. For example, if some of your volunteers perform tours for guests at your facility, you may have a service measure that tracks how many tours a volunteer performed during their shift. Service notes allow you to track narrative details for your service entries. You can create service measures to track this kind of information using the steps in the Service Measure Set Up help topic, and you can enable service notes in your account's Ground Rules Settings.
If you want to collect this kind of information at VicTouch:
- Select Service measures & notes setup from the Check-In Sequence page.
- Check Collect Service Measures or Notes on Sign-Out.
- Enter any instructions you'd like to include to help explain what volunteers should do on this screen.
- In the Service Measures section, check the box next to each option you want to be included on sign-out.
- Click the Save button.
Now when volunteers sign-out, they will see the option to enter values for the selected service measures. You can also learn more about these settings in the VicTouch Service Measure and Notes Setup help topic.
Keyboard Entry
Keep in mind that VicTouch does not have a built-in keyboard for volunteers to enter information, so if you'd like volunteers to provide additional information for service measures or service notes, your device needs to have some kind of keyboard or keypad available.
If you're using a mobile device (like a tablet), this should have a built-in virtual keyboard that will appear when a volunteer selects a field to enter information. So in this case, you likely don't need to take any further steps to accommodate additional data entry.
However, if you're using a desktop computer or similar device, you may need to make some accommodations. You could connect a physical keyboard to the device, or the device may have options to enable a virtual keyboard. You may need to work with a member of your IT team to assist you with making these accommodations.
4. Configure Service History Screen Settings
VicTouch gives volunteers the ability to review their previously recorded service information. You can configure whether this information is available to volunteers, and if you do make it available, you can choose which information is visible. This screen can include general service statistics as well as the volunteer's individual service entries broken down by year.
The Service History Page Set Up for VicTouch help topic explains how to access and configure these settings.
5. Configure Schedule Screen Settings
Volunteers can also view their schedule information through VicTouch. You can use the Schedule Screen settings to configure whether volunteers are allowed to view schedule information, and if you allow this, you can choose what schedule information is visible to them.
The Schedule Page Set Up for VicTouch help topic shows how to access these settings and explains these in more detail.
If you'd like, you can also allow volunteers to see and sign-up for open shifts in your schedule through VicTouch. This is enabled in your account's Self-Scheduling settings. You can learn more about how to configure these in the Self-Scheduling Settings for VicNet and VicTouch help topic.
Preview VicTouch
You don't need to have a VicTouch time station set up to see how your selections will appear for volunteers! You can preview VicTouch as a volunteer at any time. Just get a volunteer's PIN from their Core tab, then follow these steps:
- Choose Setup from the menu.
- Expand VicTouch.
- Click Launch at This Computer.
- A warning dialog will show because this method of starting VicTouch should not be used for your stations. Because you're just previewing, it's safe to click Yes.
After VicTouch launches, you can use your computer's mouse to click the buttons if you do not have a touchscreen. If you clock-in as the volunteer while previewing VicTouch, you can delete the service entry so it does not impact your reporting.
6. Set Up VicTouch Station
Once you have the VicTouch settings configured the way you'd like, you can set up a VicTouch station at your facility for volunteers to clock-in and clock-out.
Most users set up VicTouch like a kiosk station on a computer or tablet device. Volgistics does not provide the hardware to run the VicTouch module, so if you decide to set up a kiosk device at your facility, you would need to obtain a device from another vendor. With that said, the requirements for running the VicTouch module are relatively low. Like the rest of the Volgistics system, it is accessed over the internet via a web browser. So the only real requirements for the VicTouch station is a device with an internet connection and an up-to-date version of a supported web browser (Google Chrome, Mozilla Firefox, Microsoft Edge, or Apple Safari).
On the other hand, some users decide to have volunteers use their own smartphones to access VicTouch. To accommodate this, you can generate a printable QR code in your VicTouch settings that you can post around your facility or service area for volunteers to scan with the camera on their phone. This will launch a temporary VicTouch session in the browser on their phone, so they can clock-in and clock-out. This way you don't even need to set up a VicTouch station at all.
Because there are several different options to launch VicTouch, we will not explain each of these here. Instead, you can find more information about each of the options and specific instructions on how to set them up in the How to Launch VicTouch help topic.
But to get you started, we'll explain the most basic option for launching VicTouch on a sign-in station. To do this:
- Open the web browser on the device you'd like to use for your sign-in station.
- Visit www.volgistics.com/victouch.
- Enter your System Operator credentials (account number, email address, and password).
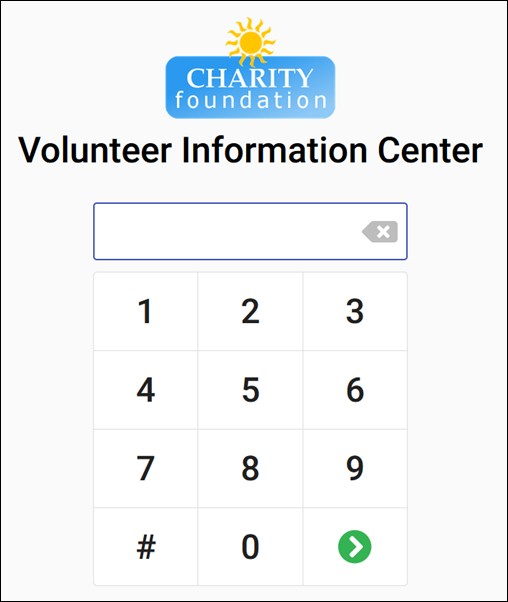
You'll be directed to the VicTouch PIN screen and volunteers can start signing-in!
7. Introduce VicTouch to Volunteers
Now that you know how to get VicTouch set up and running, let's talk about how volunteers access the module. Volunteers access VicTouch by going to your sign-in station or scanning your VicTouch QR code and entering their PIN using the number pad displayed on the PIN screen. A volunteer's PIN corresponds to their Number which is found on the Core tab of their record.
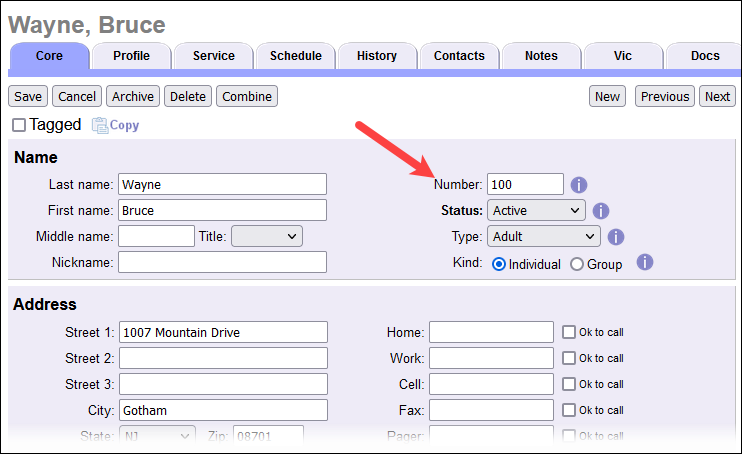
So in order to access VicTouch, volunteers will need to know their Number.
New trial accounts are set up to automatically use the last seven digits of the phone number entered in the Primary field when new records are created by an application form being submitted or a record is created manually. In this case, you can just tell the volunteers that their phone number is their PIN. Automatic Volunteer Number Settings shows how to check if your account is set up to do this.
If your account is not set up to use the volunteer's phone number as their PIN, there are a few ways to share the PINs with volunteers. We've described the main ones below.
Send PIN by Email
Probably the easiest option is to send the information by email. When you send an email message to multiple volunteers through Volgistics, you can add placeholders to the message to include information from each recipient's volunteer record. The system automatically replaces those placeholders so that each recipient only sees their own information. So you could send a message like this to your volunteers to share their PIN:
"Hi [[FirstName]],
We have started using a new volunteer time clock to help us track the service that you perform with our organization. We would appreciate it if you could remember to sign-in when you arrive to serve and sign-out when you have completed your service. We have a kiosk set up at the entrance for you to sign-in and sign-out with your PIN. Please find your PIN below:
[[Number]]
..."
The system would automatically replace the [[FisrtName]] and [[Number]] placeholders with each recipient's first name and PIN respectively. So you can send out your message to multiple volunteers and each will only see their own name and PIN. You can learn more about these kinds of placeholders in the Personalize Messages With Placeholders help topic.
Example Template for Your Message
Our sample accounts have a great example template for introducing VicTouch to your volunteers. You can copy the content of the message and adjust it to make your own templates. To find the example template:
- Visit www.volgistics.com.
- Hover over Try or Buy on the menu at the top of the page, and select Sample Account.
- Select the Click here to get started button.
- Select Mailbox from the menu.
- Go to the Out Box tab.
- Select the Templates sub-tab.
- Select Introducing Our Volunteer Time Clock.
Show PIN in VicNet
Another option is to show volunteer PINs in VicNet. The Profile page in VicNet can optionally include the Number field, so volunteers can log in to VicNet and get that information at any time. If you'd like to add this field to VicNet:
- Choose Setup from the menu.
- Expand VicNet - Beta.
- Click Profile Page (for Volunteers).
- In the Available Fields section, expand Core Fields.
- Find the Number field. Then click and drag that field into the section you'd like it to appear in.
- Click the Save button.
Now when a volunteer views their Profile, their Number will be included in the section you selected. Keep in mind that this field is always read only, so volunteers won't be able to change their Number. Only a System Operator can change a volunteer's Number from within the volunteer's record.
Once volunteers have their PIN, they can clock-in and clock-out to have Volgistics automatically post their hours. The Volunteer Guide for VicTouch help topic is a great resource to help volunteers get familiarized with VicTouch.
Related Help
- PIN Screen Settings
- Upload Logo
- Menu Screen Settings
- Enable Message Delivery at VicTouch
- VicTouch Ground Rules Settings
- VicTouch Assignment Selection Settings
- VicTouch Greeting Cards
- Greeting Card Set Up
- VicTouch Overview
- Self-Scheduling Settings for VicNet and VicTouch
- Set Up Schedule Reminders for VicNet and VicTouch
- Schedule Page Set Up for VicTouch
- Service History Page Set Up for VicTouch
- Customize Themes for VicTouch
- Volunteer Guide for VicTouch
- Options to Launch VicTouch
- VicTouch Sign-In with QR Codes