VicNet Profile and Volunteers Page Setup
The Profile page in VicNet allows volunteers to review and manage their personal information. Similarly, the Volunteers page lets Coordinators see and manage the profile information for their volunteers. You can choose which fields volunteers and Coordinators are able to see and manage on these pages. The settings for these two pages are very similar, so this help topic will explain how to set up both pages. To get started, you'll need to go to the Profile page or Volunteers page settings.
If you want to customize what volunteers see on the Profile page in VicNet:
If you want to customize what Coordinators see in volunteer profiles on the Volunteers page in VicNet:
- Choose Setup from the menu.
- Expand VicNet.
- Click Volunteers Page (for Coordinators).
- Click the Customize Volunteer Profile Content link.
From here, you can add, remove, and organize the sections and fields that appear on each of these VicNet pages. Below we've broken down the information into sections based on how we'd typically recommend walking through the setup process. However, you can certainly jump to a particular section if you'd like.
The Setup Page
Before we explain how to customize the Profile and Volunteers pages, let's familiarize ourselves with the different pieces of the setup page.
Customize Profile Content or Customize Volunteer Profile Content
This is the very first portion of the setup page, and this will look a little different depending on whether you're setting up the Profile page or the Volunteers page.
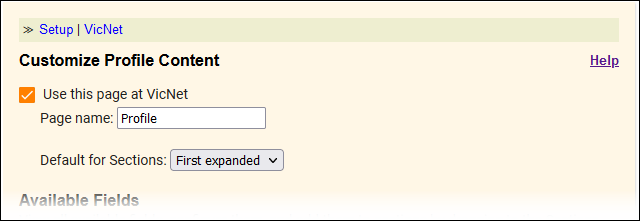
If you're setting up the Profile page, you'll have few options to configure in this area. You can configure whether volunteers can use the Profile page, give the Profile page a new name, and choose how sections should look when a volunteer comes to this page for the first time.
- Use this page at VicNet. Check this box if you want volunteers to be able to access the Profile page.
- Page name. Enter the name you'd like to use for the Profile page.
- Default for Sections. Select how sections should be expanded or collapsed when a volunteer first opens the Profile page. You can choose to have all the sections collapsed, all the sections expanded, or only the first section expanded.
If you're setting up the Volunteers page for Coordinators, you'll only see one option in this area. Here you'll only be able to choose how the sections should look when a Coordinator first opens a volunteer's profile. The options for this setting are the same as those described above in the Default for Sections list item. The options for managing whether Coordinators can view volunteer profiles and setting a name for the page will appear on the initial Volunteers Page (for Coordinators) setup page.
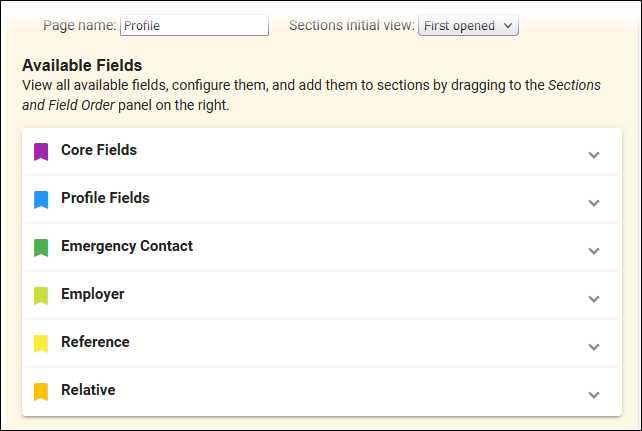
Available Fields
This part of the setup page includes all the fields you can add to the Profile or Volunteers page. The fields are located in collapsible sections that correspond to areas and types of fields on volunteer records (e.g. Core Fields. Profile Fields, etc.). For example, the Date of birth field is found on the Profile tab of volunteer records, so you'll expand the Profile Fields section to locate it.
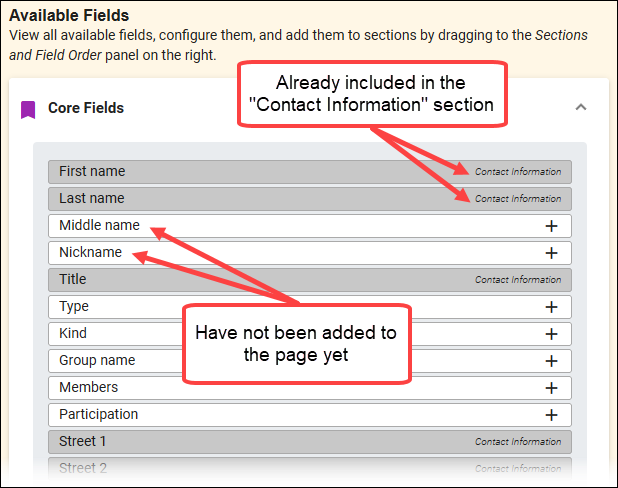
If a field appears with a white background in the Available Fields area, that field does not currently appear on the profile and you can add it. Fields with a gray background have already been added to the page, and these fields will indicate which section of the profile they've been added to.
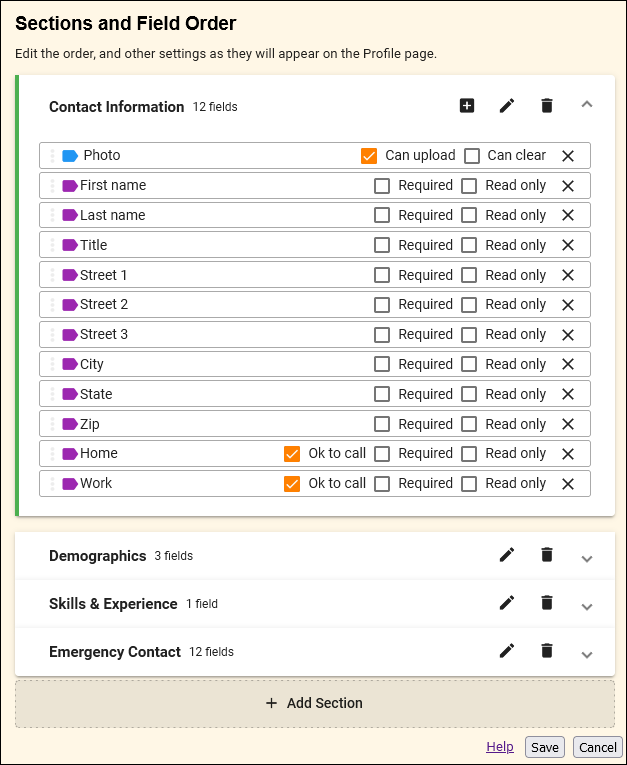
Sections and Field Order
This portion of the setup page shows all the sections you've set up on the Profile or Volunteers page. Each section is collapsible, and you can expand and collapse them by clicking on their headings. When you expand a section, you'll see all the fields that have been added to that section and the order of those fields.
Now that we're familiar with the setup page itself, let's start exploring how to customize the Profile and Volunteers pages. Remember you need to click the Save button when you're finished to keep the changes you've made.
Preview Changes
Once you've made changes to the Profile page or Volunteers page, you may want to see how things will look to your volunteers or Coordinators. You can use the options on the Vic tab of your volunteer and Coordinator records to log in to VicNet and review the changes you've made. To do that, go to the Vic tab of a volunteer or Coordinator record that you'd like to use to view VicNet and click the Log in as Volunteer button or Log in as Coordinator button. Once you've logged in, you can go to the Profile page or Volunteers page to see how the page is organized after your changes.
Keep in mind that you are actually logged in as the volunteer or Coordinator, so any changes you make and save will be reflected in your database.
Add & Manage Sections
All the information and fields you add to the Profile or Volunteers page must be organized into sections, so we recommend starting by setting up the different sections you'll need. The Profile and Volunteers pages will have some sections included by default (e.g. Contact Information, Demographics, etc.), but you can remove these, change them, and add new ones as you need.
While we recommend starting with setting up your sections, you can edit these sections at any time, so if later on you determine that you need to add more sections or remove sections you no longer need, there's no need to worry. You can come back and make the necessary changes whenever you like.
Add Sections
You can create a new section on the Profile page or Volunteers page using the Add Section button at the bottom of the Sections and Field Order area. Clicking this button will create a new section below all of your existing sections, and you can add a name for the section and any instructions you'd like to appear at the top of that section.
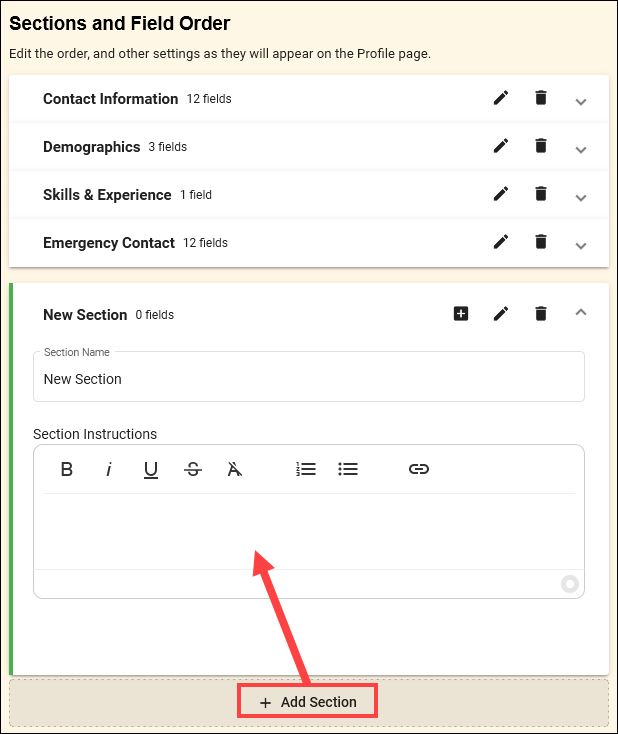
Keep in mind that you can add a maximum of 12 sections to the Profile page and Volunteers page. Once you've reached 12 sections, the Add section button will disappear, and you won't be able to add any more sections to the form. If you've reached the maximum number of sections, you will need to delete an existing section in order to add a new one.
Edit Section Heading & Instructions
After you've added a new section, you may wish to go back and change the heading or instructions you set up initially, or you may wish to change the information for one of the default sections. You can customize section headings and instructions by clicking the Edit Section Info button.
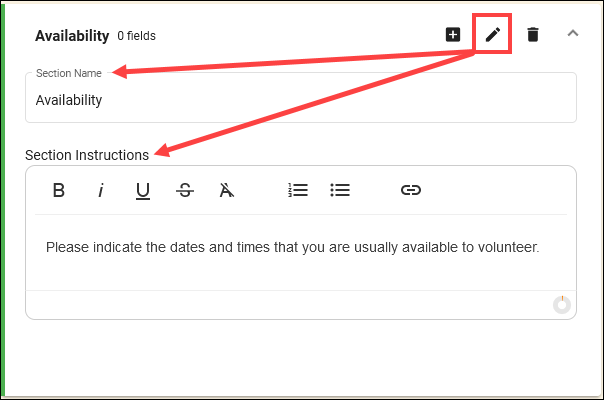
The Section Instructions field utilizes a rich text editor to let you add formatting to your instructions if needed. When you're finished editing the heading and instructions for a section, you can click the Edit Section Info button again to hide these settings.
Rearrange Sections
You can also change where on the Profile page and Volunteers page each section appears. If you'd like to reposition one of your sections, all you have to do is click on the section heading and drag it to the new location.
Remove Sections
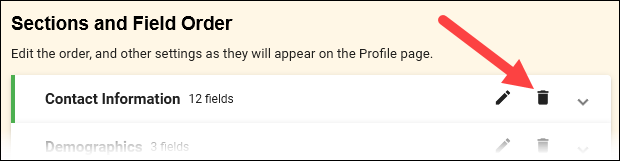
If you no longer need a section to appear on the Profile page or Volunteers page, you can remove it. To delete a section, click the Remove Section button in that section's heading. You'll be asked to confirm the deletion. Select Yes to remove the section, or choose No if you no longer wish to remove the section. Keep in mind that removing a section will remove all the fields in that section.
Add & Organize Fields
With your form sections set up, you can start adding and managing fields on the Profile and Volunteers pages. Some fields will be included on these pages by default (e.g. First Name, Last Name, Email, etc.), but you can remove these fields and add new ones if needed.
Remember that all of the fields you can add to the Profile and Volunteers pages correspond to fields that appear in your volunteer records, so if you don't see a field for information you want to include on the Profile or Volunteers page, you'll need to create a new field in your volunteer records first. Similarly, if you want to make changes to an existing field, you would need to make those changes to the settings for that field.
You can learn more about creating and editing dropdown, text, and checkbox fields in Field Customization and Configuration. Also, if you'd like to collect multiple choice responses or questions that require a Yes or No response, you can use Characteristic Fields. If you don't have any yet, you can create a new characteristic field.
Add Fields
In order to include a field on the Profile page or Volunteers page, it must be added to one of the sections you've set up. There are a couple of ways you can add a field to a section.
The first way to add a field is to click and drag that field from the Available Fields area to the desired section in the Sections and Field Order area. The following steps explain how to do this:
- In the Available Fields area, expand the section for the field you wish to add (e.g. Core Fields).
- In the Sections and Field Order area, expand the section you want to add the field to (e.g. Contact Information).
- Click and drag the label for the field you want to add and move it into the desired section.
-
Release click to drop the field into that section.
The second way to add a field is to use the Add field to... button. In the Available Fields area, the label for each field that hasn't already been added to a section will show a + icon which represents the Add field to... button. Click this button to add the field to the currently selected section. The field will be added to the very bottom of the selected section. You can move the field after it is added.

Your currently selected section is indicated with a thin green line on the left side of the section in the Sections and Field Order area. For instance, the Demographics section is the selected section in the image below.
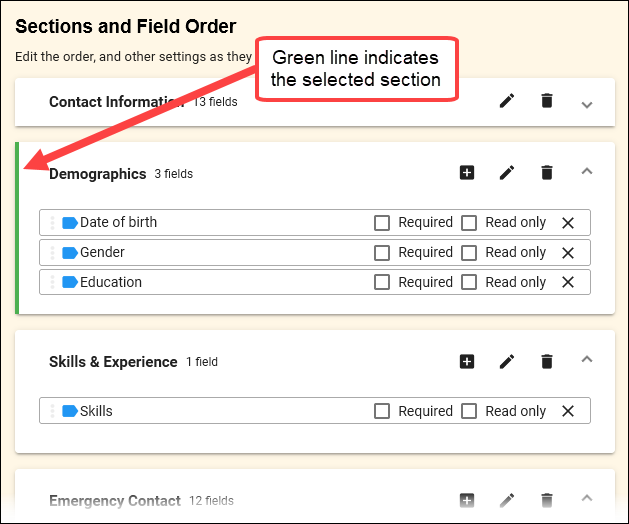
To select a section, simply click on the heading for that section.
Move & Rearrange Fields
Once you have fields added to the sections of the profile, you can rearrange them in whatever order you'd like. To do that, all you have to do is click and drag the field to the new location you'd like it to appear in.
You can move fields within a section, and you can move fields between different sections. If you click and drag a field to a section that is currently collapsed, you can hover over that section for a moment, and it will automatically expand so you can place the field in that section.
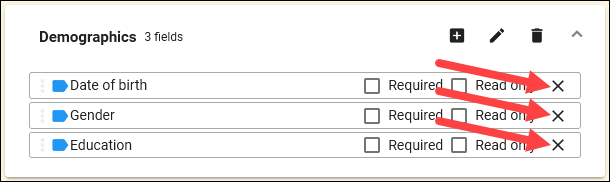
Remove Fields
If you no longer need a field that is currently set up on the Profile page or Volunteers page, that field can be removed. To remove a field, expand the section that field appears in and click the X icon on the far right of the field's label. If you mistakenly remove a field, you can always add it back.
Rows
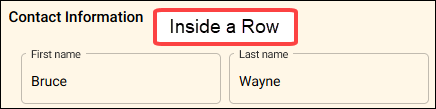
Fields on the Profile and Volunteers pages in VicNet can be organized into rows. Typically, fields are organized vertically, where each subsequent field appears below the field before it. For example, if the Profile page is set up to show the First Name field and then the Last Name field, the First Name field will appear above the Last Name field on that page. However, if you placed those fields in a row, the First Name field would appear first and the Last Name field will appear to the right of it instead of below it.

Rows can help you organize the profile to keep related fields together, and they can also help improve the readability and flow of the Profile and Volunteers pages.
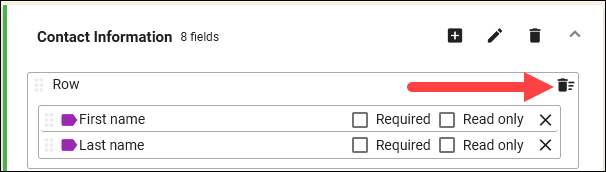
You can add a row to a section by clicking the Add Row button in the section's heading. The row will be added to the very bottom of that section, but you can move it in the same way that you would move a field. You can click and drag fields into the row as if it was its own section.
If you've inadvertently added a row or have a row that you no longer need, you can delete it by clicking the Remove Row button. However, keep in mind that this will remove all the fields in that row as well. If you just want to remove the row but keep the associated fields, you will need to move those fields out of the row before you delete it, or you will need to add them back after deleting the row.
Please note that not all fields can be added to rows. Certain fields require the full width of the page or have unique formatting (like the Photo field), so you cannot move them into a row. If you try to put one of these fields into a row, a warning message will appear near the bottom of your screen letting you know that the field cannot be moved to the row.
Configure Field Settings
Many of the fields you add to the Profile page and Volunteers page of VicNet will have some additional settings to configure. Some fields have very minimal settings, while others will have some more unique settings. Here we'll walk through these different options in more detail.
Make Fields Required
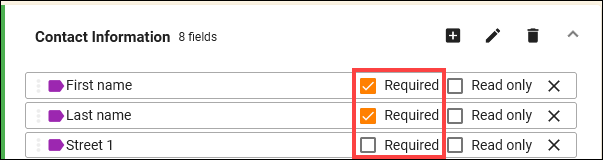
You can make it mandatory to complete certain fields on the Profile or Volunteers page by configuring those fields to be required. Most fields have this as an option, and you can make a field required by checking the Required checkbox next to that field. If you make a field required, the volunteer or Coordinator will not be able to save changes to the profile if that required field is not completed, so you should only make fields required if it is absolutely necessary that the field not be left blank or otherwise incomplete (e.g. First Name and Last Name).
Make Fields "Read Only"
Similarly, most fields also have the option to make them read only. If you set a field to be read only, volunteers will only be able to see the contents of that field and will not be able to make changes to it. This is a great way to share information from the volunteer's record with the volunteer or a Coordinator without the risk of having that information altered. To set a field as read only, check the Read only checkbox next to the field.
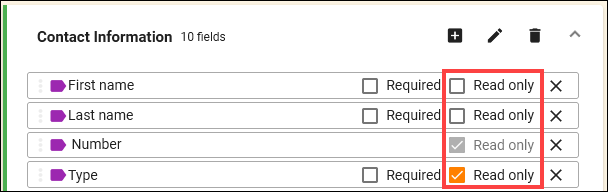
Note: The Number field is always read only since only System Operators can change a volunteer's Number.
OK to Call
All of the phone fields in Volgistics have an associated OK to call checkbox which is used to track whether the volunteer would like you to use the associated phone number to contact them. For the most part, volunteers will only provide you with phone numbers that you can use to contact them, so it may not be necessary to use these fields. However, there may be cases where you want to track this kind of information.
In these instances, you can let volunteers and Coordinators see and indicate which phone numbers are OK to call by including these checkboxes for the relevant phone number fields. To do this, check the OK to call checkboxes next to the phone fields you've added. If you do not wish to include these checkboxes, make sure the OK to call checkboxes are unchecked for the phone fields.
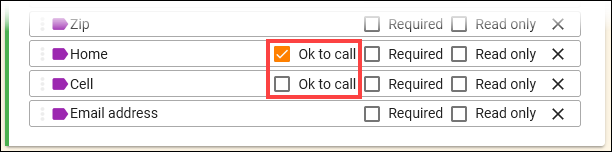
Photo Field
You can add the Photo field to the Profile and Volunteers pages of VicNet to include profile pictures for each of your volunteers, and volunteers and Coordinators can even use this field to upload photos themselves. The Photo field will appear in the Profile Fields section of the Available Fields area, and you can add it the same way you would add any other field. Once it has been added, you'll see two options: Can upload and Can clear.
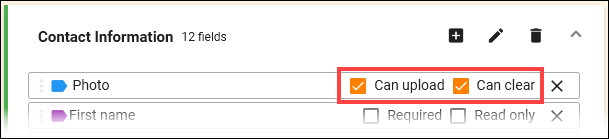
- Can upload: This option lets you choose whether volunteers are allowed to upload new photos to their profiles. For your Volunteers page settings, this lets you choose whether Coordinators can upload photos for their volunteers. Check the box if you want volunteers and Coordinators to have this ability, or leave the box unchecked if you only want them to see the photo but not change it.
- Can clear: This option lets you configure whether or not volunteers can remove their photos from their profiles. For your Volunteers page settings, this lets you choose whether Coordinators can remove photos for their volunteers. Check this box if volunteers and Coordinators should be able to clear photos. Or leave the box unchecked if you do not want them to clear photos.
If you have checked the Can upload option but left Can clear unchecked, volunteers and Coordinators can replace photos, but they cannot completely clear them. If you have checked Can clear but have left Can upload unchecked, volunteers and Coordinators can see and remove photos, but they won't be able to upload new ones.
Date of Birth
Collecting information about the age of your volunteers and their birthdays can be important for many volunteer organizations. However, depending on your needs, it may not be necessary to track the full date of birth for your volunteers. For instance, if you just want to celebrate with volunteers on their birthdays, you don't necessarily need to track the year they were born. You would just need to know the month and day they were born. However, in other cases, it may be important for your organization to track statistics based on the age of volunteers, so tracking year of birth is vital. For these reasons, the Date of birth field has several options for you to choose from.
You will find the Date of birth field in the Available Fields area under Profile Fields. When you expand that section, you'll notice that the Date of birth field label is a little larger than many of the other fields and includes additional options. These options let you choose whether or not to show and collect year of birth information. You can make your selection for this field before or after you add the field to the profile. Here is a summary of each of the options:

- Required: Choose this option if a year of birth must be provided for the volunteer. When this option is selected, the Date of birth field will automatically be required.
- Omitted: Choose this option if you do not want to show or collect volunteers' years of birth. Volunteers and Coordinators will only be able to see and enter the month and day of birth in the profile.
- Optional: Choose this option if you do not wish to require a year of birth be entered but still want to give volunteers and Coordinators the option to see and enter this information. With this option, only the Month and Day will need to be entered for the field to be considered completed. But volunteers can also see and enter the Year of birth if they'd like.
Contact Fields
Information can be added to the Contacts tab of your volunteer records to track the other individuals associated with your volunteers. For example, you may track a volunteer's emergency contacts or individuals that served as references for the volunteer. To help keep these contacts up to date, you can include contact fields on the Profile page in VicNet. And you can make sure Coordinators are able to refer to that information by adding contact fields to the Volunteers page.
The Available Fields area will include a section for each type of contact your account is set up to track. You can customize these types of contacts using the Kind field on the Contacts tab of your volunteer records. By default, the Kind field will be set up to track Emergency Contacts, Employers, References, and Relatives. If you'd like to track other kinds of Contacts, you can add more options to the Kind field in your Field Options.
To add Contact Fields to the Profile page or Volunteers page, expand the section that corresponds to the kind of contact you want to add fields for. Initially, that section will only have one field in it, and its name will correspond to the kind of contact (e.g. Emergency Contact). You can choose how many different contacts of that kind you'd like to include fields for using the Quantity settings that appear on the right side of the field label. You can include up to 4 sets of fields for a single kind of contact.

You can add the contact field and move it the same way you add and move other fields. When you add the contact field, it will look and function very similarly to a row, and the associated contact field section in the Available Fields area will be updated to show all the fields you can add for that contact type.

Now you can add fields for that kind of contact by clicking and dragging the fields into the new contact field area you just added or by clicking the Add field button (represented by the + icon) next to the fields. Contact fields can only be added to the area that corresponds to the associated kind of contact. Contact fields can only be added to the area that corresponds to the associated kind of contact.
For example, if you add the Emergency Contact field to the Profile or Volunteers page, you'll only be able to add the associated contact fields to the Emergency Contact field area. They cannot be added to other portions of the profile.
Additionally, you can place contact fields within rows. Since contact fields can only be added to the corresponding area, you need to click the Add Row button in that contact field area to create a row for the associated contact fields. The Add Row button in the section heading cannot be used for contact fields.
If you used the Quantity settings to include multiple contacts of the same kind, the Profile page or Volunteers page will include multiple sets of the fields you added for that kind of contact. For example, if you selected a Quantity of 2 for Emergency Contacts in your Volunteers page settings, Coordinators will be able to see 2 Emergency Contacts for their volunteers and each of those contacts will have all the fields you selected to include in the Emergency Contact area. Additionally, if you set up any of the contact fields to be required, those fields will be required for all contacts of that kind.
How Multiple Contacts Appear
When multiple contacts are selected for the Quantity the contacts will be stacked in tabs to save vertical space. To enter information for another contact, the volunteer will need to click on the other tabs. The first and last name of the contact will appear at the top of each tab as information is entered. Here's an example of how this looks when volunteers are asked to provide two reference contacts: