Upload Documents in VicNet
Upload Documents in VicNet
Many organizations need to collect forms, waivers, and other kinds of documents from their volunteers to keep on file. It is possible to store these kinds of documents electronically in your volunteer records using the VicDocs module. And with VicNet, your volunteers and Coordinators can upload documents to their own records in your Volgistics database.
How Does It Work?
Before we start setting up this feature, let's take a look at how it actually works. After following the steps in this help topic, the VicNet Home page will have an area for volunteers and Coordinators to upload document files.
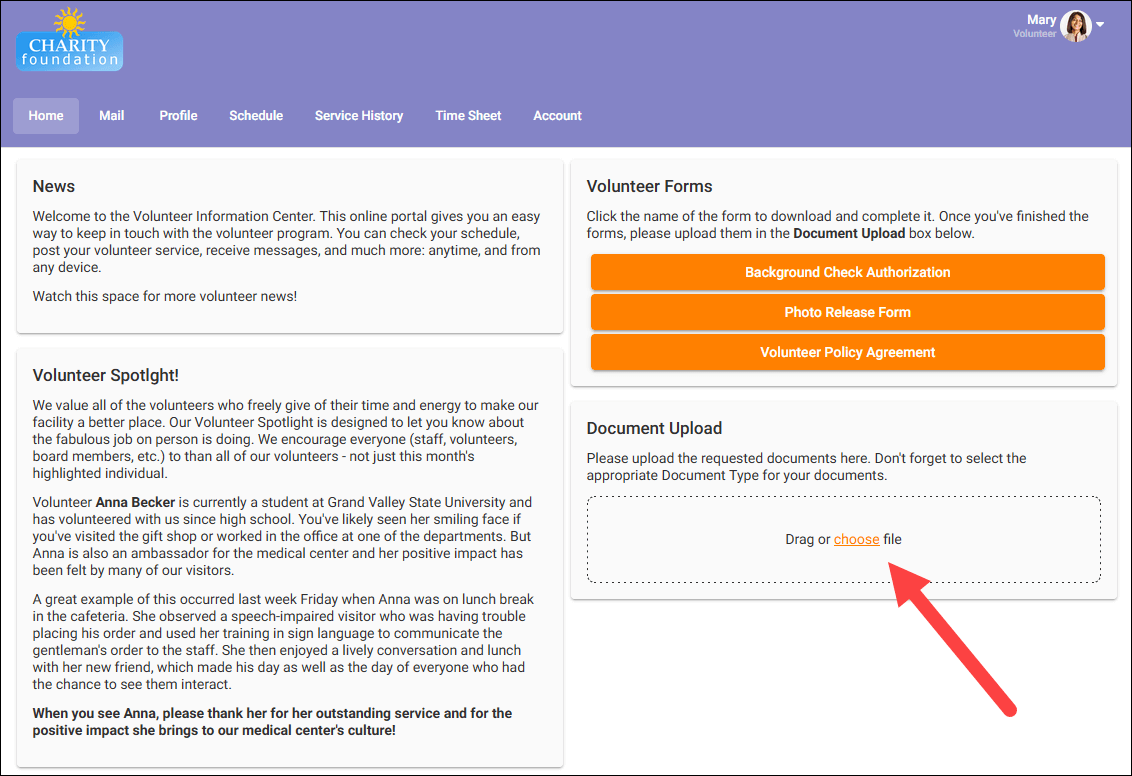
The box with the upload feature has an area labeled Drag or choose file with a dashed outline. To upload a document, the VicNet user will need to drag their document into this area or click on this area and select the document. Then they can rename the selected file if they'd like, choose which type of document they are uploading, and click the Upload button.

The documents they've uploaded will appear in the Uploaded Files collapsible area at the bottom of the box. If you've manually uploaded documents to the Vic tab of the volunteer's record, they will not see these. They will only see the documents they've uploaded themselves.
Once the system has performed a security scan on the uploaded documents, System Operators can see and access them from the Docs tab of that volunteer's record.

Coordinators will also have the ability to upload documents through VicNet, but please note that they can only upload files to their own Coordinator record. They cannot upload files to volunteer records.
The Volunteer Guide for VicNet and Coordinator Guide for VicNet have more information for your VicNet users. Please feel free to share these with your volunteers and Coordinators.
Now let's work on setting up this feature, so you can start using it!
Set Up Document Types
Each document uploaded to your volunteer, Coordinator, Site, Place, or Assignment records will be associated with a particular Document Type. All Volgistics accounts will have the built-in Application Document Type which is automatically applied to any submitted online application forms for your account. But you'll also have the ability to set up your own custom Document Types.
For example, you may need to collect volunteer policy agreements, photo release forms, background check authorizations, and driver license photos from your volunteers. You can set up a Document Type for each of these to categorize volunteer documents as they are uploaded, so that you can query them in the future. You can also choose to be notified when a volunteer or Coordinator uploads particular Document Types. To set up Document Types:
- Choose Setup from the menu.
- Expand Field Options.
- Click Documents Tab.
-
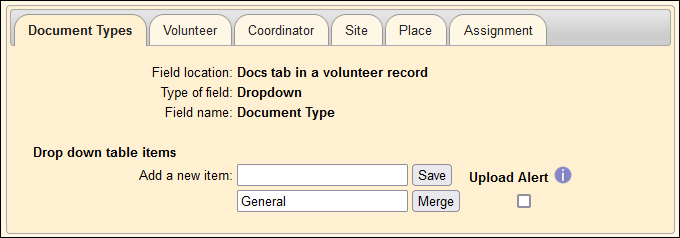
On the Document Types tab, you'll see a list of the Document Types you've already set up.
-
In the Add a new item field, enter the name of a Document Type you'd like to set up (e.g. Volunteer Policy Agreement) and click the Save button to the right of the field.
- Repeat step 5 for each new Document Type you wish to add.
If you'd like to be notified when a volunteer or Coordinator uploads a particular kind of document, you can enable upload alerts for that Document Type. When upload alerts are enabled for a Document Type, the system will automatically generate a notification on the In Box tab of the Mailbox when a volunteer or Coordinator uploads that type of document. To enable upload alerts for a Document Type, check the box next to that Document Type under the Upload Alert heading.
Add Upload Feature to VicNet
Once you have your Document Types set up, you can add the document upload feature to the Home page in VicNet. This will allow your volunteers and Coordinators to upload files directly to the Docs tab of their record in your database. To add this feature:
- Choose Setup from the menu.
- Expand VicNet.
- Click Home Page.
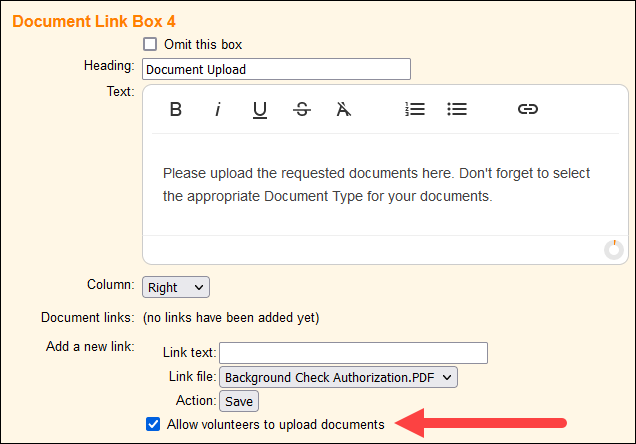
- Scroll down the setup page to the Document Link Box 4 section and make sure that Omit this box is unchecked.
- Enter a Heading and any Text you'd like to appear in this box to explain its function to your VicNet users.
- You can optionally include links to documents for volunteers to download using the Document links settings.
- Check Allow volunteers to upload documents.
-
Click the Save button.
Now the document upload box will appear on the Home page in VicNet for your volunteers and Coordinators to start uploading their files.