Create Links to VicNet
The VicNet portal is the optional module that allows volunteers to log in to a portal to do things such as review and update their volunteer information, receive messages, look at their schedule, sign-up for new shifts, and more. Volunteers with mobile phones can search for VicNet in the Google or Apple stores to download the app. Volunteers can also access VicNet with the web browser on their phone, tablet, laptop, or desktop computer. When they access VicNet through the web browser, they can go to the universal VicNet login page https://www.volgistics.com/vicnet or to the specific VicNet login page for your organization's account.
Having them go to the specific login page for your account allows them to see instructions you've added to the login page as well as the color theme and custom buttons set up for the account. If the login page is not embedded, it will also have your organization's logo if one has been uploaded.
VicNet for Different Organizations
If you have volunteers who serve at a different organization that use VicNet, they can log in with each organization's direct link and the password set for that organization. However, if they use the VicNet app or the universal login page (https://www.volgistics.com/vicnet), and use the same email address at both organizations, they'll need to make their passwords match at both organizations in order to switch between the organizations. The Switch Organizations in VicNet help topic explains how they can do this.
If you choose to have volunteers use the specific login page for your account, it works best for volunteers to access VicNet through your organization's own website. This brings traffic to the website, and it's the logical place on the internet for volunteers to go for activities related to volunteering with your organization. While you could simply email volunteers the URL address for your organization's VicNet login page, if the portal's log in page is linked to your website volunteers do not need to remember a separate website, and they will not lose the URL they need.
Adding VicNet to your website can be as simple as adding a single HTML hyperlink on a webpage. You can locate your link anywhere you'd like on your website, and you can have multiple links to VicNet from several different locations on your website if you want to.
The VicNet portal can be integrated with your own web pages so it appears to volunteers and other visitors to be part of your website. If you do this, you may wish to "brand" VicNet with your organization's color scheme and graphics. The Customize Themes for VicNet and the Customize Buttons for VicNet help topics explain more about this.
You customize the way VicNet looks and works from within the Volgistics program. This means that once there is a link to VicNet on the organization's website, an Administrator for the account can customize or alter the way VicNet looks and works without any additional changes to the website. The person who maintains the webpages only needs to add or update the link. They do not necessarily need to help with customizing VicNet, but you may want to involve them if you are going for an integrated look.
Full-Page Versus Embedded
There are two ways to add VicNet to your website: the Full-page method or the Embedded approach. Each has its advantages.
With the full-page method, VicNet fills an entire web browser window. You can configure VicNet to open in the same browser window as your website, or you can set up VicNet to open in a new tab or browser window. The full-page method is the easiest way to add VicNet to your website, but it may not appear as integrated as the embedded approach even if you customize VicNet to look like your website. To add VicNet using the full-page method, you (or your web developer) simply add a hyperlink to a webpage on your organization's website. This can normally be done in a few minutes.
With the embedded approach, VicNet opens in an HTML frame (or iframe). Other elements of your organization's website appear around the VicNet frame. This provides greater integration than the full-page method because the visitor will continue to see parts of your website (such as menus and borders) while they're using VicNet. However, it requires the use of HTML frames on your webpages, and it will be more work for you (or your web developer) to set up than a hyperlink.
Creating HTML Links to VicNet
To add VicNet to your website using either the full-page method or the embedded approach, you add an HTML hyperlink for the URL address of the VicNet log in page. The URL addresses have the same basic structure.:
https://www.volgistics.com/vicnet/{public account identifier}
You replace {public account identifier} in the URL address with the Volgistics account's public identifier number. For example, if the account's identifier were "1234," links to VicNet will be:
https://www.volgistics.com/vicnet/1234
To get the account's public identifier number to add to the URL address, an Administrator who is logged into the account will need to follow these steps:
- Choose Setup from the menu.
- Expand VicNet.
- Click the Ground Rules link.
-
The public account identifier is listed under the Links heading near the bottom of the page.
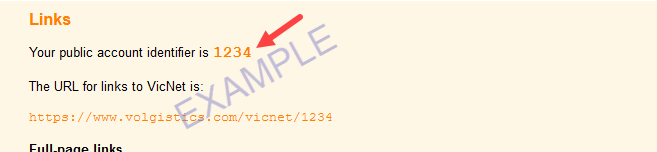
If you're adding the link to your website yourself, or sending your webmaster a message, it's easiest just to copy the whole URL and then paste it where needed. If you need to enter the URL address manually, be certain you type the web address exactly as shown above (except with your own public account identifier rather than 1234). The link will not work if it has misspellings, extra spaces, or it's missing your public account identifier.
Important!
The HTML links must use the account's public account identifier number not the account's nine digit account number. The public account identifier is different than your nine digit account number. The public account identifier is used in this link instead of your actual nine-digit account number for security purposes (using this public account identifier keeps your account number private).
Full-Page Links
You can put hyperlinks to VicNet on your organization's website as simple text links the volunteers click to be sent to the login page. Or, you may want to connect the hyperlink to an image that volunteers click such as a button or a thumbnail image of the login page. There are many free button generator programs online that can be used to make a button like the one below:

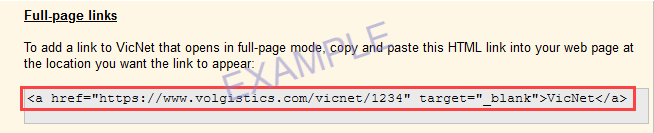
The example below shows a link for an account with the public identifier 1234 that will make the words Volunteer Information Center into a clickable link to the VicNet login page. With this link, VicNet will open in the same browser window as the webpage where the link appears:
<a href="https://www.volgistics.com/vicnet/1234">Volunteer Information Center</a>
To make the same link open VicNet in a different tab or browser window than the webpage the link appears on, add target="_blank" behind the public identifier in the URL address. Whether or not VicNet opens in a new browser tab, or a new browser window, depends on the web browser the volunteer is using. Some will open a new tab. Others will open a new window. In either case, the volunteer will still see your organization's website once they exit VicNet and close the tab or window. Here is an example of the link with the added parameter to open VicNet in a different tab or window:
<a href="https://www.volgistics.com/vicnet/1234" target="_blank">Volunteer Information Center</a>
If you are updating your organization's website yourself, or sending a message to your webmaster with information from your account, you can simply copy this code snippet from the Ground Rules page so you can paste it wherever it is needed. This will help prevent typos that could occur from entering the link manually. The code snippet makes the word VicNet the link to open the portal's login page, but this can be easily edited if you want to make something else appear as the link.
If you want your VicNet link to be a clickable button or image rather than words, that's easy too. Just add an image to the link using an HTML <img> tag, as shown in this example:
<a href="https://www.volgistics.com/vicnet/1234" target="_blank"><img src="{path to any image you choose}"></a/>
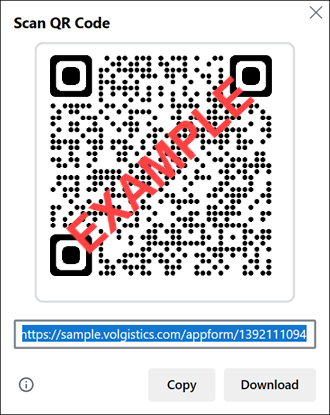
Tip: Create QR Code
An alternative option to send volunteers to the VicNet login page is to create a QR code. This can be used as the sole method to share VicNet with volunteers or in addition to a link to VicNet on your organization's website.
You can easily convert the URL address for your VicNet login page to a QR code using a variety of resources such as Microsoft Edge or bitly's QR Code Generator. Here's an example of a QR code made using the Edge web browser.
Embedded Links
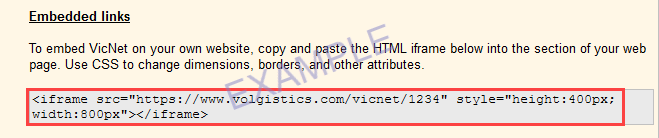
The code provided in the Embedded links section allows you to add the VicNet portal to a page on your website. You would typically use the embedded link style when opening VicNet inside an HTML frame or iframe. The code provided in Volgistics utilizes an iframe to display the portal in-line with the other information on your website.
An example of how your VicNet link may appear as the source for an iframe is shown here:
<iframe src="https://www.volgistics.com/vicnet/1234" style="height:400px;width:800px">
Be certain to use the public identifier for your account in place of 1234 in the example above!
If you are the person who is updating your organization's website, or you are sending a message to your webmaster with information from your account, you can also copy the code snippet shown under Embedded links on the Ground Rules page of your account so it can be pasted where it is needed. This will help prevent typos that could occur from entering the link manually.
How to build a webpage that contains frames or iframes is beyond the scope of Volgistics support. However, here are a few tips to help you add the VicNet module:
- Use a borderless frame
- Adjust the height and width in the style parameter for the size of the frame the VicNet module will appear in on your website.
- Include your website's main navigational elements in an adjacent frame or iframe.