Track Volunteer Absences
You can optionally use Volgistics to keep track of the number of times volunteers are absent. In organizations that depend on regular volunteer participation, a volunteer may be considered absent if they fail to serve as scheduled. Tracking the number of times volunteers are absent is often an important measure of volunteer performance in these organizations.
This help topic explains how to initially setup a Volgistics service measure for tracking absences; how to find volunteers that were absent; how to record an absence for those volunteers; and how to report absences.
Setup a Service Measure for Tracking Absences
If you would like to track absences in Volgistics, start by setting-up an Absences service measure.
- Choose Setup from the menu.
- Expand Service Tracking.
- Click the Service Measures link.
- If you do not already have a service measure for tracking absences, click on the next available service measure (e.g. Measure 1 (available)). If you already have a service measure for tracking absences (e.g. Measure 1 (Absences)), click on it.
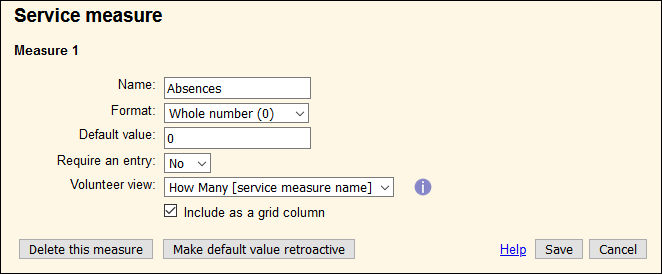
- Enter a name for the service measure (e.g.
Absences). - In the Format dropdown, select Whole number.
-
If you'd like this information to appear as a column on the Service tab of your volunteer records, check the Include as a grid column checkbox.
Your service measure settings should look like this:
-
Click the Save button.
You are now ready to start tracking absences.
Find Absent Volunteers
The next step will be to actually find the volunteers that were absent for one of their scheduled shifts. While you could do this manually by reviewing the schedule and volunteer service, a better option would be to create a Set to find these volunteers for you. Find Volunteers Who Did Not Serve as Scheduled explains how to create a Set that finds volunteers who were absent for shifts yesterday.
You can use this Set each day to find the volunteers that did not serve in their scheduled shifts the previous day. Then you can tag those volunteers, send them a message to see if they forgot to sign-in or clock their hours, and record absences if necessary. Once you've created the Set described, you can tag those volunteers with these steps:
- Choose Volunteers from the menu.
- In the Include options, click the Clear link to remove any filters you may have been using previously.
- Use the Set dropdown to select the Set you created to find volunteers that were absent yesterday.
- Click the All link at the top of the page. This will bring up a list of all the volunteers in your Set.
- At the top of the page, click the Tag button.
Now all the volunteers that do not have service recorded for their scheduled shifts yesterday will be tagged. You can also send all these volunteers an email message using the steps provided in Send a Message to the Volunteers in a Set. When you're ready you can then record absences for these volunteers using the steps in the next section.
Record Absences
Once you have your absent volunteers tagged and are ready to record their absences, this can be done using the Post page in your account. With the Post page, you can record service information for multiple volunteers at once, so this is an efficient way to record absences for all of your tagged volunteers together.
- Choose Post from the menu.
- Select to Post hours for Tagged volunteers, and then click the Continue button.
- On the next page you'll be able to configure how the service entries are posted for this batch.
- In the Assignment field options choose which Assignment(s) should be associated with these entries. If the volunteers you're posting absences for were scheduled in different Assignments, you'll likely want to select Let me choose the assignment from a list of each volunteer's assignments.
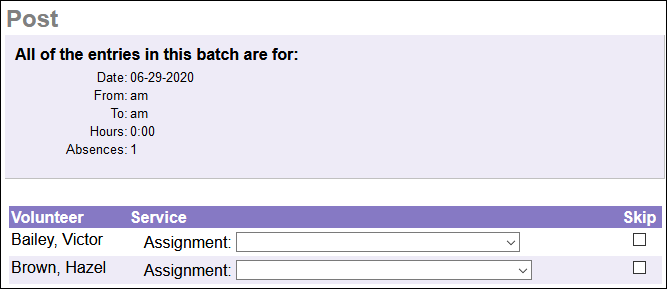
- In the Date & time fields section, choose All of the hours I'm posting are for this date and these times. Select the date that these absences should be posted for. Then make sure that the From time and To time fields have been cleared if you track this information.
- In the Hours settings, choose to Post this many hours and enter
0into the corresponding field. - Under Absences field, select Post X Absences on every entry and enter
1into the corresponding field. - Choose whether you'd like to post any information for other service measures.
- Click the Start posting button.
-
If you chose to select the Assignment for each entry, you can go through each entry to select the Assignment the volunteer was absent for.
-
If you do not want to post an absence for a volunteer that is listed on this page, you can check the Skip checkbox next to that volunteer's entry in the list. No service entry will be posted for volunteers that are skipped.
- Click the Post this page button. If you have more than one page of volunteers who were absent, repeat this process until you've given all the tagged volunteers an Absence.
Now a service entry will be added to each of the volunteer records for zero hours and one absence.
Tip
While the above method is an efficient way of recording absences, there are some alternative methods for doing this. Since absences are tracked using service entries, these can be recorded using most of the same methods you would use to post normal service entries. For example, if you only had one or two volunteers that were absent, you could choose to record those absences individually from the Service tab of each of the volunteer records.
Create a Report That Shows Absences
Now that you've set up your account to track absences and have started recording absences for volunteers that did not serve as scheduled, you can also report on this information using Service reports. It may be useful to get a monthly report of all the volunteers that were absent and how many times they were absent. This can be done using a Set and a Service Details report.
Let's start by creating a Set that includes all volunteers with an absence in the previous month:
- Choose Sets from the menu.
- Click the Create a new set button.
- Enter a name for the Set (e.g. Absent last month).
- Use the dropdown to select Their service and click the Go button.
-
In your Set rule, select the first option and configure it so that it reads At least 1 Absence in the previous month.

-
Click the Finished button.
Next, you can create a report based on this Set that lists all the volunteers that were absent last month and how many times they were absent. You can even set up this report to generate automatically each month. To create this report:
- Choose Reports from the menu.
- Expand Service Details.
- Click Create a new service details report.
-
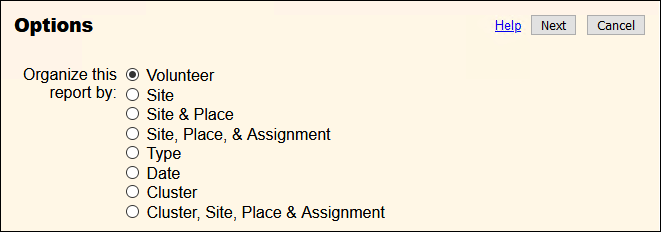
On the Options tab, change Organize this report by to Volunteer and then click the Next button.
-
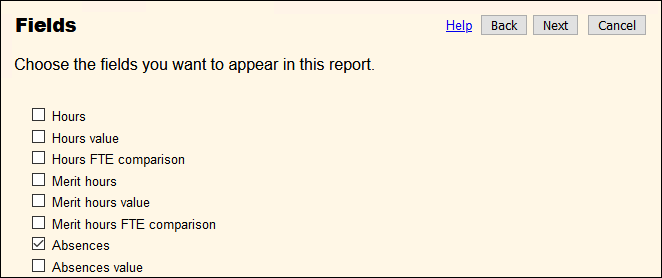
On the Fields tab uncheck Hours and check Absences. Then click the Next button.
-
On the Page Design tab, you can customize the formatting of the report. It may be beneficial to include the Set name in the title portion of the report, and if you use Site Level Access, it may also be helpful to include the Site name on the report. Click the Next button.
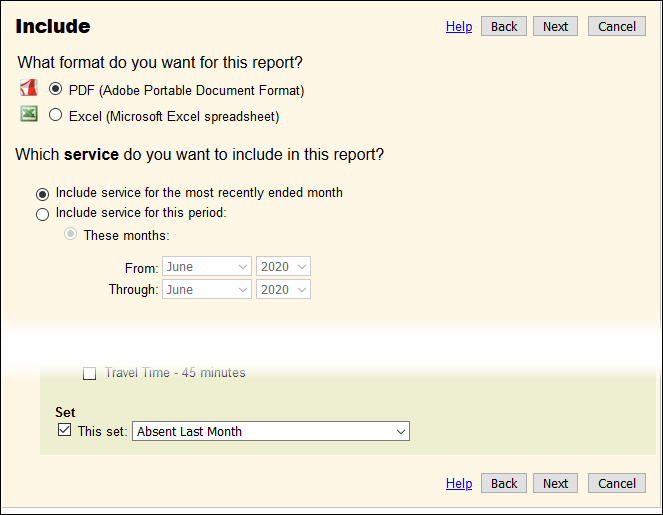
- On the Include tab, you will be able to choose which file format you'd like for the report, the time frame the report covers, and which volunteers are included on the report:
- Choose whether you'd like the report in the PDF or Excel format.
- Under Which service do you want to include in this report, choose to Include service for the most recently ended month.
- Under Which volunteers do you want to include in this report, check the checkbox in the Set section and use the corresponding dropdown to select the Set you created.
-
Click the Next button.
-
On the Save tab, enter a name for the report. Under Would you like this report to run on an automatic schedule, choose Yes, run it on the X of each month and select the date each month you'd like the report to be generated. Please note that many organizations have reports generated automatically on the first and last days of the month, so automatic reports take longer to generate automatically on those days.
- Click the Save button.
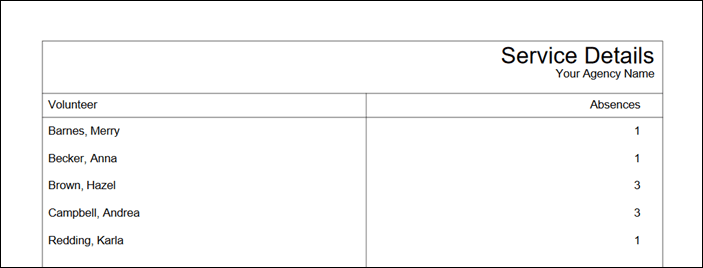
Now this report will be generated automatically each month on the day you selected, and it will list all of the volunteers that were absent at least once the previous month and how many absences they had.
An example of the report appears below.
Use a Set to Find Volunteers With a Certain Number of Absences
You may also want to monitor for volunteers who have more than a certain number of absences during a particular period of time. For example, you may only allow up to 3 absences in a 6 month time period, and you'd like to find those that have 4 or more absences in the last 6 months. You can do this using a Set like this:
- Choose Sets from the menu.
- Click the Create a new set button.
- On the Define a new set page, enter a name for the Set, select Their service from the dropdown list, and then click the Go button.
-
In this example, you would want to select the first option in your Set rule and configure it so that it reads At least 4 Absences in the last 6 months. However, you can set any conditions you want for this rule (such as 6 or more absences between two dates, or 5 or more absences this fiscal year).

-
Click the Finished button.
Once you create this Set you can easily view a list of volunteers in the Set. You can also run a report that only includes volunteers in the Set.