Enter Service From Post Page
The Post page in Volgistics provides a way for System Operators to add service information to more than one volunteer at a time. Service added on the Post page will appear on the Service tab of volunteer records and on reports such as the Service Details and Service Summary reports.
Depending on which modules are included in your account's service level, and how the account's Administrator(s) configured the account, service information may also be added in the following ways:
- By volunteers on the Service Page of the VicNet portal
- When volunteers clock-in and out at the VicTouch time stations
- By System Operators on the Service tab of individual volunteer records
If your account's Service Tracking Grounds Rules page is set up to allow notes to be entered along with service entries, you'll need to use one of the three methods above if notes should be entered with the other service information. There is not a way to add notes to service when the service is entered from the Post page.
This help topic explains how operators use the Post page. Expand a section below to learn more.
Introduction Page
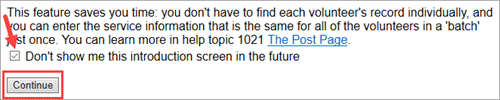
You get to the Post page by selecting Post from the Volgistics menu. After you do this, you might see an introduction page explaining some of the features of the Post page. Click the Continue button at the bottom to go to the pages for posting service.
If you do not want to see the Introduction page the next time you post service, check the box in front of Don't show me this introduction screen in the future before you click the Continue button.
Post Is Missing From the Menu
If you do not see an option to select Post when you look at the Volgistics menu, it means one of two things:
-
Your operator rights do not include access to the Post page. In this case, you may still be able to add service on the Service tab of individual volunteer records. If you can't do this, you'll need to have an operator with access post the service for you, or contact your account's Administrator and ask to have your operator access updated to include the Post page.
-
Your account is on Hold. If this is the case, Post will appear on the menu when the account is reactivated if the account holder placed the account on Hold, or when the service fee is paid if the account is on Hold because the paid through date passed. You can still add service on the Service tab of individual volunteer records while your account is on Hold.
Choose Volunteer Records
The first page for posting is where you select what group of volunteers you'd like to add service information to, as well as how you'd like the page to be sorted. If you saw the Introduction page after selecting Post from the menu, you'll need to click the Continue button to get to this page.
Post hours for
Use the controls in this section to select which volunteer records will show on the pages where you'll add the service information. There is more information about each of the options below. With all of the options, you will be able to skip volunteers who are listed but do not have service information you need to enter.
-
Tagged volunteers
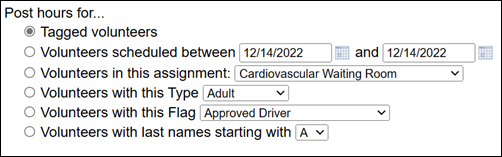
In Volgistics, a tag is a temporary way to identify a record or group of records to work with. This option works great if you need to post service to a group of volunteers that is not the same every time. For example, volunteers who attend an orientation session where you give service hours for attendance. If you do not have any tagged volunteer records, this option will be disabled.
Tags are also used if you need to add service information to all of the volunteers in a Set or query of the database. For example, if you made a Set to find volunteers who did not serve when scheduled, you can tag the volunteers in the Set and then post the absence with a Service Measure to track it.
-
Volunteers scheduled between these dates
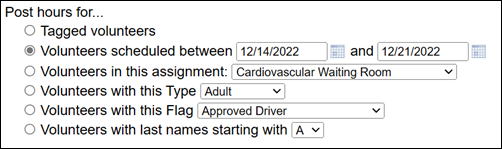
If your volunteers are scheduled to serve in advance, you can convert the schedule entries to service entries using this option. All the details such as the Assignment, date, and scheduled times are prefilled. You can simply post all of the service in the date (or date range) you choose exactly as it appears on the schedule. Or you can adjust the start and stop time if the volunteer did not serve the exact time they were scheduled for, and skip posting service if the volunteer was absent. There is not a way to make schedule information for just certain Assignments show.
If you've posted service from the schedule before, the dates shown by default are the last schedule dates where you posted service. Remember this is specific to your System Operator record. If your account has other operators who post service from the schedule, the dates will not show the last time they posted service.
If you need assistance with using this option, we recommend going to the Post Hours From Schedule help topic because it has information specifically for posting from the schedule that is not found in this help topic.
-
Volunteers in this assignment
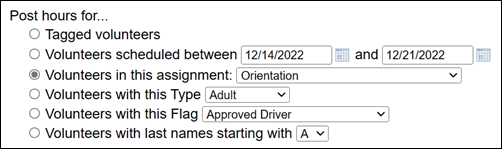
Volunteers are linked to the Assignments where they serve by their Role in the Assignment. This option will list all the volunteers with Roles in the Assignment you select. Your account's Administrator(s) select which Role(s) a volunteer must have in order to be listed by using the settings on the Service Posting Setup Page.
-
Volunteers with this Type
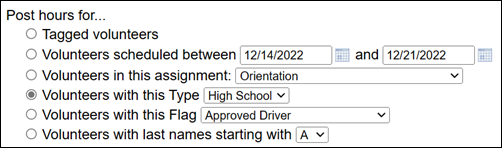
Each volunteer record can have a Type recorded on the Core tab. Types are typically used to divide your volunteers into categories such as Adult, College, and High School. Or, Staff, Regular Volunteer, and Event Volunteer. This option will list all of the volunteers with the Type you select so you can post service. This option works well for posting service if there was an event where just a certain group of volunteers served such as a park clean-up for volunteers with the Youth Type.
-
Volunteers with this Flag
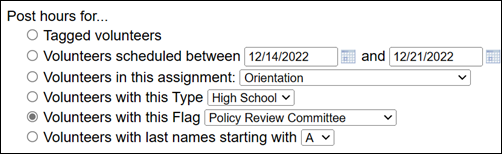
Your Flags are similar to Types. Flags appear on the Core tab and can be used to put volunteers into categories. The difference is a volunteer can only have one Type, but they can have up to 36 Flags. When you select this option, the page will list all volunteers who have the Flag you select. This option works well if you need to post service for a group of volunteers, such as everyone with an Auxiliary member Flag on their record.
-
Volunteers with last names starting with
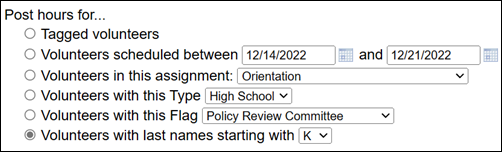
This option will list all of the volunteers who have a last name beginning with the letter you select. These will be the same volunteers that show if you select a letter on the Volunteers page. This option works well if you collect time sheets from the volunteers and organize them alphabetically. You'll be able to go down the list and enter service for volunteers who turned in a time sheet, and skip the volunteers who did not. You can learn more about collecting and posting service information in this manner in the Enter Service From Paper Time Sheets help topic.
Post hours for volunteers if their status is
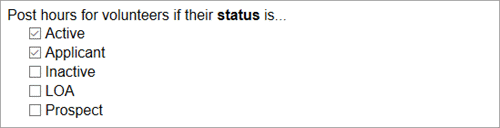
If you select to post hours for volunteers with an Assignment, Flag, Type, or last name starting with a certain letter, you can optionally choose which volunteers are listed based on the Status currently recorded on the volunteer's Core tab. If you select to post hours for tagged volunteers or volunteers scheduled on a certain date, this option will not appear.
This allows you to filter the list of volunteers even further. For example, you may want to post service to volunteers with the Youth Type, but only if they have the Active or Applicant Statuses. If no Statuses are selected, the system will display all volunteers who meet your selection in the Post hours for section regardless of their current Status.
Tip!
If you selected Volunteers in this assignment, keep in mind that the Role a volunteer has in the Assignment is not the same thing as the volunteer's current Status. The Role shows the volunteer's relationship (such as Assigned, Substitute, or Trainee) to the Assignment or job they serve in. While the Status shows the volunteer's relationship (such as Active, Applicant, or Inactive) with your organization itself.
Sort volunteers

By default, the pages for posting service are sorted alphabetically by the last name of the individual volunteer or group's contact. There may be times when having the page sorted by the volunteer's number will be more efficient. For example, if your volunteers each have time cards and the cards are organized according to the volunteer's number. In this case, change the radio button from Alphabetically to By number and the list of volunteers will change to match your choice.
Choose Service Information
After you click the Continue button on the page where you choose which volunteer records you want listed, you'll be taken to a page where you can select the service information you want entered on the records. This can be a great time saver if many of the service entries will have the same Assignment, Hours, or Service Measure input because you can choose to add the same information to each entry. You can also select to add different information to each entry if the information will be different for each volunteer listed. This section explains more about each option that might show for entering service information.
Assignment fields
You will see an option to add Assignment information as long as there is at least one Assignment added to your account (or to your Site if you are an operator restricted to viewing one Site at a time).
If you're posting hours for volunteers scheduled on a certain date, the Assignment option will not show because the Assignment is automatically selected based on the volunteer's schedule.
-
All of the service I'm posting was performed in this assignment

Select this option if the service you're posting is for volunteers who all served in the same Assignment. When you choose this option, the Assignment field will automatically be filled in on the service entries for all the volunteers on the list so it will be one less thing you'll have to add.
-
Let me choose the assignment from a list of each volunteer's assignments

Select this option if you want to pick the Assignment for the service entry from a list of all the Assignments where the volunteer has a Role.
-
Let me choose the assignment from a list of all assignments

Select this option if you want to pick the Assignment for the service entry from a list of all of the Assignments available to your System Operator record.
Date (or Date & time) fields
Every service entry must have a date associated with it so some form of date field will always appear here unless you're posting hours for volunteers scheduled on a certain date. When you post hours for volunteers scheduled on a certain date, the date and time are automatically prefilled based on the schedule information.
When you are not posting for volunteers scheduled on a certain date, whether or not the time fields show depends on which fields the account's Administrator has selected to appear for service tracking. The options available for entering service are:
- A month and year with a lump sum for hours served.
- A specific date with a lump sum for hours served.
- A specific date along with start and stop times. Hours served are calculated based on start and stop times entered.
- A date range with a lump sum for hours served.
- A date range along with start and stop times. Hours served are calculated based on start and stop times entered multiplied by the number of days in the range.
The choices in this section will change based on what fields are selected for service tracking. For example, if tracking is based on hour totals for a month, there will be fields to enter a month and year. But if tracking is based on a specific date and times, there will be fields to enter a date along with start and stop times. We used the single date configuration with start and stop times for the screenshots.
-
Let me enter the date and times on each entry
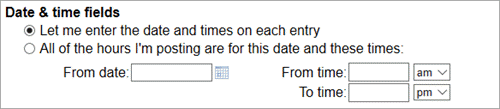
Select this option if you want to enter the dates (or date and times) on every service entry. As outlined above, the wording and options will change depending on the settings on your Service Tracking Ground Rules page.
-
All of the hours I'm posting are for this date and these times
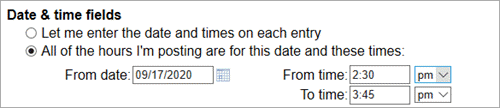
Select this option if all of the service was from the same month, date, or date range. As before, the wording and option to put in the times will be different depending on the settings on your Service Tracking Ground Rules page.
This option is a great time saver because the date and time information will be filled in already when you go to post service so you will not need to make a selection for each volunteer listed.
Tip!
When your account is set up to collect a start and stop time for service entries you may have situations where the volunteers all served on the same date (or in the same date range), but the start and end times are not known. In this case, enter the date (or date range), but leave the From time and To time fields blank. You'll be able to add the hour information in the Hours field as long as the time fields do not have anything selected.
Hours field
Services entries generally have hour information showing how much time the volunteer gave when they served. When you're posting hours for volunteers scheduled on a certain date, this is calculated from the start and end times for the schedule entry so the Hours field will not appear.
You may also have situations when the service information you are tracking is not related to hours. For example, if you have Service Measures for tracking absences or donations, the hour information will not apply. In this case, you can enter zero (0:00) for the hours and you'll still be able to put in information for the Service Measures. Please note! If a volunteer did not serve any hours, you will need to enter zero for the Hours field. The system will skip the entry if the Hours field is left blank.
-
Let me enter the hours on each entry

Select this option if all of the volunteers did not serve the same amount of time. You'll be able to go through the list and put in different hour totals for different entries and volunteers.
-
Post this many hours XXX for each volunteer

Select this option if the volunteers you are posting service for all served the same number of hours.
If your account is set to collect a start and stop time for service tracking, and you put in times in the Date & time fields section of the Post page, this option will automatically be selected. The Hours field will be filled in based on the times entered and disabled like it appears in the image above. If you want to change the number of hours entered in the Hours field, you will need to remove the times entered or select the option to enter the times on each entry.
After you select this option, you will need to put in the hours to post if the hours are not filled in automatically by entering times. The hour entry can be zero (0:00) or any number of hours over zero up to 9,999. For group records, enter the number of hours given by each participant. You'll enter the number of volunteers who served when you post the service and this will determine the total hours given to the group. You can learn more about how group hours are calculated in the Hours and Group Records section below.
Please note! If a volunteer did not serve any hours, you will need to enter zero for the Hours field. The system will skip the entry if the Hours field is left blank.
Service measure fields
Your account's Administrator(s) may have Service Measures set up to collect additional information about volunteer service. Some common uses for Service Measures are to collect information on how many visits or shifts the volunteer serves, the number of miles a volunteer drives, the number of tours a volunteer gives in a shift, or the number of times they were absent. The Post page lists every Service Measure in your account so you may see up to 14 additional fields on the page. If no Service Measures have been added in your account, you will not see this option.
The screenshots were taken for a Service Measure called Visits.
-
I do not want to post any (Service Measure) information

Select this option if you do not want to add any service information for the Service Measure. Because Service Measures only accept numbers as input, selecting this option will put a zero in the Service Measure's field for the service entry created by posting service.
-
Let me enter (Service Measure) on each entry

Select this option if you want to enter a different number for the Service Measure for each volunteer listed. This gives you the ability to add each individual's information when posting service
-
Post XXX (Service Measure) on every entry

Select this option if the same number should be used for every volunteer listed. There will not be a way to change the number when posting the service so only select this option if the same number should be entered for every volunteer on the list.
Default Values and Selections
You may see certain options selected already, or values already entered, for your Service Measures. There are two reasons this happens.
-
As a convenience, the system remembers your last choice and entries when you post service. For example, if you have a Service Measure called Mileage, and you select Post XXX Mileage on every entry. If you entered 10.5 the last time you posted service on the Post page, you will see the same option selected with the same value entered the next time you use the Post page. If this is what you need to enter this time, just proceed without changing anything. Or, just make the necessary changes if you need to make different selections or entries.
-
You may also see a number entered for a Service Measure already even if the Post XXX (Service Measure) on every entry option is not selected. This occurs if a default value was set when the Service Measure was created. If the default value is not what you need to enter, simply delete it and put in the new number.
How many entries?

This is the last option on the Post page so if your account has more than a couple of the 14 possible Service measure fields, you will have to scroll down to see this option. If you are posting hours for volunteers scheduled on a certain date (or date range), the How many entries? option is not available.
The How many entries? setting allows you to select to post up to 12 different service entries on each of the volunteer records listed. Your selections for the other Post page options will be used for every one of the service entries you choose to post. For example, if you selected that all the entries are for the same Assignment in the Assignment field, all the entries will have that Assignment prefilled.
You will not need to enter information on each of the possible service entry boxes. For example, if you select to make 8 entries, and a volunteer only has 3, you can leave the extra 5 entries blank and only 3 entries will be made for the volunteer.
This option works great if you need to add past service information to volunteer records that are already in your database. You can quickly make a lump sum entry for each of the 12 months in a year so your monthly hour reports are accurate. Or, if monthly report accuracy isn't important, but yearly service report information is, you could make a lump sum entry for up to 12 different calendar years all at once.
Post Service
After you click the Start posting button on the page where you selected the service information, you'll be taken to the page(s) to finalize the postings. Any items selected as applying to all of the service entries will be listed in a box at the top of the page. Here's an example of what you might see if you are posting service for some tagged volunteers who all attended an Orientation Assignment on the same date and times.

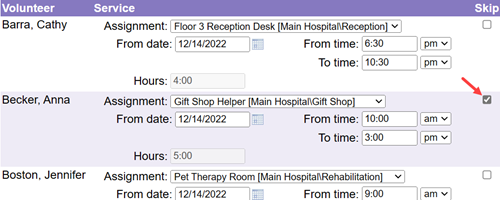
Underneath will be a list of the volunteers you chose to have listed. If you selected to enter items, you'll see options to make those selections.
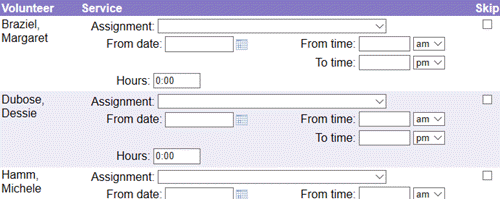
Just go down the list and fill in the information needed for each volunteer's service. Service is handled differently for group records. If you have a question about posting service for a group, see the Hours and Group Records section below.
If you do not want to post service to one of the volunteers on the list, check the box in the Skip column to the right of the listing. This is especially handy if you're posting hours for volunteers scheduled on a certain date and someone did not show up for their shift.
When you get to the bottom of the page, you'll see how many pages of volunteers are waiting to have service posted, as well as which page you're currently on. You'll also see a count for the volunteers listed on the current page and the overall count for how many volunteers will have service posted. Your account's Administrator(s) controls how many volunteers (1 - 25) are listed on each page by using the settings on the Service Posting page.
There are buttons below the page and count information to control what you'd like to do next.

- Click the Post this page button if you'd like to post service to the volunteers listed on the current page and continue to the next page.
- Click the Post, then quit button if you'd like to post service to the volunteers listed on the current page, but not the volunteers listed on the other pages.
- Click the Skip this page button if you do not want to post service to any volunteers on the current page, but want to go to the next page of volunteers listed.
Hours and Group Records
If you're posting hours for group records, it's important to understand how the system calculates their hours. This section explains how the Post page determines a group's hours. If you are posting service for a group from the Service tab of the group's record, see the Posting Service for Groups section of the Tracking Groups help topic for information.
On the Post page, there are two ways to have the system automatically multiply the number of volunteers who served, by the number of hours each volunteer gave, to get the total hours for the group.
-
Same Hours for Each Volunteer
The first is when you set the Hours field to give the same hours to each volunteer while choosing how to post service information.
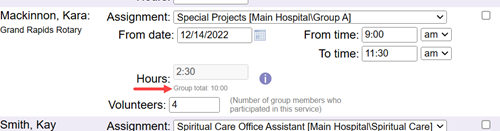
Here's an example of how this works. If you select to post 4:00 hours for each volunteer, and then enter 4 in the Volunteers field when posting service, the system will give the group 16 hours (4 x 4) for the service entry. This is true regardless of whether your account's Administrator(s) has the account set to collect only hours, or hours along with From and To times.
You will not see the group's total hours when you're posting service, but the service entries created when you finish posting will include the total hours for the group.
-
Posting Includes From and To Times
The second is if your account has From and To times available for posting service. In this case, as long as times are entered in the From time and To time fields, the system will multiply the hours for each volunteer by the number of volunteers to get the total hours for the group. This is true whether the times are entered while choosing how to post the service information or while actually posting the service information.
If you selected to enter the date and time on each entry, a Group total will show below the Hours field after you enter the number of volunteers to let you know how many total hours the group will receive.
When posting service from the schedule, there is an additional consideration because there are separate schedule entries for each opening slot a volunteer from the group is filling. The screenshot below shows a group that is filling three spots on the schedule.
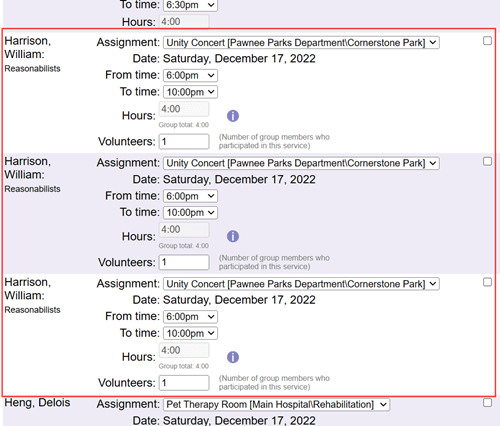
The operator posting service could leave the separate schedule entries and the system will make separate service entries for each one. So in the example above, the group record would have three service entries for 3:30 hours for a total of 10:30 hours. While this gives the group full credit for the hours they served, having multiple service entries for the same day can be confusing. If you only want one service entry, the recommended way to handle this is to tally up the number of times the group appears on the schedule. Then, you can check the Skip box by all but one of the group's entries. Update the remaining entry's Volunteers field with the number of volunteers who were scheduled and the system will calculate the group's total hours.
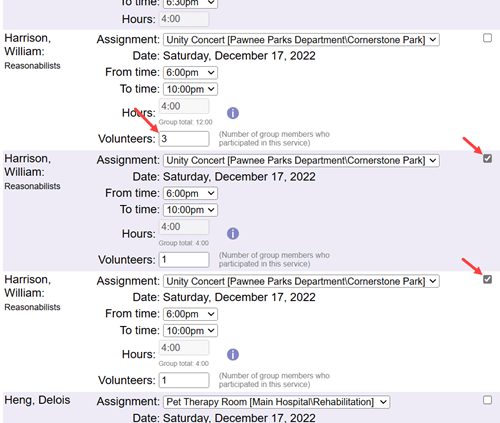
In the example above, you'd enter 3 in the Volunteers field because the group was filling three spots on the schedule. When service is posted, the system will multiply the number of hours (3:30) by the number of volunteers (3) so the service entry will be for 10:30 hours.
Finish Posting
When you are finished posting service, you'll get a notice that the batch is complete and the system will make service entries on the Service tab of each volunteer record included in the batch. The service information you posted will also be available on reports such as the Service Details and Service Summary reports.
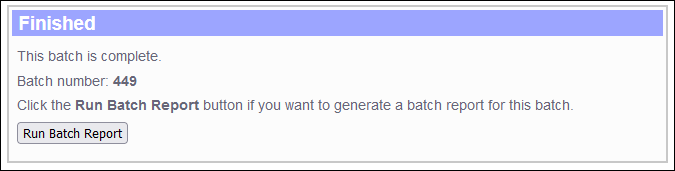
The last page you see will include a batch number that can be noted on written time sheets if those were used for posting the service. The batch number can also be used to delete all of the service entries posted in the batch at once if you find a mistake was made. See the Delete a Batch of Service help topic to learn how to do this. If only a few of the entries posted in the batch are incorrect, you can delete or edit them by following the steps in the Edit Service Entries help topic.
Click the Run Batch Report button if you'd like to generate a report listing all of the service you just posted. You can also run a Batch report later by following the steps in the Batch Report Overview help topic. You can run a Batch report based on the batch number, and the help topic also shows how to get a list of all batches posted on a certain date if you're unsure of the number.
Related Help
- Service Measure Overview
- Audit Entries from VicNet or VicTouch
- Batch Report Overview
- Enter Service From Paper Time Sheets
- Methods of Posting Service
- Enter Past Hours
- Assignment Roles
- Post Hours From Schedule
- Track Volunteer Absences
- Delete a Batch of Service
- Find Volunteers Who Did Not Serve as Scheduled
- Service Tab Overview
- Post Page Settings
- Batch Report (stock)
- Service Details Report Overview
- Service Summary Report Overview