Open Self-Scheduling In Waves
There may be times when you want to open up self-scheduling in waves for volunteers in the VicNet portal. For example, a performing arts center may want volunteers who have been with them the longest to get first crack at the ushering opportunities for sought after shows. Or, an annual art festival may want volunteers who have returned year after year to be able to schedule for prized venues first. This article explains how you can accomplish this in Volgistics.
If you need help with how to create the actual schedule for an assignment to show the dates, times, and number of volunteers needed, see Add Schedule Openings.
If you need help with enabling self-scheduling, see Self-Scheduling Settings for VicNet and VicTouch.
Make a Flag for Each Wave
Here are the steps to add new Flags:
- Choose Setup on the menu.
- Expand Field Options.
- Select Core Tab.
- Click Flags.
- Enter your first Flag in the Add a new item field, and then click the Save button to the right of the field. The Flag's name can simply be a wave number (Wave One, Wave Two, etc.), or it can be what the waves will be based on (1 year of service, 2 years of service, etc.)
- Repeat step 5 until all your waves are entered.
- Click the Save button at the bottom of the page to exit.
Make a Set to Identify the Volunteers in Each Wave
A Set is a way to query your volunteer records to find the volunteers with something in common. We'll give an example of how to make a Set to find the volunteers based on their Years of Service Settings. There are a variety of other Set rules you can use to base your waves on as well.
Here are the steps to create a Set to find the volunteers with at least 1 year of service, but less than 2 years of service:
- Select Sets from the menu.
- Click the Create a new set button at the top.
- Enter a name for your Set in the What would you like to call this set? field.
- Select Their years of service from the dropdown list.
- Click the Go button.
- Configure your Set rule to be Their Years of service are Between 1 years 0 months and 1 years 11 months.
- Click the Finished button in the lower right corner.
- Repeat the steps to make a Set for each wave. Once you have a Set for each of the waves, continue to the next section.
Add the Flag for Each Wave
In most cases, organizations want the volunteers in each wave to be able to continue to self-schedule after the next wave opens up. For example, if you allow the first wave to sign-up for a week, and then you allow the next wave to start scheduling, you will still want the first wave to be able to sign-up while the second wave is self-scheduling. In this scenario, the volunteers in all but the last wave will have multiple Flags on their records. Meaning a volunteer in the first wave will have all the Flags for all the waves, a volunteer in the second wave will have all the Flags except for the first wave Flag, a volunteer in the third wave will have all the Flags except the first and second wave Flags, and so on. Then the last wave will only have one Flag--the one for the last wave. The Tags feature works great for this because Tags are cumulative unless they are cleared between jobs.
There may be times organizations only want one group to be able to access the Schedule at a time. In this case, the Tags feature will also work but the Tags will need to be cleared before moving on to the next wave.
We included directions for each scenario. Be sure to follow the instructions for whichever scenario meets your needs the best.
- Select Tags from the menu and click the Clear all tags button.
- Select Volunteers from the menu.
- Select the Set for the first wave from the Tags dropdown. Be sure the other filters are set on Any.
- Click the All link to the right of the row of letters.
- Click the Tag button.
- Select Tags from the menu.
- Select the Flag for the wave you are adding the Flag for from the Add this Flag to all of the tagged volunteer records dropdown then click the Go button.
If you want volunteers in previous waves to be able to continue to self-schedule when a new wave opens, you can create another Set. If you need the second scenario where only one wave will be able to self-schedule at a time, go back to Clear All Tags and follow the steps again. In either case, you will keep repeating the steps until you've added Flags for each of the waves.
Set the Rules Tab to Control Which Wave Can Self-Schedule
When you are ready for the first wave to start self-scheduling, you will need to configure the Rules tab of the assignments to allow this. To do this:
- Select Assignments from the menu.
- Click on an assignment you want the first wave to start self-scheduling for.
- Go to the Rules tab.
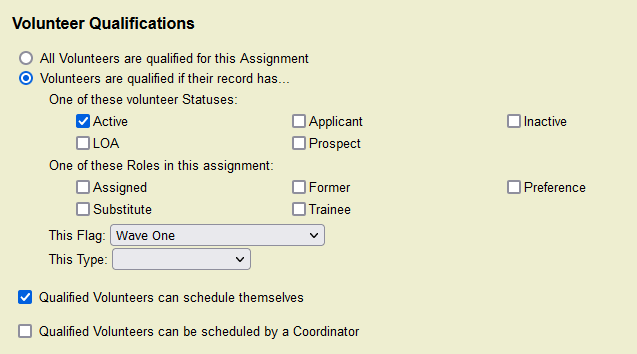
- Under Volunteer Qualifications, select Volunteers are qualified if their record has....
- Select at least one Status under One of these volunteer Statuses. Leave the Role settings (One of these Roles in this assignment) blank, and select the Flag for your first wave from the Flag dropdown list.
-
Check Qualified Volunteers can schedule themselves.
Here is an example of a Rules tab setup so only volunteers with the Active Status and the Wave One Flag can self-schedule:
-
Click the Save button.
- Make the same changes on any other assignments you want to open the first wave of self-scheduling for.
When you are ready to open the schedule for the next wave, follow the same steps except select the Flag for the second wave in step 5.