Getting Started with Self-Scheduling
Volunteer self-scheduling is a handy tool to make scheduling your volunteers easier and to keep your volunteers engaged with your program. Once you have self-scheduling up and running, all you need to do is create shifts in your schedule and volunteers can schedule themselves for the shifts they'd like to fill. You don't need to find and manually schedule volunteers to fill shifts yourself. With a little bit of set up, you can make managing your schedules a breeze.
This help topic walks through the process of enabling, configuring, and using the self-scheduling features in Volgistics.
Setup
Self-scheduling is not enabled by default, so let's start by discussing what you'll need, how to enable it, and how to set it up.
What You Need
In order for volunteers to schedule themselves, they need a way to interact with the Volgistics system. That is done through either the VicNet portal or the VicTouch time clock. VicNet is designed to be accessed from volunteers' own devices, while VicTouch is typically set up on-site at your locations for volunteers to sign-in and sign-out for their service. For this reason, VicNet is usually the better option for using this feature. That way volunteers can schedule themselves for shifts even when they aren't at your facility.
If your account's service level doesn't already include VicNet or VicTouch, you should add at least one before you make self-scheduling available to your volunteers. The Add VicNet, VicTouch, or VicDocs help topic explains how to check which modules are already included in your account's service level and how to add them if necessary. Note that you don't need both modules to use self-scheduling. You can use one or the other if you don't need the functionality of both.
You may also find the Getting Started with VicNet and Getting Started with VicTouch help topics useful if you have not set these up or made them available to your volunteers yet.
Enable Self-Scheduling
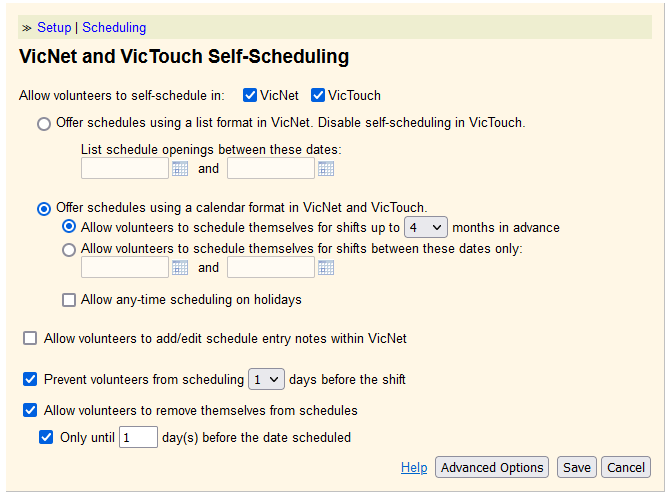
Now let's enable the self-scheduling feature. This is done under the Scheduling settings on the Setup page of your account. If you do not have access to Setup, you should contact a System Operator with Administrator permissions to assist you with this.
- Choose Setup from the menu.
- Expand Scheduling.
- Click Self-Scheduling.
- Next to Allow volunteers to self-schedule in, check the box for the module you'd like volunteers to use to self-schedule.
-
Choose the schedule format that volunteers will use to schedule themselves and customize the settings to fit your scheduling needs. You can find more detailed information about each of the options on this page in the Self-Scheduling Settings for VicNet and VicTouch help topic. But here is a simple breakdown of the things you should consider and configure:
- The Offer schedules using a calendar format... option is more popular because it can be used in both VicNet and VicTouch and may be in a more familiar layout for volunteers. The Offer schedules using a list format... is limited to VicNet, but it works well for organizations that are scheduling volunteers for an event or for shifts that take place in a very specific date range.
- Choose the date range that volunteers should be able to schedule for.
- Choose whether volunteers can enter notes when they sign-up for a shift.
- You can optionally prevent volunteers from signing-up for shifts that are less than a set number of days away (so you don't have volunteers signing-up last minute).
- You can optionally allow volunteers to remove themselves from shifts and prevent volunteers from removing themselves a set number of days before their shifts (so they don't remove themselves last-minute).
-
Click Save when you're finished.
Missing Shifts
If you allow volunteers to remove themselves from the schedule but no shift (or unfilled opening slot) remains after they remove themselves, it means they were on the schedule without filling an opening slot. The Figure (or Figures) Without a Frame section of the Schedule Icons help topic explains how to quickly tell if a volunteer is scheduled in an opening slot and also lists reasons this can happen.
Configure Assignment Scheduling Rules
While some volunteer jobs may be appropriate for any volunteer to schedule for, some of your volunteer tasks may require more qualified or trained volunteers. For this reason, each of your Assignments has a Rules tab where you can configure which volunteers are qualified to sign-up. To set up Assignment scheduling Rules:
- Choose Assignments from the menu.
- Click the link for an Assignment you'd like to configure.
- Go to the Rules tab.
-
In the Volunteer Qualifications section, indicate which volunteers should be allowed to schedule for this Assignment. You can choose to have all volunteers count as qualified to schedule for this Assignment.
Or you can limit scheduling to only volunteers that satisfy particular criteria. You can base these criteria on Status, Role in the Assignment, Flag, and/or Type. At least one Status must be selected for any volunteers to meet these criteria. Please note that you do not need to use ALL of these options. You should only select the minimum number of options necessary to limit who can schedule.
For example, if you want to limit scheduling to only volunteers that have been specifically assigned to the Assignment, you can check the Active Status option and the Assigned Role option. You don't need to also select a particular Type or Flag.
-
Check Qualified Volunteers can schedule themselves.
-
In the Allow scheduling for... options, choose whether volunteers should only be able to fill openings or if they can schedule for any times that they want on particular days of the week. Typically, limiting volunteers to scheduling in openings is the best option.

-
Click Save.
Repeat these steps for each Assignment you want to configure for self-scheduling. If you'd like more details about these settings, you can learn more in the Schedule Qualifications and Rules help topic.
Set a Default for the Rules Tab
If most of your Assignments will have the same settings on the Rules tab, you can save a default for new Assignments. This will not impact your current Assignments, but each time you add a new Assignment the Rules tab will use the default settings. That way you'll only need to make adjustments if something should be different for the Assignment.
To set the default, configure your settings and then scroll to the bottom and click the Make this the default setup button.
Using and Managing Self-Scheduling
Now that you have enabled self-scheduling and have it ready to go, volunteers can start signing-up. To do that, volunteers will sign-in to VicNet or VicTouch and access the Schedule. From there, they can see dates with available shifts, select them to see more details about each shift, and sign-up. You can learn more about how volunteers interact with self-scheduling in VicNet and VicTouch in the following Volunteer Guides:
Self-Scheduling Alerts
When a volunteer signs-up for a shift, they'll appear in your schedule right away, so you can always count on your schedule in Volgistics being up-to-date with the latest changes. However, you may also want to be notified when volunteers schedule themselves in or remove themselves from the schedule. In addition to letting you configure volunteer qualifications, the Rules tab mentioned above has options for setting up self-scheduling alerts. These alerts can be sent to a particular System Operator via the In Box tab of the Mailbox in your account and/or to the Coordinators assigned to that Assignment. To configure these alerts:
- Choose Assignments from the menu.
- Click the link for an Assignment you'd like to configure.
- Go to the Rules tab.
- Under Self-scheduling alerts, you can set up alerts for when volunteers add themselves to the Assignment's schedule and/or remove themselves from the Assignment's schedule. Check the boxes for the kinds of alerts you want to send and for the individuals you want to receive those alerts. You can learn more about these settings in the Self-Scheduling Alerts section of the Schedule Qualifications and Rules help topic.
- Click Save.
Schedule Confirmations and Reminders
Volgistics has features to increase the likelihood that volunteers will serve their self-scheduled shift. They can automatically receive confirmation email or text messages with the details of the shift at the time they select it. See Automatic Schedule Confirmation Messages for information about setting up this feature.
They can also have a reminder of their upcoming shift sent automatically a certain number of days before their shift or on a certain day each month. For information on setting up this feature, see Schedule Reminder Message Overview.
Related Help
- Schedule Overview
- Self-Scheduling Settings for VicNet and VicTouch
- Schedule Qualifications and Rules
- Schedule Page Set Up for VicNet
- Schedule Page Set Up for VicTouch
- Add Schedule Openings
- Edit a Schedule Opening
- Delete a Schedule Opening
- Scheduling Volunteers
- Edit a Schedule Entry or Remove a Scheduled Volunteer
- Open Self-Scheduling In Waves
- Schedule Reminder Message Overview
- Automatic Schedule Confirmation Messages