Filter Reports for Specific Checklist Dates
When you create or modify a custom report, or run the Volunteer date history (stock) report, you can choose to limit the report to just the date records for specific Checklist items. This help topic explains how to do this.
Volunteer Date History (stock)
Here's how you can limit the stock Volunteer Date History report to only include dates for certain Checklist items.
- Select Reports from the menu.
- Expand Volunteer list.
- Select Volunteer date history (stock). Custom reports appear above stock reports so you may need to scroll down to see the stock reports.
- Click the Run It button.
- Select whether you want the report in Microsoft Excel or PDF format, optionally select which volunteers you'd like to include, and then scroll down to the Date Records section at the bottom.
-
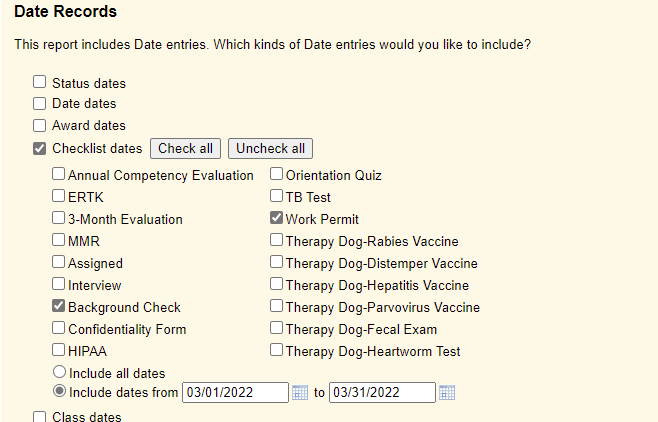
In the Date Records section, check the box by Checklist dates and then select the Checklist items where you want date information. If you want all Checklist dates included, click the Check all button. If you only want dates that fall in a certain range, select the Include dates from option and put in the date range you'd like.
-
Click the Run Now button.
The system will generate the report file and place it on the In Box tab of your Volgistics Mailbox.
Custom Date Report
You can also include date records for specific Checklist items on custom report templates you create as long as the right fields are included and the report is the right style. Report styles that include Checklist date information include:
- Awards Reports
- Excel Spreadsheet Reports
- Labels Reports
- Volunteer List Reports
- Volunteer Profile Reports
Here's how to make a custom report template that only includes dates for specific Checklist items:
- Select Reports from the menu.
- Expand one of the report styles listed above.
- Click the Create a new (report style) report link, or you can select one of the stock reports that is close to what you'd like and click the Clone It button.
-
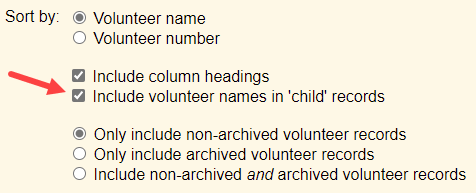
Select the options you'd like on the Options tab. If you're using an Excel spreadsheet style report, be sure the box by Include volunteer names in 'child' records option is checked so the name information is included on the Dates worksheet.
-
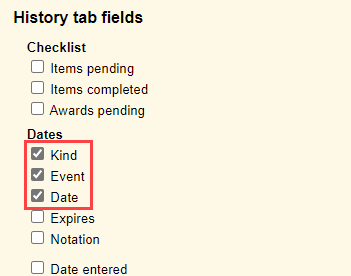
Select the fields you'd like on the Fields tab. You'll need a name field (of course) and then scroll down to the History tab fields heading. Check the Kind, Event and Date fields. Make any other field selections you'd like before moving to the next tab.
-
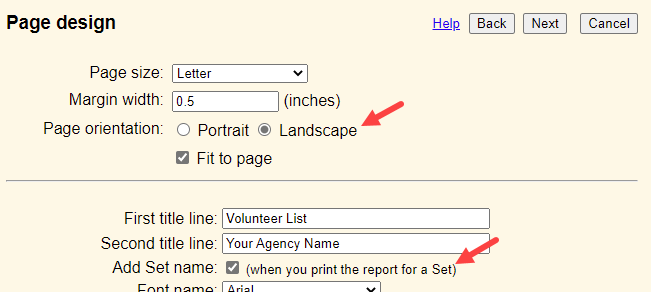
If you want the report in PDF format, you can set some options on the Page Design tab. One setting you may want to select is to change the orientation to Landscape if the number of fields you selected in step 4 might cause the columns to be continued on other pages in Portrait orientation. You can also choose to add the name of the Set to the report's title if you will use a Set to limit the report's results to certain volunteers.
-
On the Include tab, select whether you want the report in Microsoft Excel or PDF format, optionally select which volunteers you'd like to include, and then scroll down to the Date Records section at the bottom. Check the box by Checklist dates and then select the Checklist items where you want date information. If you want all Checklist dates included, click the Check all button. If you only want dates that fall in a certain range, select the Include dates from option and put in the date range you'd like.
-
Once you have the report set up the way you'd like, go to the Save tab to save the template. We recommend giving the report a name that will easily identify the purpose of the template so you don't need to create a new template if you need similar information again. Click the Save button if you want to save your settings to use later. Click the Save and Run button if you want to save your settings and produce a report file now.
Tip!
Over time the list of custom report templates in an account can become cluttered if the account holders are not diligent about deleting custom reports that are no longer needed or were only used once. One way to help with this is to start the report's title with the initials of the System Operator who created the report. Or, if the account has Site Level Access enabled the name of the Site the report is for. This will group the operator's or Site's custom reports together alphabetically, plus make it easy to determine who uses the report template.
Related Help
- Search for Pending Checklist Items
- Mailbox In Box Tab
- Search Based on Checklist Dates
- Delete Report Templates
- Stock Report Overview
- Excel Spreadsheet Report File Structure
- Limit a Report to the Volunteers in a Set
- Create Custom Reports
- Checklist Overview
- Volunteer List Report - Volunteer Date History (stock)
- Volunteer List Report Overview