Create an Invoice
How can I get an invoice for the service fee?
Volgistics does not automatically send Order-Invoices to account holders because the organization controls the service level and how many months they'd like to pre-pay. When an invoice is needed, account holders can create one in the secure Volgistics Store.
We send alerts to the account's billing contact at regular intervals starting 90 days from the account's paid through date to remind them to make an invoice to get the billing process started. Starting ten days before the account's paid through date, we also send the alerts to the account's Administrator(s). If you have a large organization that uses a central accounts payable department, or you must use a reseller, the Billing Tips for Large Organizations help topic has useful information for making sure your payments are made on time.
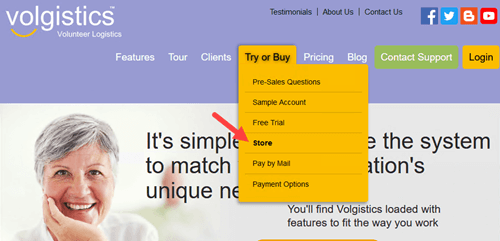
The first step to get an Order-Invoice is to log in to the Volgistics Store like this:
- Visit www.volgistics.com.
-
Hover over Try or Buy in the menu at the top of the page and select Store.

-
Enter your Volgistics account number and your account credentials. Your account credentials may be either a Volgistics Administrator's login name and password, or your account's accounting access code.
- If the account has two-factor authentication enabled, enter the single-use code and then click the Submit button. This is not necessary if two-factor authentication is not enabled.
Select a Situation
Once you're logged in to the Store, the steps to make an invoice vary depending on the account's current state. Select the situation that applies to your account for the steps to make an invoice.
- Trial Account Converting to Paid Account
- Prepaid Account Without an Invoice
- Prepaid Account With an Invoice
- Automatic Payment Account Switching to Prepaid
- Dormant Account Reactivating
- Create a PDF File or Print an Invoice
You may also find these resources useful.
- Invoice Has Incorrect Name or Address
- Service Levels and Invoices
- Create a PDF File or Print an Invoice
Please note that all prices are in United States dollars and payments must be made in U.S. funds.
Trial Account Converting to Paid Account
If you have a trial account and you're ready to convert it to a paid account, follow these steps:
- Select the service level you want for your paid account.
- Choose the Pre-payment (check or credit card) option.
- Pick the number of months you want the invoice to cover
- Review the billing contact's email address and update it if necessary.
- Click the Continue button.
- If the VicDocs document storage module was not included in the service level you selected in step 1, you'll see a dialog box giving the option to have the documents you uploaded during the trial period deleted or sent to your Volgistics In Box. Select the option you'd like and then click the OK button.
An Order-Invoice will be created with the options you selected. See the Create a PDF File or Print an Invoice section below if you need help saving or printing the invoice. You'll be able to activate your trial account immediately by paying the invoice by credit card. If you send the payment, the trial account will be activated when the payment is received.
Prepaid Account Without an Invoice
If you're a prepaid account and you do not see an Order-Invoice after you log in to the Store, follow these steps:
- Click the Create an invoice and extend your service link. This link will not show if your account is prepaid more than a year out.
- Select the option you'd like under I want to create an invoice...
- Leave the setting on For the same service level if you want the invoice to use your account's current service level.
-
Select For a different service level and I will adjust my service level later if you want to make an invoice for a different service level. This will allow you to select a new service level for the invoice. (Please note that this does not change your account's actual service level! See the Service Levels and Invoices callout box below for information about invoices that have a service level different than the account's.)
-
Select the number of months you want to prepay with the invoice. You can have the invoice cover anywhere from 1 to 18 months.
- Click the Continue button.
An Order-Invoice will be created with the options you selected. You can add a purchase order if needed for internal processing. You can pay the invoice immediately with a credit card, or you can send the payment and the account will be extended when the check is received.
See the Create a PDF File or Print an Invoice section below if you need help saving or printing the invoice.
Invoice Has Incorrect Name or Address
The system uses the name and address recorded for the Volgistics account when it creates the Order-Invoice. If your invoice has an error, an Administrator for the account will need to log in to the account and update the information. The Update Organization's Name help topic explains how to do this.
After the account is updated, cancel the incorrect invoice as shown in the Prepaid Account With an Invoice section then create a new invoice with the updated information.
Prepaid Account With an Invoice
If you see an Order-Invoice when you login to the Store, review it to make sure it's accurate. Just pay the invoice by credit card if it's all set or send in the payment. See the Create a PDF File or Print an Invoice section below if you need help saving or printing the invoice.
If the Order-Invoice needs to be changed, click the Cancel Order-Invoice link. Then, follow the steps in the Prepaid Account Without an Invoice section above to create a new Order-Invoice. The old invoice information is still available to the Volgistics accounting team so if a payment is in progress for the invoice it can still be applied even if the invoice is canceled.
Automatic Payment Account Switching to Prepaid
If your account currently has the Automatic payment method selected as the payment option, follow these steps to switch to prepaying with an Order-Invoice.
- Click the Switch payment method to Pre-payment link.
-
The system will calculate the paid through date based on the amount of the unused service fees left for the billing cycle. Your prepayment will need to be made before this date or your account will be placed on Hold for up to 30 days, which will restrict System Operator access.
-
Click the Cancel button if your organization is not able to operate with the Hold restrictions. Your account will remain on the Automatic payment method and you can switch to Pre-payment immediately after the next billing date so you have more time for the payment to be made.
-
Go to step 3 if you will pay the Order-Invoice by credit card or if the payment you send will arrive before the paid through date. (You may also wish to proceed if the payment will take less than 30 days to be delivered and your organization can operate with the Hold restrictions while the check is en route.)
-
Select the service level you'd like for the invoice. The account's current service level is selected by default. If you select a different service level, see the Service Levels and Invoices callout box below for information about invoices that have a service level different than the account's.
- Select the number of months you want to prepay with the invoice. You can have the invoice cover anywhere from 1 to 18 months.
- Click the Continue button.
An Order-Invoice will be created with the options you selected. You can add a purchase order if needed for internal processing. You can pay the invoice immediately with a credit card, or you can send the payment and the account will be extended when the check is received. See the Create a PDF File or Print an Invoice section below if you need help saving or printing the invoice.
Dormant Account Reactivating
Volgistics includes a feature that allows account holders to make accounts dormant for up to a year. Here are the steps to create an invoice if your account is currently in the Hold period while dormant.
- Click the Create an invoice link.
- Select the number of months (1 to 18) that you'd like the invoice to cover. Accounts are not allowed to change their service level while they are dormant so you will not be able to choose a service level for your invoice that is different than the account's current service level. If you need to make an invoice with a service level different than the account's current service level, click the Reactivate account previously placed on hold link and then follow the steps in one of the sections above.
- A dialog will appear letting you know you'll need to reactivate the account to make the payment by credit card or e-check. Click the OK button on the dialog to see the Order-Invoice. See the Create a PDF File or Print an Invoice section below if you need help saving or printing the invoice.
If you'll be paying the Order-Invoice by credit card or e-check, log in to the Store when you're ready to make the payment and click the Reactivate account previously placed on hold link. You'll be taken to a page with updated information about the account's status. Return to the Store Options page and click the Pay Order-Invoice link to arrange for electronic payment.
If you send the payment for the invoice, the account will automatically be reactivated when the check is applied to the account. Your account's billing contact will automatically receive a Transaction Confirmation email message when the payment is applied.
Service Levels and Invoices
Your account's service level controls how many volunteer records you can track, how many users can access your account, and which optional modules are available. In contrast, the Order-Invoice is simply a document created as part of the pre-payment method to pay the service fee. By design, the invoice can have different levels selected than the account's current service level. This is necessary to allow accounts to plan for future changes.
Paying an invoice with a service level different than the service level currently in place for the account will not change the actual service level of the account. This will need to be done separately as shown in the Change Account's Service Level help topic.
Create a PDF File or Print an Invoice
Once you have your Order-Invoice, you may need to make a PDF copy of it to save, or print out a paper copy. This section explains how to do this. The examples show the options for the Google Chrome web browser. If you are using a different web browser, the location and names of the items may be different. However, the basic steps will be the same.
-
To start, click the Printable view link that appears to the right of the invoice number.

-
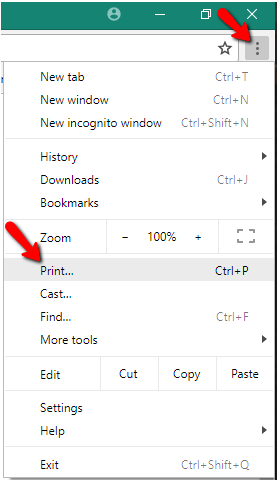
Select your web browser's menu and then select Print.

-
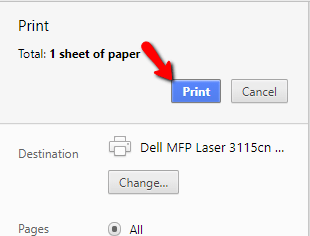
If you want to print a paper copy of the Order-Invoice, make sure your printer is selected and then click the Print button. If you want to save the Order-Invoice as a PDF file, skip to step 4.

-
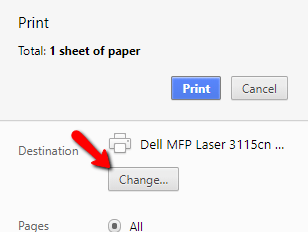
If you want to save a PDF file for the Order-Invoice, click the Change button in the printer selection section.

Then, select an option that will save the page as a PDF. Most web browsers have a built-in option for this.

Now, click the Save button that replaces the Print button shown in step 3. You can name your file and choose where to save it.
How can I get an invoice for the service fee?
Related Help
- Change Billing Contact Email Address
- Make Account Dormant
- Hold Period
- Archived Versus Non-Archived Records
- Price List
- Add VicNet, VicTouch, or VicDocs
- Service Levels
- Get a Receipt
- Verify Payment Delivery
- Accounting Access Code
- Change Account's Service Level
- Cancel Account
- Activate a Trial Account
- Payment Options
- Pay By Mail
- Update Organization's Name
- Billing Tips for Large Organizations
- Add a Purchase Order to an Invoice