Send Text Messages
How to Send a Text Message
If your account has text messaging enabled, you can compose custom text messages to your volunteers and/or Coordinators. This help topic explains how to do this.
The system can also send text messages automatically to do things such as remind volunteers about scheduled shifts and upcoming Checklist expiration dates.
In order to receive messages by text, the volunteers and Coordinators must opt-in to text messaging first.
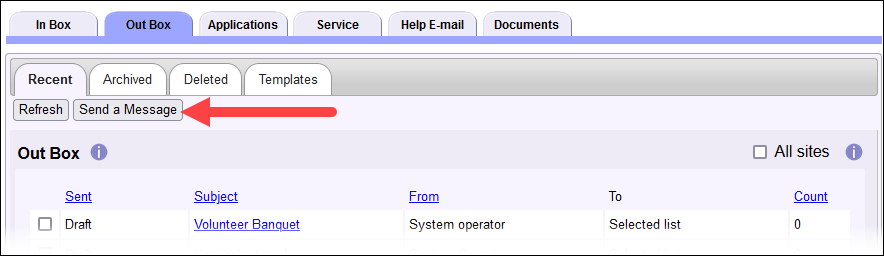
You can start a custom text message from the Volgistics Mailbox. If you are not already on the New Message window, you can get there using these steps:
- Select Mailbox from the menu.
- Click the Out Box tab.
-
Click the Send a Message button.
Tip!
You can also start messages from many other pages in the system. Just look for a Messages icon toward the top of whatever page you're on.
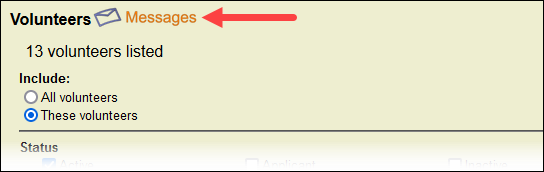
Click the icon and you'll be taken to the mailbox so you can compose your message and send it out. The message recipients will be automatically limited to just the volunteers who were listed on the page.
Here's how to use the settings on the New Message page to send your text message. If you send your message by another method in addition to text, you will see options that are not covered in this help topic. In this case, see Send an Email Message Overview or Send a Message to VicNet or VicTouch for information about the other options.
Message Composition Page
Select How You'd Like to Send Your Message
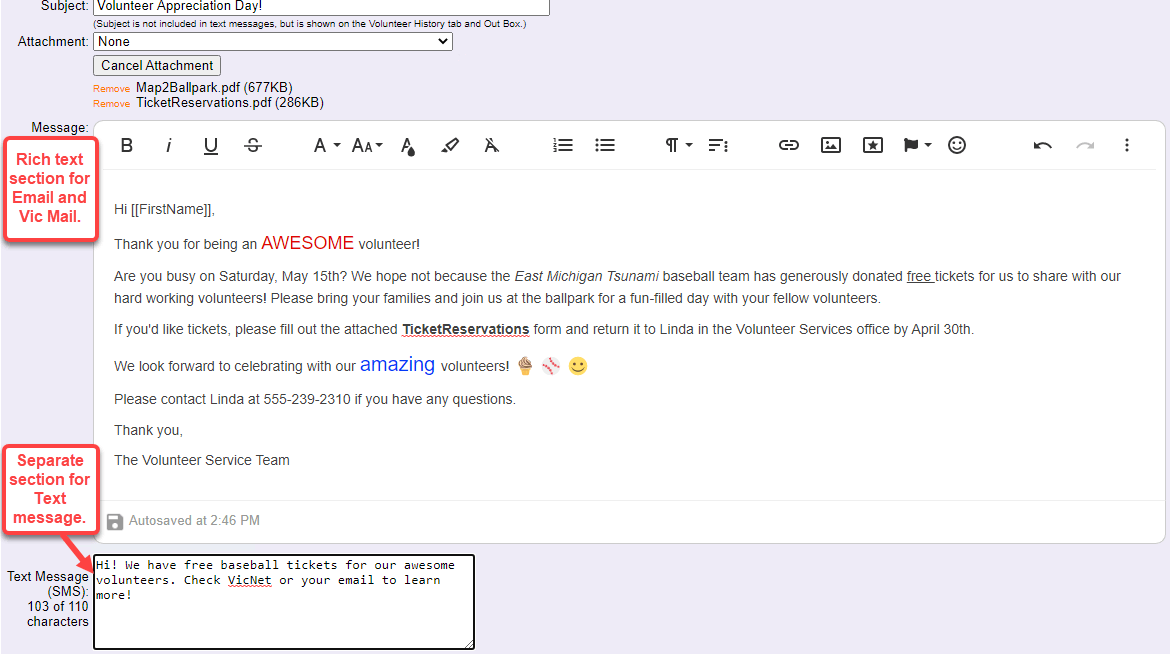
Check the Text Message checkbox to send this message by text/SMS. When this option is checked, it limits the message field to 110 characters. If your account does not have text messaging enabled, you will not see this option.

You can optionally check the Email and/or VIC mail boxes if you want volunteers to receive the message by more than one method.
When the Email option is checked, it enables the rich text formatting options so you can use features such as different fonts, text colors, pictures and tables in your messages. You may also find Send an Email Overview useful.
When the VIC mail checkbox is checked, the volunteers will receive the message when they visit VicNet or VicTouch. These messages can also include rich text formatting.
Attachments
If the Email and/or VIC mail options are selected, it will also allow you to add attachments to your message. However, attachments cannot be sent by text message, so volunteers will not receive these attachments if they receive the message by text. The attachments will only be delivered by email and/or VicMail.
Choose Who Will Receive Your Message
Use the To section to specify which volunteers and/or Coordinators this message should be sent to. If you clicked the Messages icon to get to the New Message page, this section will already be filled in.
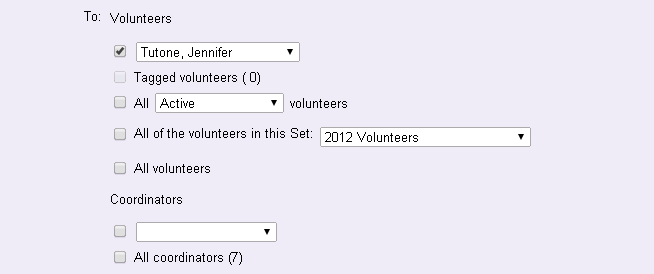
- To send your message to an individual volunteer, check the box at the top and select the volunteer's name from the dropdown list.
- To send your message to all of the tagged volunteers, check the Tagged volunteers checkbox.
- To send your message to all volunteers with a specific Status (such as all Active volunteers), check the box for this and select the Status of the volunteers you want to send the message to.
- Check All of the volunteers in this Set and then choose a Set if you want to send your message to all of the volunteers included in the Set.
- To send your message to every volunteer in your database no matter what their Status is, check the All volunteers checkbox. Please note that this will not send the message to archived volunteer records because archived volunteers cannot receive messages.
- To send your message to an individual Coordinator, check the box for this and select the Coordinator's name from the Coordinators dropdown list.
- Check the All coordinators checkbox to send your message to all Coordinators.
There is not a way to send your message to more than one, but not all, Coordinators.
Please Note
You can combine checkboxes to send a message to more than one group. For example, if you need to send a message to all volunteers with the Applicant Status plus just one volunteer with the Active Status, you could use the Status dropdown and select the Applicant Status and then select the one volunteer's name from the individual option.
Choose a Message Type
If you have more than one volunteer or Coordinator selected to receive the message in step 2, the message must have a message type. Use the Message type dropdown list to choose the message type that represents the kind of message you're sending. Whichever message type appears at the top of your Message type setup page is selected in the dropdown by default.
Message types are part of message preference features. Your message will not be sent to volunteers and Coordinators if they have opted not to receive messages of the type selected in the Message type dropdown.
If the Message type dropdown is disabled, the message is only set up to go to one volunteer or Coordinator so the message preference feature does not apply.
Enter a Subject
You must enter a subject for the message. This field cannot be left blank. The subject will not be part of the text message, but it is necessary because it identifies the sent message on the Out Box and in the message history on the volunteer record. The Subject line is limited to 40 characters or less.
Compose Your Message
Enter your message in the text composition window. Text messages cannot exceed 110 characters and there is a counter beside the window that shows how many characters you've entered. When you reach 110 characters you will not be able to enter more text and an alert will appear.
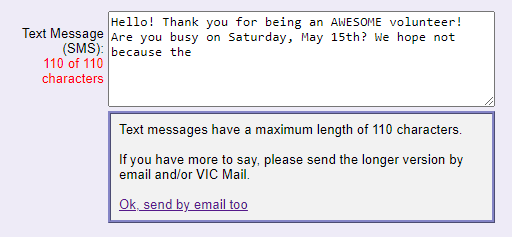
If your message must be longer than 110 characters, you can send the longer portion by email or VicMail, and use the text portion to let recipients know to check for the message. If you selected to send the message by just text, click the Ok, send by email too link in the alert to add an email option to your message.
Messages being sent by text along with email or VicMail will have two windows to compose the message. Use the top window to enter the message that will be delivered by email or VicMail, and use the bottom window to enter the message that will be delivered by text.
Save or Send Your Message
If you need to step away or take a break from composing your message, you can click the Save Draft button at the bottom of the page to save your work so far. You can find that message near the top of the Out Box to open and continue working on it later.
Once you're done composing your message, you can send it immediately or you can schedule it to send at a future time. If you want to send the message immediately, use the Send dropdown to select Send Now. If you want to schedule the message to go out on a future date or time, use the Send dropdown to select Schedule Send and use the options in the pop-up dialog to select the date and time you want to schedule the message to send.
When you schedule a message to be sent in the future, it will appear on the Out Box with the details of the scheduled date and time showing in the Sent column.
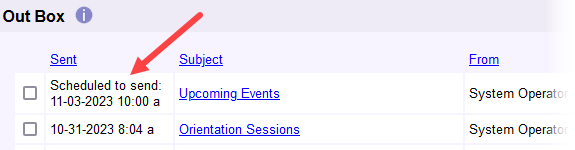
If you need to edit the message or cancel it before the time it is sent, click the link for the message in the Out Box and click the Cancel Send & Edit button. Now you can edit the message like you would a message you saved as a draft. You can make changes to the message and reschedule it to be sent, send it immediately, leave it as saved, or delete it if you no longer wish to send it.
Message Sent Page
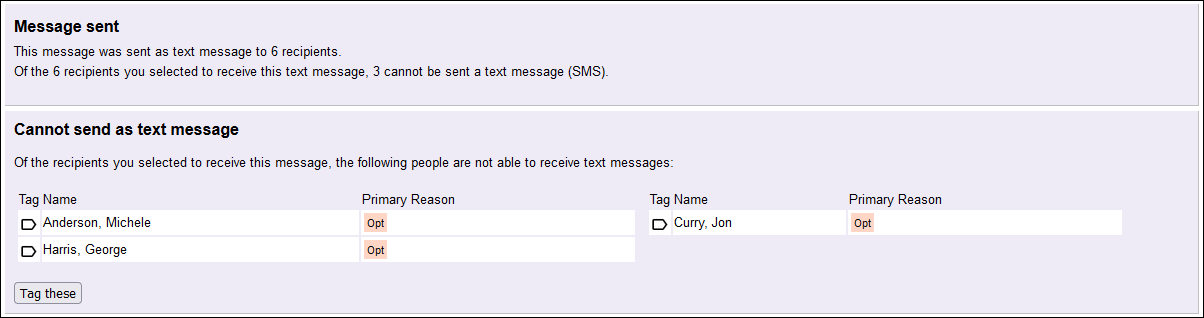
Sometimes text messages are not able to be sent to everyone you selected as a recipient. Because of this, after your message is sent you'll see a page showing the number of successful recipients along with information about any volunteers and Coordinators who could not receive the message. This page may have different sections depending on why the volunteer or Coordinator could not receive the message and whether the text message was also sent by email. We'll cover the section for text messages here. If you have questions about why someone did not receive an email message, see the Message Sent Page section of the Send an Email Message Overview help topic.
There is not a way to return to this page so if you'll need the information about volunteers who did not receive the message we recommend clicking the Tag these button. Then you can run a report for the tagged volunteers, or do any of the other tasks shown in the Tag Functionality help topic.
If your message was sent to a group of volunteers who were already tagged, or if the page shows Coordinators (who cannot be tagged), tagging the people listed will not be a good option. In this case, one option is to take a screenshot of the page so you can refer to it later. You can also create a Set to find volunteers who cannot receive text messages. Search Based on Text Opt-In and Text Number Validity can help you with this.
The volunteers and Coordinators listed on the page will show either Opt or Pref in the Primary Reason column.
Opt
If Opt is listed as the reason they could not receive the message, it means one of two things. Either the volunteer or Coordinator has not opted-in to text messaging yet, or has opted-in and then opted-out by texting STOP. In this case, the volunteer can text RESUME to opt back in if they want to receive text messages again.
Pref
If Pref is listed as the reason they could not receive the message, it means the volunteer or Coordinator has opted-in to text messaging but does not want to receive the type of message that was sent. The Message Preference Overview help topic has more information on how this works. In this case, the volunteer will need to log in to the VicNet portal and update the Account page if they want to receive the type of message you sent.
Related Help
- Update Message Types
- Add Coordinator Message Descriptions
- Add Volunteer Message Descriptions
- Enable Text Messaging
- Volunteer and Coordinator Guide for Text Opt-In
- Text Number Validity
- System Operator Guide for Text Opt-In
- Disable Text Messaging
- Find Volunteers With Invalid Text Numbers
- Search Based on Text Opt-In
- Search Based on Text Number Validity
- Text Messaging Overview
- Get Started With Text Messaging
- Out Box Tab Overview
- Message Preference Overview
- Send a Message to the Volunteers in a Set
- Send a Message to Volunteers Scheduled on a Certain Day
- Send a Message to All of a Coordinator's Volunteers
- Send a Message to All of the Tagged Volunteers