Get Started With Coordinators
A Coordinator record in Volgistics gives a level of access between a volunteer and a System Operator. Coordinator records work well for things like volunteer team leaders who assist volunteer managers, or department heads who need to know about volunteers who are scheduled to work.
Coordinator records can have automated daily or monthly email or text messages sent showing who is scheduled. They can also receive email or text alerts when volunteers add themselves to, or remove themselves from, the schedule. If you include the VicNet portal in your account's service level, Coordinators can also assist with common supervisory tasks such as updating basic volunteer information and managing the schedule for a Site, Place, or Assignment. If you're unfamiliar with what a Coordinator can do in VicNet, we recommend reviewing the Coordinator Guide for VicNet.
If the person will need to perform more tasks such as receiving new applications, entering or reviewing service hours, sending messages to volunteers, or running reports, they will need a System Operator record instead of a Coordinator record.
Add Coordinators
If you do not have Coordinator records in your account already, you will need to create them. If you have volunteers who will also be Coordinators, you will need to create separate records for the volunteer and Coordinator. There is not a way to transfer, or clone, a volunteer record to make a Coordinator record.
The steps to make a new Coordinator record are:
- Select Coordinators from the menu.
- Click the New coordinator button at the bottom of the page.
- Enter the Coordinator's contact information. You will need to complete at least the Last name, First name, and Email fields. Once you save the record, you can return to it to add more information
- Click the Save button.
- Select the Assignments tab.
- Select a Site, Place, or Assignment that the Coordinator will oversee from the Assignment dropdown list. If you select a Site or Place record, the Coordinator will be linked to all Assignments that fall under the Site or Place.
- Click the Save button.
- Complete steps 6 and 7 for all of the areas the Coordinator supervises.
- Repeat steps 1 - 8 for any other Coordinators you need to add to the system.
Enable Schedule Reminders for Coordinators
Coordinators can receive automated Schedule Reminder messages to let them know who is scheduled to serve in the Assignment(s) they oversee. There are daily reminders that show the volunteers scheduled on a certain date, and monthly reminders that show everyone scheduled in the coming month.
If your account is not configured to use reminders yet, Schedule Reminder Message Overview explains more about how it works.
Enable Self-Scheduling Alerts for Coordinators
Depending on your account's configuration, volunteers can add or remove themselves from the schedule at the VicTouch sign-in stations or in the VicNet portal.
Coordinators can automatically receive an alert message when volunteers in the Assignments they oversee make a change to the schedule for the assignment. This will let the Coordinator know about changes to the schedule as the changes happen. You enable these alerts on the Rules tab of each assignment record. Here are the steps to take:
- Select Assignments from the menu.
- Select an assignment your Coordinators oversee.
- Go to the Rules tab.
-
Scroll down to the Self-scheduling alerts section and check the box by Send an alert to this assignment's Coordinators. There are separate settings so you can have alerts sent only when volunteers add themselves, or remove themselves. You can also configure the alerts to only be sent when certain volunteers make a change. Please note that this setting controls alerts for both the System Operators and the Coordinators.
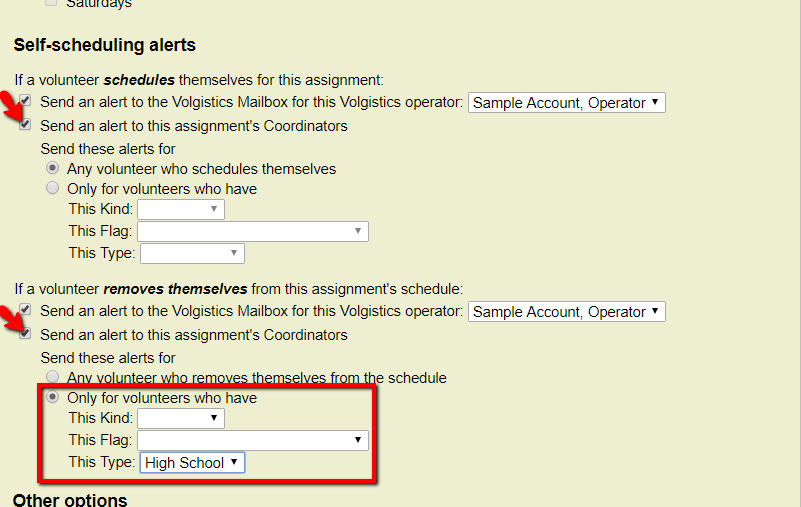
In the image above, alerts will be sent to the System Operator selected, and the assignment's Coordinators, when volunteers add themselves to the schedule. When volunteers remove themselves from the schedule, alerts will also be sent to the System Operator selected, and the assignment's Coordinators, but only if the volunteer has the High School Type.
-
Click the Save button after you make your changes.
- Repeat steps 1-5 for any other assignments where you want Coordinators to receive alerts.
Configure VicNet for Coordinators
If your account's service level includes the VicNet portal, the next step is to configure the portal for Coordinator access.
First, you need to set up what Coordinators see in VicNet. Coordinators can potentially access the Home, Mail, Volunteers, Schedule, and Account pages. In some cases you can set what Coordinators can see or update in VicNet, provide directions specifically for Coordinators, or even disable access to the page altogether.
The basic steps to update a page for Coordinators are:
- Choose Setup from the menu.
- Expand VicNet.
-
Select the page that you want to update. For example, if you want to add special directions to the Schedule page for Coordinators, select Schedule Page. If you need help with the settings once you select a page, look for the Help link in the top or bottom right corner.

Here's some basic information about each of the pages your Coordinators could access.
Home Page
The Home page is the first page your Coordinators see after they log in to the VicNet portal. The Home page cannot be disabled because it is the landing page Coordinators usually see after logging in. There is not a way to display different information on the Home page for Coordinators and volunteers. Both groups will always see the same view of the page. You can learn more about the setup page in the Home Page Settings help topic.
Mail Page
The Mail page is where Coordinators can view VicMail messages. Uncheck the box in front of Use this page at VicNet under the Coordinators can heading if you do not want the page to show for Coordinators.
Volunteers Page (for Coordinators)
The Volunteers page will require the most set up for Coordinators. It's where you control which volunteer records the Coordinator can see, and what information about the volunteer is available. You will also select whether the Coordinator can update the information about the volunteer or just view it.
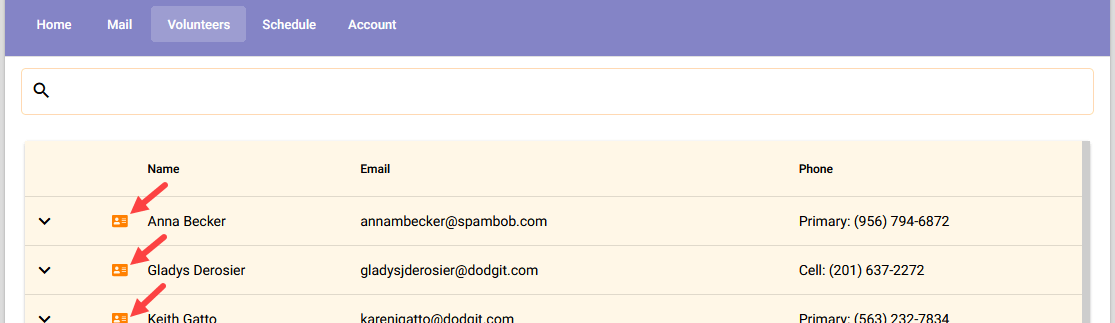
When Coordinators select the Volunteers page, they'll initially see a list of the volunteers who serve in their assignments.
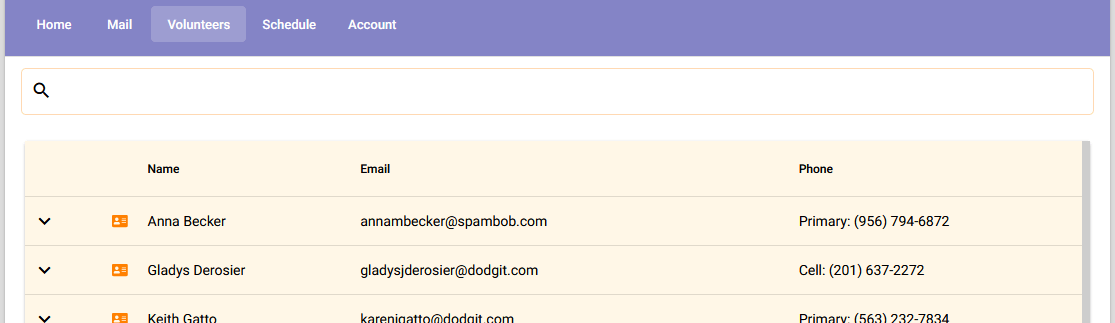
Coordinators can select a volunteer from the list to see a page showing more information for that person. In VicNet, Coordinators will need to click or tap the Profile link to go to the page for a certain person.
Set Which Volunteers Show
The settings on the first page that you see after selecting Volunteers Page (for Coordinators) control which volunteers show for the Coordinator. This is based on the volunteer's Status as well as the Role(s) the volunteer has in the Coordinator's assignment. For example, with the settings below the Coordinators will only see volunteers on their list if both of the following apply:
-
The volunteer has a Status of Active
AND
-
The volunteer has a Role of Assigned, Substitute, or Trainee in an assignment the Coordinator oversees.

Set How List is Displayed
Use the settings under Include these fields on the volunteer list. . . to control what volunteer contact information the Coordinator sees on the list of volunteers. Phone fields will only show if the OK to call box by the number is checked on the Core tab of the volunteer's record. If the Ok to call box is hidden for a phone field in your account, then that phone number will be counted as Ok to call for the purposes of this setting.

You can also choose the name format for volunteer names on the initial list Coordinators see.

Customize Volunteer Profile Content
The information on the Volunteers page that Coordinators see after selecting a volunteer's name from the list are organized into sections. Click the Customize Volunteer Profile Content link to get to the page where you manage and organize the fields available to Coordinators.

The fields you can make available to Coordinators appear on the Available Fields side of the page. There is information on how to add, remove, and organize the fields in the Add & Organize Fields section of the VicNet Profile and Volunteers Page Setup help topic.
Fields must be added to sections, and the sections are located on the Sections and Field Order side of the page. For information on how to add, remove, or change the order of the sections, see Add & Manage Sections in the VicNet Profile and Volunteers Page Setup help topic.
Schedule Page
The Schedule page is where Coordinators can view and optionally make changes to the schedule for the assignments they oversee. Select View schedules only under the Coordinator Access heading to make the schedule read only. Select View and change schedules if you want to allow Coordinators to schedule volunteers or edit current schedule entries.
There are also options to control how information is displayed on the monthly view of the schedule under the Coordinator Name Display heading.
You can find more information about the settings on the Schedule page in the Schedule Page Settings for VicNet help topic.
Account Page
The Account page is where Coordinators can change their password. If your account has text messaging enabled, the Account page is also where Coordinators opt-in to receive text messages. There is not a way to disable this page, but you can change the name of the navigation button.
Preview VicNet as a Coordinator
Before you let Coordinators know about VicNet, we recommend reviewing the changes you have made to make sure things are set up the way you'd like. To do this, you can use a record that you have set up already, or you can add a Coordinator record to use for testing. The steps to review a record are:
- Select Coordinators from the menu.
- Click on the Coordinator record you'd like to preview.
- Go to the Vic tab.
- Click the Log in as Coordinator button.
Introduce VicNet to Your Coordinators
The last thing you need to do is let your Coordinators know VicNet is available. The method you use to communicate this will vary depending on things such as how many people you've added, whether you're starting fresh or just adding additional users, and your security and privacy needs. For example, if you're starting fresh and just added a whole group of Coordinators, having an orientation meeting may be most effective. But if you have an established system, or are just adding a few people, simply calling them on the phone or sending an email message may be easiest.
Sending email messages is a convenient method of communication, but there are security concerns if the message contains a temporary password because email messages can be intercepted. So if you choose to send an email message, one of the methods of providing the password other than temporary passwords should be used. You can learn more about Coordinator passwords in Volunteer and Coordinator Password Overview.
Basically, you will need to let the Coordinators know three things about VicNet:
1. Where to Login
Your Coordinators login at the VicNet portal just like your volunteers. If you (or your webmaster) has placed a link to the login page on your organization's website, you just need to let them know what webpage they need to go to.
If you have not placed the link to VicNet on your organization's website, you can just tell the Coordinators to use the universal login page: https://www.volgistics.com/vicnet. Or if they have an Android or Apple phone or tablet, they can search for VicNet in the app stores to download the VicNet app.
The Coordinator Guide for VicNet help topic explains more about how the Coordinators can login.
2. Their Login Information
Coordinators login with the email address recorded on their Coordinator record and a password. You can find information on the recommended method to get Coordinators their first password in the Two Password Tips! box below.
3. How to Use the System
The Coordinator Guide for VicNet help topic is a great resource for helping Coordinators learn how to use the VicNet portal.
If you are sending an email message to your Coordinators, you can include a direct link to the help topic so Coordinators can access it from the internet. See the Insert Link section of Using the Rich Text Editor if you need help with how to put a link in your email message.
Our sample accounts have a great example template that covers all three things mentioned above. You can copy the content and adjust it to make your own template. To find the example template:
- Visit www.volgistics.com.
- Hover over Try or Buy on the menu at the top of the page, and select Sample Account.
- Select the Click here to get started button.
- Select Mailbox from the menu.
- Go to the Out Box tab.
- Select the Templates sub-tab.
- Select Introducing Our Coordinator Portal.
Two Password Tips!
-
There are multiple ways Coordinators can get their first password, but for simplicity and reliability we suggest having them click the Password Reset button on the VicNet Login page. This reduces the chances that the password reset link will expire if you send the link. See Set a VicNet Password for more information on this option.
-
If you have volunteers who are also Coordinators, let them know that setting the same password on both records will allow them to choose between the two records when they login. There's more information in Shared Email Addresses.
Related Help
- Enable Photo Upload
- VicNet Ground Rules
- Shared Email Addresses
- Coordinator Overview
- Coordinators Who Are Volunteers
- Send a Message to VicNet or VicTouch
- Allow Coordinators to Schedule, but Not Volunteers
- Volunteer and Coordinator Password Overview
- Set a VicNet Password
- Home Page Settings
- Create Links to VicNet
- View VicNet as Volunteer or Coordinator
- Set Up VicNet Access
- Send Password Message to a Volunteer or Coordinator
- Track Overall Usage and Last VicNet Access Date
- VicNet Overview
- Getting Started With VicNet
- Schedule Page Settings for VicNet
- VicNet Profile and Volunteers Page Setup
- Coordinator Guide for VicNet
- Send a Link to a Specific Webpage