Track Vaccine Compliance
If you are the volunteer manager at an organization related to healthcare, you may need to report on yearly compliance for the number of volunteers who received certain vaccines. Volgistics can help you track this information. This help topic covers a scenario for an organization who needs to report on flu vaccine compliance where the following conditions apply:
- The vaccine must be given annually between October 1st and December 1st
- Tracking for the flu vaccine is required for volunteers 18 and older
Your organization may have different policies so you will need to make adjustments in order to report the correct information.
Tracking Volunteers Over 18 Years of Age
If you have youth and adult volunteers at your organization, the first step is to make sure you can track which volunteers are over 18 years old. There are a variety of options to do this in Volgistics. For example, if you record the year of birth in the Date of birth field, Volgistics will automatically keep the volunteer's age updated each year when their birthday arrives. Some organizations do not track the volunteer's year of birth so in this case another method will need to be used such as the Type or Flag fields, or a spare dropdown field setup to track age categories.
We recommend recording a year of birth in the Date of birth field because this allows the system to automatically update the age field when a volunteer's birthday passes. If you use another method, you will need to develop an internal system for making sure the fields are updated when the volunteer turns 18. If you track the year of birth, and you also use another field such as the Type to keep track of adult and youth volunteers, you can find information on how to keep the field updated in Update Youth Type to Adult.
If you rely on the Age field to track volunteers who are over 18, you can make a Set to identify these volunteers. Here are the steps to do this:
- Select Sets from the menu.
- Click the Create a new set button.
- Enter a name (such as
Adult Volunteers) in the What would you like to call this set? field. - Select Their age from the dropdown list under Include volunteers in this set based on, and then click the Go button.
- Configure your Set rule to be Their age is 18 and older.
- Click the Finished button.
Create a Checklist Item for Flu Vaccine
The next step is to create a Checklist item to track the flu vaccinations. There is not a need to create a new Checklist item for each year's vaccines so once you have this in place you will not need to do it again. Instead, you will be able to record a date along with the Checklist item that will show the year. To create a Checklist item:
- Select Setup from the menu.
- Expand Checklist Items.
- Select Add a New Checklist Item.
- Give your item a name.
-
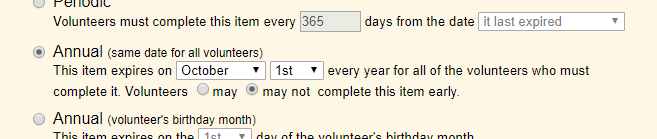
In the How often must volunteers complete this checklist item? section, we recommend using the Annual (same date for all volunteers) option. In the scenario we gave where the vaccines need to be given between October 1st and December 1st, it's easy to think you should use December 1st as the date here because that is the date the leaders require the vaccine to be given by. However, this will not work well for tracking because this is an annual item so the expiration date should be the renewal date when a volunteer will need to complete the item again. Based on this, October 1st will work best because that is the starting date volunteers can receive a vaccine each year. Also, be sure to select may not complete this item early if volunteers cannot get the vaccine before the October 1st to December 1st window.
-
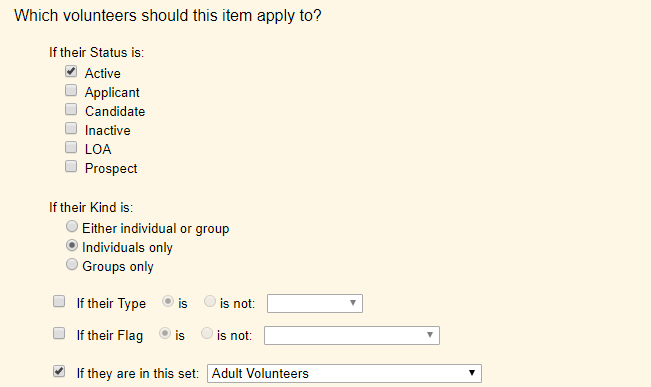
In the Which volunteers should this item apply to? section, check the Status(es) a volunteer should have in order for the item to apply. Typically only volunteers who are actively serving need to receive the vaccines so this would be the Active Status plus any other customized Statuses you have to track that a volunteer is actively serving.
If you use group records to track community organizations who come in to perform a task such as landscaping or stuffing boxes for food drives, you will generally set the option under If their Kind is to Individuals only because volunteers who are part of a group are generally not subject to the same requirements as individual volunteers who work with your patients and staff. If you use group records differently and the volunteers with group records are subject to the same requirements as other volunteers, you will need to set the option to Either individual or group so the Checklist applies to the group records also.
Finally, this is where you will limit the item so it only applies to volunteers 18 and over. If you use a Type or Flag for this, select If their Type is or If their Flag is and then select your Type or Flag from the dropdown list. If you made a Set to find volunteers over 18, select If they are in this set and then pick the name of your Set from the dropdown list.
Here is an example of what the Which volunteers should this item apply to? section may look like after you have it configured:
-
Finally, you can configure Volgistics to automatically send out reminders about the item at the bottom of the page. There are three reminders that can be setup so it may be helpful to have these go out at critical points. For example, you could have one go out 10 days before the October 1st expiration to remind volunteers about the approaching requirement, another go out zero days before the expiration (or on October 1st) to let volunteers know they can start getting the shot, and the last go out when the December 1st deadline arrives (or 62 days after the expiration).
Remember you can personalize these messages by using email placeholder codes such as
[[FirstName]]in the message body. -
Remember to click the Save button after all changes are made.
Create Notations and Fields to Track Additional Information
You may need to report additional information about the flu vaccines such as if it was given at your facility or given elsewhere, if the volunteer cannot receive the vaccine due to medical contraindications, or the volunteer declined for some reason. You can create notations to add to the Checklist date records that will allow you to report this information. You will only need to do this the first year. After that, the notations will already be in the system. Here is how you can add the notations:
- Select Setup from the menu.
- Expand the Field Options link.
- Select History Tab.
- Select Notation (for Checklist dates).
- Enter a notation you need to track in the Add a new item field and click the Save button to the right.
- Repeat step 5 until all of your notations have been added.
- You can optionally set a default notation that will be given, but please be aware that this will be the default for any other Checklist items you have in your account as well.
- Click the Save button at the bottom of the page when you're done.
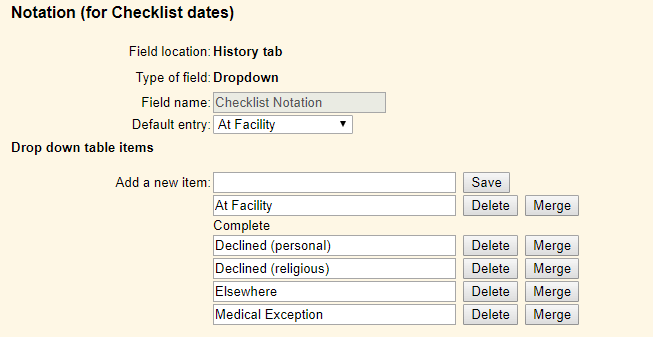
When you're finished, your page may look something like this:
You can optionally add a text field, dropdown list, or other field if you need to put in additional information such as where the volunteer received the flu vaccine, or if the vaccine was an injection or a nasal spray. You will be able to create a query to look for volunteers with a certain response in the field(s), and you can include the information on reports. To add a spare field:
- Follow steps 1-3 above if you are not still on the setup page for the fields on the History tab.
- Select Spare text or Spare dropdown.
- Enter a name for the field and change the Hidden setting to No. You can optionally have a default entry for the field and include it as part of the date grid on the History tab of volunteer records. If you are using a dropdown, enter the list items like you entered in the notation items.
- Click the Save button.
Enter Flu Vaccine on Individual Records
Once you have your Checklist item and notations in place, you're ready to start tracking the vaccine for volunteers. This will need to be done for each flu season as you receive information about who received the vaccine.
If you only have one volunteer to put in information for, or the volunteers you need to put in information for received the vaccine on different dates or have different notations, follow the steps outlined in this section. If you need to track information for multiple volunteers who all received the vaccine on the same day and will have the same notation, see the Enter Flu Vaccines for Multiple Volunteers section below.
The first thing you will need to do is go to the History tab of an individual's record. If you need help with locating records, see Finding Records. Once you're on the History tab of the record, there are two options to put in the information.
If the vaccine was given on the current date and the notation will be the default notation, the easiest option is to check the box next to the Checklist item and click the Save button.
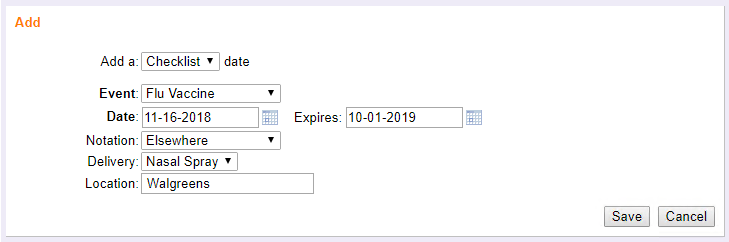
If the date or notation is different, you can add a Checklist date as shown above and then click the Edit link by the date entry and then change the date, notation, or related information. Another option is to save a step by using the Add box below the date grid to enter the information. After you select Checklist from the first dropdown, the other fields related to Checklist items will appear. Please note: The system will not automatically put in the expiration date for Checklist dates entered like this. You will need to enter the expiration date when making the entry. Here is what the Add box might look like when you're done:
Enter Flu Vaccines for Multiple Volunteers
You may get an update listing a group of volunteers who all received the flu vaccine on the same date who will also have the same notation. In this case, it will be quicker to enter the information on all the records at once. There are two options to do this.
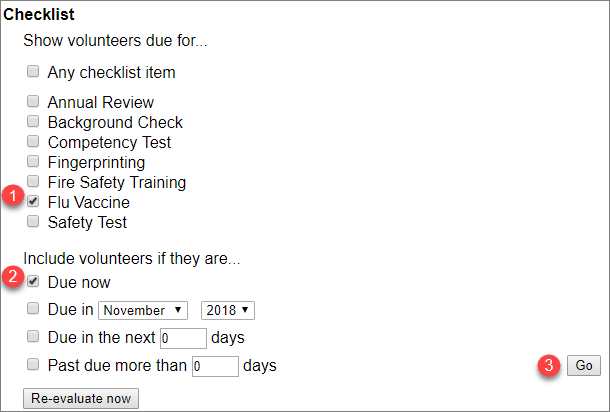
If the volunteers will all have the notation setup as the default notation, and you do not need to enter information in an additional field, the quickest option is to use the Checklist page. After you select Checklist from the menu, follow these steps:
- Check the box by the Flu Vaccine Checklist item.
- Check Due now under Include volunteers if they are.
-
Click the Go button.
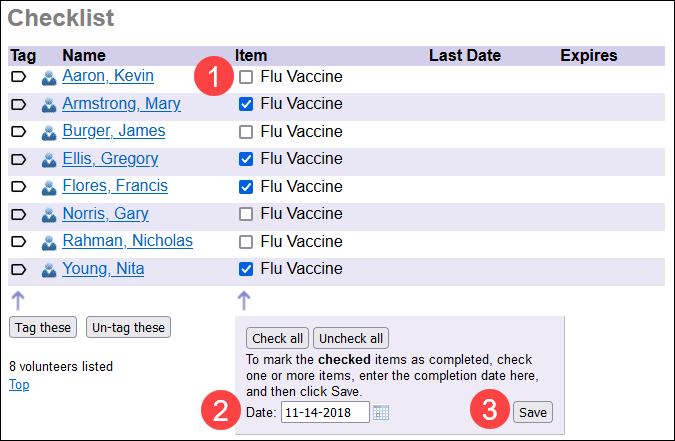
The volunteers who have not completed the flu vaccine requirement will be listed on the page. Now you can mark the item complete like this:
- Check the box in the Item column for the volunteers who received the vaccine.
- Enter the date the vaccine was given in the Date field at the bottom of the column.
-
Click the Save button.
If you need to enter a notation other than the default, or information into other fields, you can enter in the flu vaccine information by using the Tags feature. Here are the steps to do this:
- To make sure you do not accidentally mark volunteers who did not receive the vaccine as receiving it, select Tags from the menu and click the Clear all tags button. If the button is disabled, there are not any tagged records to clear.
- Select Volunteers from the menu.
- Tag the records for the volunteers who received the vaccination.
- Select Tags from the menu.
- Find the Add this Date to all of the tagged volunteer records section.
-
Select Checklist from the top dropdown and the other fields related to Checklist items will appear. Please note: The system will not automatically put in the expiration date for Checklist dates entered like this. You will need to enter the expiration date when making the entry. Here is what the completed section might look like when you're done:
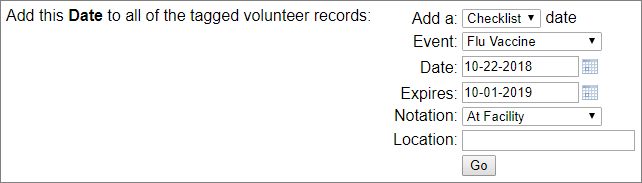
-
Click the Go button.
Create or Update Sets for Flu Vaccine Results
At the end of each flu vaccine campaign, you will need to report on the groups of volunteers who received the vaccine, declined the vaccine, etc. The first step to do this is to create Sets to identify the volunteers with a Checklist date in the date range required. You will need to create the Sets the first year you track information, and then update the Sets to use the current year in years to come.
To create Sets:
- Select Sets from the menu.
- Click the Create a new set button at the top.
-
Enter a name for the Set in the field under What would you like to call this set? To organize your list, it's useful to name all the Sets so they start with the same words. This will group the similar Sets together on the Sets page. Large organizations may want to also start Set names with the initials of the operator who creates them so each operator's Sets appear together.
-
Select Their checklist dates from the Include volunteers in this set based on dropdown and click the Go button.
Now you can configure the Set rule to locate the volunteers you need. To do this:
- Select the Checklist item you setup to track flu vaccinations from the top dropdown.
- Select the Anytime between option and pick the date range for the current year's flu vaccine campaign.
-
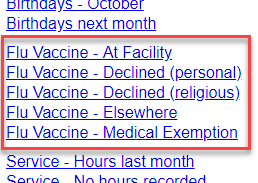
Check the Only if the Notation for the date is option and then pick one of your notations from the dropdown list. The example below shows a Set rule setup to find volunteers who declined the vaccine due to religious reasons.
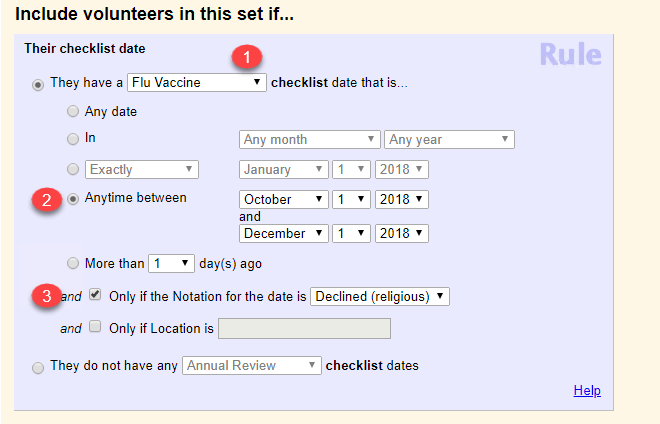
-
Click the Finished button when you are done configuring your Set rule.
Follow the steps above until you have a Set for each of the notations that are used for tracking the flu vaccines. Each year, you will need to adjust the year for each of the Sets to look for the results based on the campaign for the current year.
To update Sets:
- Select Sets from the menu.
- Select the name of a Set to update.
- Change the year selected in the dropdown lists by Anytime between to the current year.
- Click the Finished button.
- Repeat steps 2-4 for each of the Sets related to the flu vaccines.
Use Sets to Report Flu Vaccine Results
If you have not created or updated your Sets to identify volunteers who have a flu vaccine Checklist date for the current year, see the Create or Update Sets for Flu Vaccine Results section above. If you already have your Sets, you can use them to pull the information you need to report.
If you need overall numbers for volunteers in each category you track for flu vaccines, or you need to work with the records for the volunteers in the Set, we recommend viewing the Set on the Volunteers page. This will allow you to quickly get the count for how many volunteers are in a category such as how many received the vaccine at an outside location. This option works best if you need to work with the volunteers also. For example, if you need to find volunteers who declined the flu shot and send them a message, tag them to change their Status, or remove them from the schedule.
If you need a hard copy of the volunteer information, you will need to run a report. You can limit any report to just the volunteers in a Set using the Include tab on the report. When you do this, it may also be helpful to show the Set's name in the report title.
You may also need to run one report showing volunteers in two or more categories such as those who received the vaccine whether it was at your facility or elsewhere. You can do this by adding tags to the volunteers in each Set and then running the report for just the tagged records.
Tip!
When you run a report such as the Volunteer Date History (stock) report that includes the dates volunteers completed Checklist items, you can limit the report to just a certain Checklist item (or certain items).
Report Volunteers with No Date Recorded
Finally, most likely you will need to report numbers or names for volunteers who have no information at all about the flu vaccine. They did not provide information that they received the vaccine, cannot receive the vaccine, or choose not to receive the vaccine. In this case, there is not a flu vaccine Checklist date recorded for the volunteer so the Sets will not work to find them.
If you need to report for the current year, simply use the Checklist page to find volunteers still due for the item. If you need help with how to do this, see the Enter Flu Vaccines for Multiple Volunteers section above. After the Checklist page shows the records for volunteers still due (they do not have a date recorded), you can click the Tag these button to tag the records for follow-up action such as sending a message, changing the Status, or running a report.
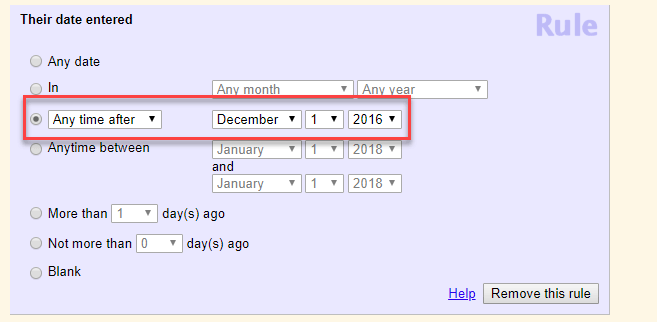
If you need to do this for past years, you will need to update your Sets as shown in the Create or Update Sets for Flu Vaccine Results section above to look for dates in the year you're interested in. In addition, you will need to create one new Set to remove tags from volunteers added to your account after the year you're interested in. For example, if you're looking for results from 2016, and a volunteer was not added until 2017, they will show in your results unless you identify these individuals and remove the tags from them also. When you make this Set, use the Their date entered rule and set it to Anytime after December 1, 2016.
Once you have modified the Sets for the year you are looking for and have your new Set, the process to identify the records without a date in the year will use the Tags feature. What you'll do is tag all of the records with the Status(es) you track flu vaccinations for, then un-tag the records in each of the Sets. When you are done, only the volunteers who do not have a date recorded in the year, who were also in your database during the year, will still be tagged.
The first step is to tag all of the records for volunteers who have the Status(es) you track vaccinations for. To do this:
- Make sure you do not already have records tagged for your session by selecting Tags from the menu and clicking the Clear all tags button. If the button is disabled, there are not any tagged records to clear.
- Select Volunteers from the menu.
- Select a Status you track from the Status dropdown and make sure the other filters are on Any.
- Click the All link to the right of the row of letters.
- Click the Tag button.
- If you track vaccines for more than one Status, repeat steps 2-5 except select a different Status from the dropdown. (Hint: You can also find volunteers with more than one Status by clicking the Advanced options button on the Volunteers page.)
After you have everyone the Checklist item applies to tagged, you will start un-tagging by following these steps:
- Select Volunteers from the menu.
- Select the new Set you made from the Set dropdown and make sure the other filters are on Any.
- Click the All link to the right of the row of letters.
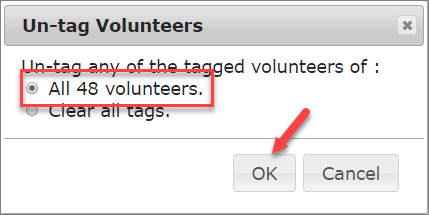
- Click the Un-tag button.
-
A pop-up will appear asking if you'd like to un-tag just the records on the page or all tags. Be sure the setting is set to only clear records on the page and then click the OK button.
-
Repeat steps 1-5 except select one of the Sets created to find volunteers with a Checklist date in the year you're looking for when you get to step 5. Once you follow the steps for each Set for the flu vaccine Checklist dates, only the volunteers who do not have a Checklist date in the year will still be tagged.
You can then find the number of records tagged, run reports, or perform any other task you can complete for tagged records. See Tag Functionality if you need any assistance with this.
Related Help
- Search Based on Checklist Dates
- Field Customization and Configuration
- Tags Overview
- Tag Functionality
- Tagging Records
- Update Youth Type to Adult
- Sets Overview
- Create a Set
- View Volunteers in a Set
- Limit a Report to the Volunteers in a Set
- Send a Message to the Volunteers in a Set
- Using Tags With Sets
- Add Set Names to Report Titles
- Checklist Overview
- Create a Checklist Item
- Mark Checklist Items Complete
- View a Volunteer's Checklist Items
- Find Volunteers Due for a Checklist Item
- Volunteer List Report - Volunteer Date History (stock)
- Filter Reports for Specific Checklist Dates