Reorganize Sites, Places, or Assignments
Volgistics provides features for tracking volunteer Assignments. Assignments is the term Volgistics uses to describe the tasks volunteers perform at your organization. Depending on your organization's purpose, Assignments may also be thought of as jobs, tasks, opportunities, projects, work areas, positions, events, or something else.
You may want to organize your Assignments under Sites and Places. As with Assignments, Sites and Places are just terms Volgistics uses. The Sites and Places can represent many different things depending on your organization. For example, they might be campuses, locations, departments, floors, programs, events, and more.
The chart below shows the basic Site, Place, and Assignment structure:
You can learn more in the Assignments, Sites, & Places Overview.
There may be times when you need to re-arrange the way Sites, Places, and Assignments have been organized in your account. Volgistics includes tools you can use to:
- Combine two or more Assignments into one
- Move Assignments from one Place to another
- Delete Assignments
- Combine two or more Places into one
- Move a Place from one Site to another
- Delete Places
- Combine two or more Sites into one
- Delete Sites
This help topic explains how to perform these tasks, and what happens when you do.
Restrictions
The Site, Place, and Assignment records form the framework, or structure, you use to track volunteer scheduling and service. The system uses different kinds of records for different purposes. Because of this, you cannot automatically:
- Change an Assignment record into a Site or Place record
- Change a Place record into an Assignment or Site record
- Change a Site record into a Place or Assignment record
- Give volunteers a Role (such as Assigned) at a Site or Place. Volunteers can only have Roles in Assignments.
These restrictions ensure that your database always has the logical organization required for features such as reporting and scheduling to function properly.
Assignments
This section covers how to combine, move, or delete Assignment records in your account.
Combine Two or More Assignments Into One
If you find you have two or more Assignment records for the same Assignment, or you are merging what are currently separate volunteer Assignments into one, you can easily combine Assignment records.
What Happens When You Combine Assignments
When you combine two Assignments into one, Volgistics merges them together in the database. Specifically:
- If the Assignments had different names, the name of the Assignment that you combined the first Assignment into will be the name of the combined Assignment. For example, if you combine an Assignment titled Front Desk with an Assignment titled Information Desk, the combined Assignment will be titled Information Desk
- Volunteers who have a Role such as Assigned in the first Assignment will have the same Role in the new combined Assignment. No volunteer Roles are deleted.
- When volunteers have service entries associated with the first Assignment, these will now be associated with the new combined Assignment. No service records are deleted.
- The schedules for the two Assignment records are combined into one schedule for the new combined Assignment.
- Coordinators for the first Assignment become Coordinators for the new combined Assignment.
- Reports that list volunteer service by Assignment will no longer list the first Assignment. Instead, all of the service for the first Assignment will appear under the new combined Assignment.
- Any documents uploaded for the first Assignment will be moved to the Docs tab of the new combined Assignment as long as the combined Assignment is not over the 50 document limit. If the combined Assignment will be over the 50 document limit, you will be able to select which documents to keep.
How to Combine Assignments
To combine two Assignments into one:
- Choose Assignments from the menu.
- Select the Assignment you want to combine into another. For example, if you want to merge Front Desk into Information Desk, select Front Desk.
- Click the Combine, move, or delete button.
- In the Combine box, use the dropdown list to select the other Assignment. In the example from step 2, if you're in the record for Front Desk, you will select Information Desk from the dropdown list. You can combine any Assignment with any other Assignment in your account, no matter what Site or Place it's under.
- Click the Start button.
- If the two Assignments will have over 50 documents when they are combined, a Combine Documents page will appear. See the VicDocs and Combining Sites, Places, or Assignments section below for information on deciding which documents to keep.
Move Assignments From One Place to Another
If you organize your Assignments under Places, you can move (relocate) an Assignment from one Place to another. For example, if you have an Assignment called Tutor at a Place called Educational programs, you can move the Assignment to a different Place called Outreach programs.
Move Assignments From One Place to Another
When you move an Assignment from one Place to another, all of the records associated with the Assignment move along with it. Volunteer Roles and service entry information, plus Coordinator records associated with the Assignment, will not change other than appearing under the new Place.
Service reports that list service according to Place will now list service associated with the Assignment that was moved under the new Place rather than the old Place.
How to Move an Assignment
To move an Assignment from one Place to another:
- Choose Assignments from the menu.
- Select the assignment you want to move.
- Click the Combine, move, or delete button.
- In the Move box, use the dropdown list to select the Place you want to move the Assignment to. You can move an Assignment to be under any other Place in your account, no matter what Site the Place is under.
- Click the Start button.
Delete Assignments
If you have Assignments you no longer need to track, you can delete them. Deleting Assignments cannot be undone so be sure you understand what happens when you delete an Assignment before proceeding. In some cases it may be better to mark the Assignment inactive, or merge it into another Assignment, rather than delete it.
What Happens When You Delete an Assignment
When you delete an Assignment in your account, Volgistics erases the entire Assignment record and all references to the Assignment. Specifically:
- No volunteers will show the deleted Assignment on their Service tab.
- Any service records associated with the Assignment will have a blank Assignment field after the Assignment is deleted.
- Service reports such as the All service by assignment-fiscal year (stock) report that list service according to Assignment will report service records that were associated with the Assignment under (None).
- Any Coordinator records associated with the Assignment will remain in your account. However, they will no longer be associated with the deleted Assignment.
- The schedule for the Assignment will be deleted. No volunteers will appear scheduled for the deleted Assignment.
- Documents uploaded to the Docs tab of the Assignment will be deleted. You will have the option to download these locally during the deletion process
How to Delete an Assignment
To delete an Assignment:
- Choose Assignments from the menu.
- Select the Assignment you want to delete.
- Click the Combine, move, or delete button.
- Locate the Delete box and be sure to review the information regarding how deleting the Assignment will impact your account.
- If the Assignment has documents uploaded to the Docs tab, there will be an option to have these documents downloaded or deleted. See the VicDocs and Deleting Sites, Places, or Assignments section below for information on downloading and retrieving documents.
- If you are sure that you want to proceed, select the Yes option under Are you certain you want to delete . . . . and then click the Continue button.
Places
This section covers how to combine, move, or delete Place records in your account.
Combine Two or More Places Into One
You can combine two or more Place records into one. The Place records you combine may be under the same Site, or under different Sites.
Combine Two or More Places Into One
When you combine Place records, the two Places are merged in your account. The Places can be under the same Site, or different Sites.
- If the Places had different names, the name of the Place you combined the first Place into will be the name of the combined Place. For example, if you combine a Place titled Volunteer Training with a Place titled Continuing Education, the combined Place will be titled Continuing Education
- When you combine two Places into one, any Assignments under the first Place are moved to the new combined Place. If the same Assignment name exists under both Places, the duplicate Assignment name will have a number added to it. For example, if both Places had Assignments titled Wheelchair Skills, the Assignment from the first Place would become Wheelchair Skills 1 in the combined Place.
- Volunteer Roles, service entries, and schedules for Assignments that are moved will continue to be associated with that Assignment.
- Coordinator records associated with an Assignment that is moved will continue to be associated with that Assignment.
- Any documents uploaded for the first Place will be moved to the Docs tab of the new combined Place as long as the combined Place is not over the 50 document limit. If the combined Place will be over the 50 document limit, you will be able to select which documents to keep.
How to Combine Places
To combine two Places into one:
- Choose Assignments from the menu.
- Select a Place you want to combine into another. For example, if you want to merge the Place called Volunteer Training into the Place called Continuing Education, select Volunteer Training.
- Click the Combine, move, or delete button.
- In the Combine box, use the dropdown list to select the other Place. In the example from step 2, if you're in the record for Volunteer Training, you will select Continuing Education from the dropdown list. You can combine any Place with any other Place in your account, no matter what Site it's under.
- Click the Start button.
- If the two Places will have over 50 documents when they are combined, a Combine Documents page will appear. See the VicDocs and Combining Sites, Places, or Assignments section below for information on deciding which documents to keep.
Move Places From One Site to Another
If you organize your Places by Site, you can move a Place from one Site to another.
What Happens When You Move a Place
When you move a Place from one Site to another, all of the records associated with the Place move along with it.
- Volunteers who have Roles in Assignments under the Place will continue to have the same Roles in the same Assignments.
- Service entries associated with Assignments under the Place will continue to be associated with the same Assignments. The difference is that reports organized by Site, Place, and Assignment will now show the service under the new Site instead of the old.
- The schedule for the Place will now appear under the Schedule for the new Site.
How to Move a Place
To move a Place from one Site to another:
- Choose Assignments from the menu.
- Select the Place you want to move.
- Click the Combine, move, or delete button.
- In the Move box, use the dropdown list to select the Site you want to move the Place to. You can move a Place to be under any other Site in your account.
- Click the Start button.
Delete Places
You can delete Places from your account as long as the Place is not the only Place under a Site. Each Site must have at least one Place record under it. Also, there cannot be any Assignments listed under the Place. You must move or delete all Assignments under the Place before you can delete the Place.
What Happens When You Delete a Place
- When you delete a Place, Volgistics removes all references to the Place, and deletes the Place record itself.
- Any Coordinator records associated with the Place you delete will remain in your database. However, they will no longer be associated with the deleted Place.
- Documents uploaded to the Docs tab of the Place will be deleted. You will have the option to download these locally during the deletion process
How to Delete a Place
To delete a Place:
- Choose Assignments from the menu.
- Select the Place you want to delete.
- Click the Combine, move, or delete button.
- Locate the Delete box and be sure to review the information regarding how deleting the Place will impact your account. If there are still Assignments under the Place, the Delete box will not appear. In this case you will need to move or delete the Assignments before proceeding.
- If the Place has documents uploaded to the Docs tab, there will be an option to have these documents downloaded or deleted. See the VicDocs and Deleting Sites, Places, or Assignments section below for information on downloading and retrieving documents.
- If you are sure that you want to proceed with deleting the Place, select the Yes option under Are you certain you want to delete . . . . and then click the Continue button.
Sites
This section covers how to combine, move, or delete Site records in your account.
Combine Two or More Sites into One
You can merge the information for Sites together by combining the Sites.
What Happens When You Combine Sites
When you combine two Sites, all information and related records from one Site are moved to another. Specifically:
- The name of the Site that you combined the first Site into will be the name of the combined Site. For example, if you combine a Site titled North Campus into a Site titled West Campus, the combined Site will be titled West Campus
- When you combine two Sites into one, all of the Places and Assignments under the first Site are moved to the new combined Site. If the same Place name exists under both Sites, the duplicate Place name will have a number added to it. For example, if both Sites had Places titled Continuing Education, the Place from the first Site would become Continuing Education 1 in the combined Site.
- Volunteer Roles, service entries, and schedules for Assignments under the Places that are moved will continue to be associated with those Assignments.
- Coordinator records associated with Assignments under the Places that are moved will continue to be associated with those Assignments.
- If your account uses Site Level Access, the System Operators assigned to each of the Sites you are combining (Site-Level Operators or Multi-Site Level Operators) will be assigned to the combined Site after the merge. After the merge they will see the Places, Assignments, and volunteers that were associated with the other Site involved in the merge.
- If your account uses Site Level Access, your volunteers can be associated with a Site. After the merge, volunteers associated with the first Site will now be associated with the combined Site.
- Any documents uploaded for the first Site will be moved to the Docs tab of the new combined Site as long as the combined Site is not over the 50 document limit. If the combined Site will be over the 50 document limit, you will be able to select which documents to keep.
How to Combine Sites
To combine two Sites into one:
- Choose Assignments from the menu.
- Select one of the Sites you want to combine into another. For example, if you want to merge Site North Campus into Site West Campus, click the link to North Campus
- Click the Combine, move, or delete button.
- In the Combine box, use the dropdown list to select the other Site. For example, if you want to combine North Campus into West Campus, and you're on the record for North Campus, select West Campus from the dropdown list.
- Click the Start button.
- If the two Sites will have over 50 documents when they are combined, a Combine Documents page will appear. See the VicDocs and Combining Sites, Places, or Assignments section below for information on deciding which documents to keep.
Delete Sites
You can delete Sites from your account as long as the Site is not the only Site in the Site, Place, and Assignment structure. If your account only has one Site, you will not be able to delete the Site. Also, there cannot be any Assignments listed under the Site. You must move or delete all Assignments under the Site before you can delete the Site.
What Happens When You Delete a Site
- When you delete a Site, Volgistics removes all references to the Site, and deletes the Site record itself.
- Any Coordinator records associated with the Site you delete will remain in your database. However, they will no longer be associated with the deleted Site.
- If you use Site Level Access, Volgistics System Operators who are specifically assigned to just the Site you are deleting (Site-Level Operators) will be blocked from the system until an Administrator un-checks the Block this operator's access to the system box on their System Operator record. Multi-Site Level Operators (those Operators assigned to multiple Sites and can switch between them) who are assigned to the deleted Site as well as other Sites, will no longer be able to associate with the deleted Site.
- If you use Site Level Access, volunteers who had the Site you delete listed on the Core tab of their record will no longer show this Site.
- Documents uploaded to the Docs tab of the Site will be deleted. You will have the option to download these locally during the deletion process
How to Delete a Site
To delete a Site:
- Choose Assignments from the menu.
- Select the Site you want to delete.
- Click the Combine, move, or delete button.
- Locate the Delete box and be sure to review the information regarding how deleting the Site will impact your account. If there are still Assignments under the Site, the Delete box will not appear. In this case you will need to move or delete the Assignments before proceeding.
- If the Site has documents uploaded to the Docs tab, there will be an option to have these documents downloaded or deleted. See the VicDocs and Deleting Sites, Places, or Assignments section below for information on downloading and saving documents.
- If you are sure that you want to proceed with deleting the Site, select the Yes option under Are you certain you want to delete . . . . and then click the Continue button.
VicDocs
If your account uses the optional VicDocs module, you may have additional considerations when combining or deleting Sites, Places, or Assignments. You can learn more about these in the sections below.
VicDocs and Combining Sites, Places, or Assignments
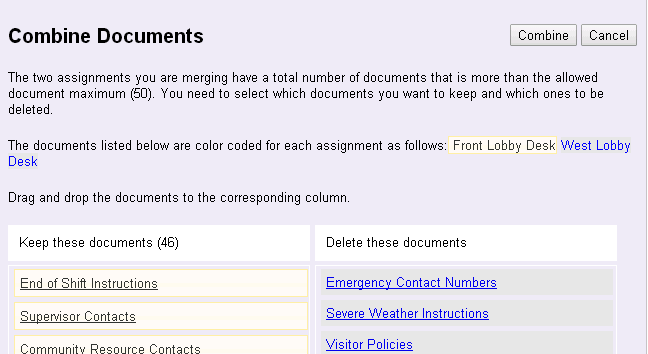
Each Site, Place, or Assignment record can have up to 50 documents uploaded to the Docs tab. If combining two Sites, Places, or Assignments will cause the Docs tab of the combined record to be over the limit, you will see a Combine documents page after you click the Start button.
The documents for the Site, Place or Assignment that will remain after the merge will be in the Keep these documents column on the left. Drag and drop documents from one column to the other until you have the documents you wish to have for the combined record in the Keep these documents column. When you are finished, click the Combine button to finish combining the records.
If you need to see the contents of a document, in many cases you can just click on the document's name. Your web browser will launch the program it needs to open the document. In some cases your web browser's settings are not configured to recognize the file type so the file will not open. In this case, you will need to change your web browser's settings so that it associates the correct program with the file extension if you want to open the document just by clicking on it.
If you wish to save any of the documents in the Delete these documents column before combining the records, open them as described above and then use the save feature in whatever program the file opens with. Or you can often right-click on the document's name and select the option to save the document from the menu.
If the number of documents in the Keep these documents column is more than 50, the Combine button will be disabled until the column's count is 50 or less. You can easily see when the column's total exceeds the limit because the document count in the column heading will turn red.

VicDocs and Deleting Sites, Places, or Assignments
If the Site, Place, or Assignment you're deleting has documents on the Docs tab, you will see an option to make the documents available during the steps to delete the record.

If you do not need the documents, choose the option to delete the record and the documents. If you want to save the documents locally, select the option to download the documents. When you choose this option, the documents for the record will be placed in a zip file and sent to the In Box tab of your Volgistics mailbox. Please note: You must save the zip file to your local computer within 5 days. After 5 days the zip file will be automatically deleted and the documents will be permanently removed from the system.