Main Setup Page Settings
The Application Form Setup Page is the main page you'll go to when adding a new application form or making changes to an existing form. Among other things, the page has settings for adding the form's title and instructions, setting up the form's sections, and selecting which fields are on the form. The Application Form Setup Page is also where you control what happens when the form is submitted. For example, you can set what Status the applicant will receive initially, or whether the applicant's record goes directly into your database or is sent to the Applications tab of your mailbox for auditing.
Keep in mind that the Application Form Setup Page has the settings for one specific form. Making a change on the page will only update one form so if you have several forms that need to be updated, you'll need to make changes on the Application Form Setup Page for each form individually.
Also, you can choose to include a logo on your forms by uploading a Display graphic in your account's Logo Graphic settings. That logo will be used for all of your forms. The Upload Logo help topic explains more about this.
You get to the Application Form Setup Page by following these steps:
- Select Setup from the menu.
- Expand Application Forms.
- Select the name of a current form or click Create a Form to start a new form. You can also clone an existing form to make a new form. For details, see the Clone an Application Form help topic.
Title
Use this section to add the title that applicants see publicly as well as the internal name for the form. In many cases, the same name will be used in both places, but having an external and internal name allows more flexibility. For example, an organization that staffs health care clinics may have a north clinic and a south clinic with separate forms for each. So they would have the organization's name show on the public view for both forms, but internally they'd use North Clinic and South Clinic so they know which form was submitted.
Top of Form Title
Use the Enter the title you want to appear at the top of this application form field to enter the title that appears at the top of the form applicants see. This could be something generic like Volunteer Application Form or Registration Form, or it could be more specific with your organization's name along with the form's purpose. For example, Anytown Museum's Summer Internship Application.
The title always appears at the top right of the form. If you have uploaded a Display logo it will appear at the top left of the form. The number of characters in your title can exceed the width of the input field, but keep in mind that having a long title will cause the title to wrap to more than one line on the actual form.
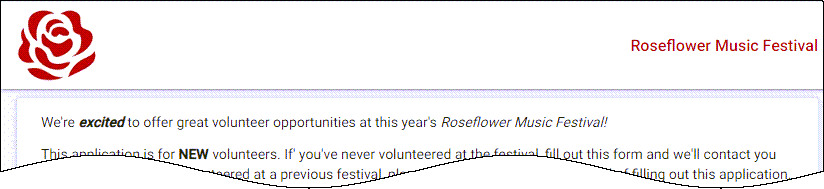
Here's an example of what your title and logo might look like.
Keep in mind that if you embed your application form on your organization's website, the logo and title will not show because your organization's webpage will usually have these elements.
Internal Title
Enter the name you want System Operators to see for the form inside of your account in the Enter a name for internal use that describes this application form field. This name will not show to volunteers so it can be more informal, but it must be unique because two forms cannot have the same internal title.
This title is limited to 45 characters and is the name operators will see in these locations:
- The alphabetical list of applications operators see after selecting Setup, Online forms and then Volunteer application forms.
- The name of the application submitted shown in the application submission alerts.
- The name of the application shown while the application is pending on the Applications tab of the mailbox.
- The name of the PDF file created when an application is submitted.
Instructions
Add your instructions in the field under Enter the instructions you want to appear at the top of the form. You may want to add information about how the on boarding process for new volunteers works at your organization, point out that fields with asterisks are required fields, or remind the applicant to click the button at the bottom of the form when they're done entering their information.
You can add some basic rich text elements to your instructions to make them easier to read. When you use the Enter key to add a line break to your content, the rich text editor will automatically apply extra space between the original line and the new line. This is done to help break up your content and make it more readable. If you do not want to include extra spacing between lines, hold down the Shift key and then press Enter. See the Using the Rich Text Editor help topic if you need more help adding rich text to your instructions.
Tip!
After you add information or make changes to your form, it's often helpful to view the form as the applicant will see it. You can do this without making your form publicly available by saving your changes and clicking the Preview button in the Links section.
Your form will open on a new web browser tab or window so you can easily visualize your changes. You can leave this page open and just refresh it to see new changes after you make other updates on the Application Form Setup Page.
Theming
These settings will let you configure the appearance of the application form. You can select from default color schemes or create your own custom color scheme to match your organization's aesthetic. You can learn more about the specifics of the Theming options in the Customize Themes for Application Forms help topic.
Site Selection
This link takes you to the Site Selection setup page. This page's setup options will function differently depending on if your account has Site Level Access enabled or not.
When Site Level Access is not enabled, this page's purpose is to limit the Assignments that appear in the Assignment Preference field to just those in a particular Site.
When Site Level Access is enabled, these settings will still limit which Assignments appear in Assignment Preference fields, but it also controls which Site(s) will receive applications submitted through this form. If you're setting up one form for each Site, you can specify which Site the form is for on this page.
The Update Site Selection help topic has more information about each setting on the page.
Customize Form Content
In this portion of the application form settings, you'll configure the information you want to collect from applicants. These settings let you create sections on your form, choose which fields to add on your form, and customize how those fields are organized on the form. Check out the Customize Application Form Content help topic for more specific information on how to use these settings.
Receipt Confirmation
The Receipt confirmation link takes you to a setup page where you can customize the message that is displayed after an applicant successfully submits their completed application. The page also has settings to set up an email message that is automatically sent to the applicant after the form is submitted.
You can learn more about this page in the Update Receipt Confirmation Messages help topic.
Link to Assignment Descriptions
If your application form includes the Assignment Preference or Schedule Fields, you can make Assignment names in those fields link to the corresponding Assignment's description in your Opportunity Directory. Applicants can click the link to be taken to a description of the Assignment.
To include these links on your form, check Link Assignments, Places, and Sites to Opportunity Directory descriptions.
If your volunteer application form does not include the Assignment Preference or Schedule Preference fields, this option will not have an impact on your application form.
The Add Assignment Descriptions to Applications help topic provides more details on using this option.
Status
In Volgistics, the volunteer's Status is used to show the volunteer's relationship with your organization. Because each volunteer record must have a Status, you need to select the Status a volunteer should be given when you receive their application into your database. In most cases, organizations give the Applicant Status to new volunteers because this generally represents someone who has not completed the on boarding process. If your organization does not require new volunteers to complete an on boarding process, you may choose to give new volunteers the Active Status (or any other Status that fits your needs) instead.
Type
If you want all of the people who submit this application form to always have a specific Type when you first receive their application form, select that Type from the Type dropdown list.
If you create more than one volunteer application form, you can use the Type field to determine which application form a given applicant used. For example, if you have one application form for Adults and another for Juniors, you can set the Type on the Adult application form to Adult and the Type on the Junior application to Junior.
Because volunteers can only have one Type, if you specify a Type here you cannot also allow volunteer's to choose their Type on the application form. If you want volunteers to be able to choose a Type from the Type field on the application form, do not select a Type here. Instead, use the Customize Form Content settings to add the Type field to the application form.
The Type and Flag Field Settings help topic explains how to add additional items to the Type field.
Flag
Similar to the Type, you can select to have the people who submit this application form automatically have a certain Flag on their record. However, there is not a way to allow applicants to select their own Flag when filling out an application.
You can learn how to add additional Flags to the Flag dropdown list in the Type and Flag Field Settings help topic.
Kind
If you use both Group and Individual records in your account, and you want all the people who submit this application to always have a specific Kind (Group or Individual), select the Kind from the dropdown list. This is useful if you create different application forms with different fields for groups and individuals.
Your choice here impacts whether the Kind field and the other group related fields (Group name, Members, and Participation) can be selected as fields on the application form. If Individual is selected from the dropdown, none of the group fields are available to add to the application form. If Group is selected from the dropdown, the Kind field is not available to add to the application, but the other group related fields can be selected to show on the form.
Alerts
You can have the system automatically send an alert to System Operators each time someone submits this application form. By default, the Do not send alerts option is selected, and the system will not notify you when a volunteer submits the form.
If you'd like the system to send alerts for application submissions, you have a couple of options for selecting recipients. Choose Send alerts to all operators if you want every operator in your account to be notified when this application form is submitted. Alternatively, if you only want certain operators to be notified, choose Send alerts to these operators and use the corresponding dropdown to select up to 10 specific operators to receive alerts when this form is submitted.
Once you've selected recipients for the alerts, you can use the Send the alert... options to choose how you'd like the alerts to be sent to the selected operators. Check the box next to each delivery option you'd like the system to use for these alerts.
The To the Volgistics mailbox option will send the alert to the In Box of the Volgistics mailbox. The mailbox is shared by all operators so everyone can see the alert even if it is sent to the attention of one operator. If your account has Site Level Access enabled, only the operators at the same Site share the mailbox.
The By email option will send an email message with the alert to the email address recorded in the Email field on the System Operator's record.
If any of the selected operators has opted-in to text messaging, check the By text message box to have the alert sent to those operators' cell phones. Any operators who have not opted-in yet, will not be able to receive these alerts by text message.
Application Auditing
By default, your application forms are set to be audited. This means when the form is submitted it creates a pending record on the Applications tab of the Volgistics mailbox. A System Operator must receive the pending record into the database to make a fully functional volunteer record. If duplicate checking is enabled in the account, auditing allows operators to receive a warning if an application is submitted using the same first and last name, and/or email address, as a record already in the account. Auditing also allows operators to screen out phony applications (such as an application for Mickey Mouse), plus they can view the PDF file that is automatically created showing what was entered on the submitted application form.
If you want new applications to go directly into your database of volunteer records, check the Bypass auditing box. The system will not warn operators if an application is a possible duplicate when auditing is bypassed.
Links
The Links section gives you the information you'll need to make your application form available to potential volunteers. The section also provides a way to view what your form will look like and temporarily make a form unavailable.
Disable Links
You may have times when you want to make an application form temporarily unavailable. You might choose to disable an application form while you make changes to it, or if the event for which you were collecting applications has past (but you don't want to delete the application form yet). When the application form is disabled, links to the form from your web site (as well as direct attempts to go to the form's URL address) will receive a temporarily unavailable message.
If you'd like to do this, check the box in front of Temporarily disable links to this form. You can find more information about disabled forms and how to customize the message shown for disabled forms in the Disable an Application Form help topic.
Preview Application
Previewing an application form is a great way to see how it will look to applicants before you make it public. If you're working with your form, click the Save button and then click the Preview button to see your form. If you're actively working with your form, you can leave the preview page open and then simply refresh the webpage after you save the updates on the Application Form Setup Page.
URL Address
Each application you create in your account will have a unique web address. You'll find an application form's URL in the Links section below The URL for links to this application form is heading. If your webmaster just wants a simple link to the form, you can give them this URL address. Additionally, if you know the email address of people who'd like to fill out an application, you can also copy this URL address and paste it into an email message inviting them to fill out the form.
Links With HTML Code
If you are in charge of your organization's website, or if your webmaster would prefer, we also provide the URL address to link to the application form along with the HTML (Hypertext Markup Language) to create the links on your organization's website. Use the Full-Page Links HTML code if you want the application form to open on a separate webpage. Use the Embedded Form HTML code to add the form into a webpage and have the page's height automatically adjust to the height of the form. Finally, the Embedded Form with Static Height code can be used to add the form into a webpage without the option to automatically adjust the page to the height of the form. Using this option may cause your form to have a scroll bar depending on the static height set and the height of your actual form. In this case, users would need to scroll up and down to see the entire form.
The Create Links to Your Application help topic gives more details about how to add the volunteer application form to your website.
Submissions
This section has a count of the number of times this online volunteer application form has been submitted since the date it was created or the last date the submission count was reset. Click the Reset this count button if you want to reset this count to zero and start counting over again. If you want to get a raw count of how many applications are submitted for your organization each year, you'll need to set a reminder to go to the Application Form Setup Page at the start of the year to record the previous year's count and reset the counter to zero for the upcoming year.
Keep in mind that the number of times an application form is submitted is not necessarily the same as the number of new volunteers who joined your organization. For example, the count will not factor out duplicate records or volunteers who didn't make it through the onboarding process. Also, the count is not updated if a volunteer record created by an application form submission is deleted later.
Other options to find how many new volunteers joined your organization are to run a Status Statistics (stock) report, or to create a Set that finds all of the volunteers who have started during a certain time period.
If you do not see a Submissions section on your Application Form Setup Page, it means that the form has never been submitted. In this case, once an applicant completes the form the Submissions section will show.
Print Blank Form
You can save a blank PDF file of the application form, or print out a paper copy of the form that has not been filled out. To do this, click the Print button and then use your web browser to take the action you want. For more information, see the Print a Blank Application help topic.
Clone Form
Your application form may be set up almost the way you want it, but you'd like to make a new form with some modifications. In this case, click the Clone button to keep the current form and make a new form with the same settings. There are more details in the Clone an Application Form help topic.
Delete Form
If you want to permanently remove an application form, click the Delete button at the bottom of its Application Form Setup Page.
NOTE: When you delete an application, there is not a way to recover the setup page for the form so you should only delete forms you're positive you no longer need!
When a form is deleted, the volunteer records created by the form submission will remain in your account, but the form itself will be deleted. If there are any links on your web site for the form you're deleting, they will no longer work. It's best to remove any links to the application form before you delete it.
Related Help
- Update Site Selection
- Update Receipt Confirmation Messages
- Collect Assignment Preferences
- Schedule Preferences Versus Assignment Preferences
- Upload Logo
- Disable an Application Form
- Schedule Orientation While Applying
- Enable Text Opt-In While Applying
- Field Customization and Configuration
- Show Only Certain Assignments for Assignment Preferences
- Add Assignment Descriptions to Applications
- Collect Affiliation Information
- Application Form Overview
- Receive Applications From Mailbox
- Applicant Information on Volunteer Records
- Create Links to Your Application
- Application Forms and Site Level Access
- Volunteer Policy, Confidentiality, and Release Agreements
- Preference Field Settings
- Clone an Application Form
- Print, View, or Save a Completed Application
- Print a Blank Application
- Customize Themes for Application Forms
- Customize Application Form Content