Document Uploads on Application Forms
Document Uploads on Application Forms
Collecting documents like resumes, reference letters, and waivers is often a vital part of the volunteer onboarding process. These documents can be stored on the Docs tab of volunteer records using the VicDocs module. It is also possible to collect those documents right when volunteers are applying to serve with your organization. That way you can get all the information you need right from the start.
This help topic explains how the document upload feature works and how to get it set up on your application forms. Click the headings below to expand the associated sections and see more information.
How Does It Work?
Let's take a look at how the document upload feature works before we start setting it up on your forms. Using the information in this help topic, you can add fields to your forms so applicants can upload and attach documents to submit along with the form itself. Those documents are added to the applicant's Docs tab once they are received into your database.
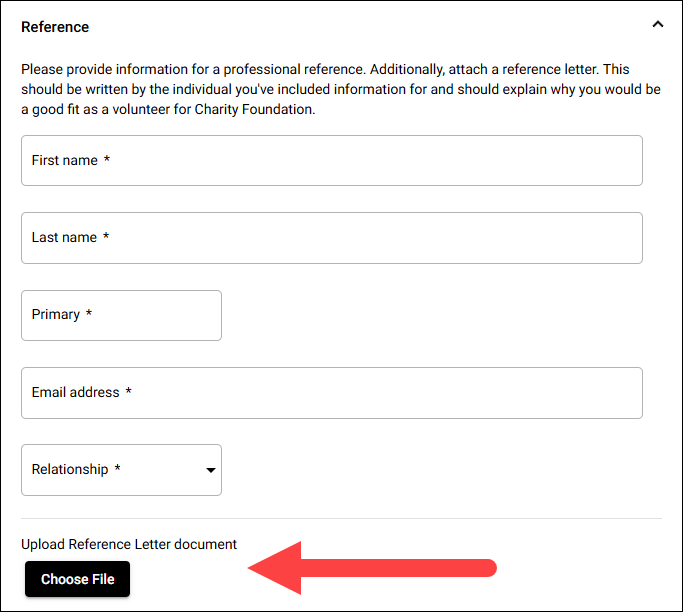
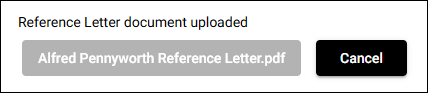
The upload feature appears amongst the other fields on your form. Applicants click the Choose File button to select the document they wish to attach to their submitted form. Once the document is selected, the document is uploaded automatically, and the name of the document replaces the Choose File button. If they selected the wrong document, they can click the Cancel button to remove that document and then upload a new one.
Once the applicant has submitted their form, it is sent to your Volgistics account and stored on the Applications tab of the Mailbox (unless you chose to have your forms bypass auditing). From this tab, you can review the applicant's submitted form, but you won't have access to the documents they uploaded. To access those documents, you need to receive the applicant into your database. The uploaded documents are available in that applicant's volunteer record on the Docs tab.
Now that we know how it works, let's start getting things set up for you to collect documents from your applicants!
Set up Document Types
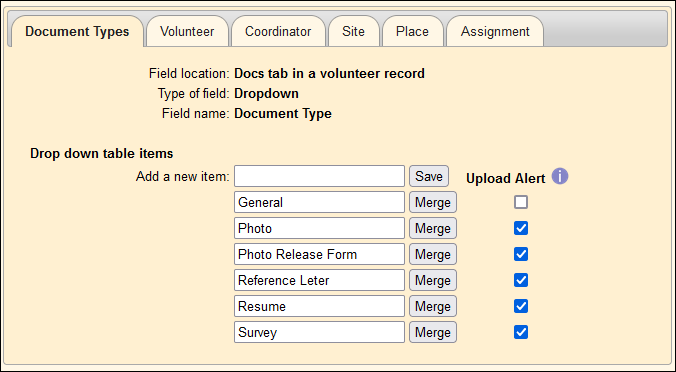
Every document uploaded to your volunteer, Coordinator, Site, Place, and Assignment records needs to be associated with a Document Type. These are used to categorize the documents you store in your database. By default, all Volgistics accounts have the built-in Application Document Type which is automatically applied to the PDF copy of your volunteers' submitted application forms. Additionally, you have a General Document Type, which should be used for documents that you do not wish to track in any particular category.
You can also add custom Document Types to help you track and categorize the documents you need to collect from volunteers. For example, you could create Document Types for resumes, reference letters, driver's license photos, waiver forms, etc. It's important to set these up in your account because when you add the upload fields to your form you need to specify which type of document the applicant should upload.
To set up your Document Types:
- Choose Setup from the menu.
- Expand Field Options.
- Click Documents Tab.
- On the Document Types tab, your existing Document Types are listed. The Application type is not listed because this is built-in and cannot be modified.
- In the Add a new item field, enter the name of a Document Type you'd like to set up (e.g. Reference Letter) and click the Save button to the right of the field.
- Repeat step 5 for each new Document Type you'd like to add.
Note
You may notice the Upload Alert options on this setup page. You can choose to enable upload alerts for individual Document Types, but please keep in mind that these alerts are only sent when volunteers or Coordinators upload documents through VicNet. These kinds of alerts are not sent when applicants include documents with their forms.
However, you can choose to have notifications sent when an application is submitted if you'd like. The Alerts section of the Getting Started With Application Forms help topic explains more about that.
You can learn more about setting up and managing Document Types in the Documents Tab Settings help topic.
Add Upload Feature to a Form
Once you have set up your Document Types, you can add the document upload feature to your application forms. Here are some steps you can follow to do this:
- Choose Setup from the menu.
- Expand Application Forms.
- Select the link for the application form you wish to add the document upload feature to.
- Click Customize Form Content.
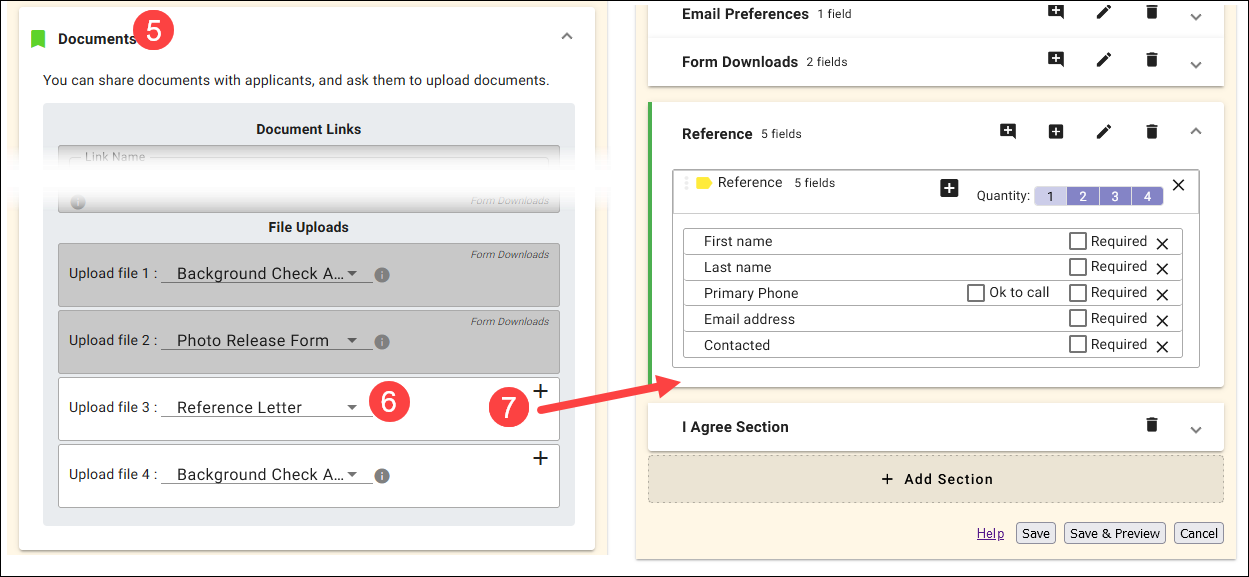
- In the Available Fields section, expand Documents. There are 4 Document Links and 4 File Upload fields in this expandable area.
- In the File Uploads section, use the Upload file dropdown for an available file upload to select the type of document you want to have applicants upload. You can select from the Document Types you set up earlier.
-
Click and drag that Upload file field to the section of your form that you'd like it to appear in. Or you can use the + icon next to that field to add it your currently selected form section. The Customize Application Form Content help topic explains more about adding new sections and repositioning fields on your form.
-
If you'd like to require applicants to upload a file of this type, you can check the Required box next to the Upload file field after adding it to your form.
- Repeat steps 7 through 9 for each Upload file field you want to add to your form. You can add up to 4 of these fields to your form.
- Click the Save button.
Now applicants can attach documents of the types you designated when they submit their form.