Customize Application Form Content
Customize Application Form Content
In Volgistics, you can customize what fields and information appear on the online application forms you create. This help topic explains how to customize this content. To get started, you'll need to go to the setup page for the form you want to customize.
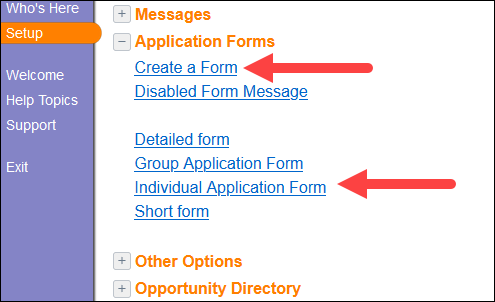
- Choose Setup from the menu.
- Expand Application Forms.
-
Select the form you'd like to customize or click Create a Form if you want to start a brand new form.
-
Click the Customize Form Content link.
From this setup page, you can add, remove, and edit your form sections and manage which fields and instructions appear on the form. Below we've broken down how to use this setup page into steps based on how you would use this page if you were starting from scratch with a brand new form.
The Setup Page
Before we explain how to customize your form, let's first go over the different portions of this setup page to familiarize ourselves.
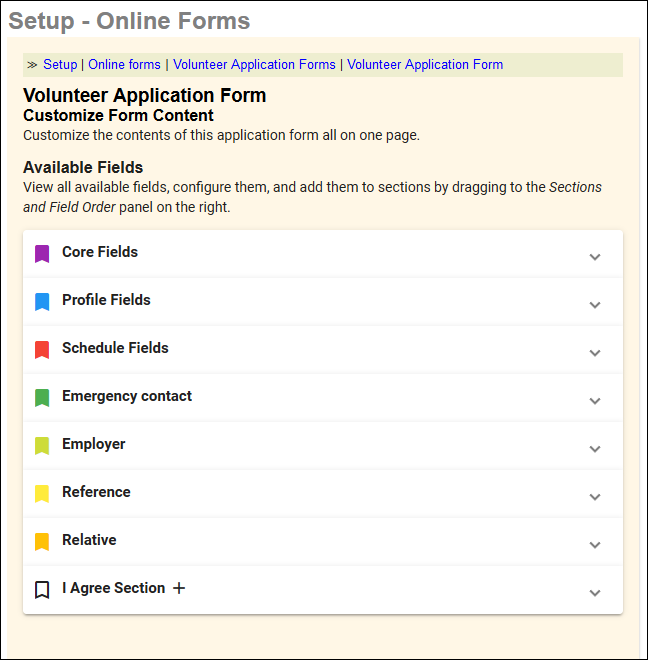
Available Fields
This portion of the setup page shows all the fields that you can add to your application form. These are all stored in collapsible sections (e.g. Core Fields, Profile Fields, Schedule Fields, etc.). The sections correspond to areas and types of fields on the volunteer record. For example, the Date of Birth field is found on the Profile tab of volunteer records so you'll expand the Profile Fields section to locate it on this setup page.
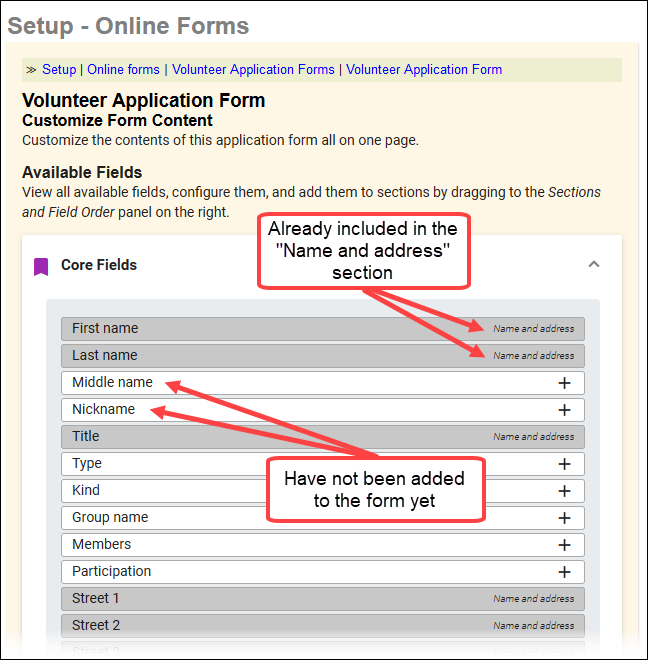
Fields that appear with a white background are not currently configured to appear on your form. Fields with a gray background have already been added to the form, and they indicate which form section they've been added to.
Sections and Field Order
This portion of the setup page shows the sections that appear on your form. Each section is collapsible, and you can expand them by clicking the heading for the section. When you expand each section, you'll see all the fields that are currently configured to be in that section and the order of those fields in that section.

Now that we've taken a look at the different parts of the setup page, let's dive into using this page to customize your form. As you make changes to your form, remember that you need to click the Save button to keep any changes you've made. You can also use the Save & Preview button to save your changes and bring up your form to immediately see how it looks.
Add & Manage Form Sections
We recommend starting by setting up your form sections. All the information and fields on your form must be organized into sections, so this is a good place to begin. New applications have a few sections included by default (e.g. Name and address and Demographic Information), but you can add more sections, change the existing sections, and/or remove existing sections. You can make changes to the sections on your form at any time, so if you discover that you need to add more sections or need to remove sections down the road, you can always make those changes later.
Add Sections
If you'd like to create a new section on your form, click the Add Section button at the very bottom of the Sections and Field Order portion of the setup page. This creates a brand new, empty form section below all of your existing form sections.

Keep in mind that each application form can have a maximum of 12 sections (not counting the I Agree Section). Once your form has 12 sections, the Add Section button will disappear, and you won't be able to add any more sections to the form.
Edit Section Headings & Instructions
Each form section has a heading and can optionally include instructions. These can be customized by clicking the Edit Section Info icon for the section you'd like to customize.
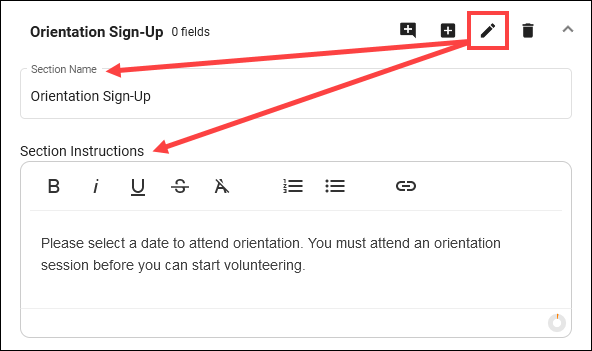
The Section Instructions utilize a rich text editor so you can add formatting to the instructions if needed. Once you're done editing this information, you can click the Edit Section Info icon again to hide it.
Rearrange Sections
If your form sections aren't in the order that you'd like, you can always reorganize them in a way that works better for you. To rearrange your sections, simply click and drag the section heading into the position you'd like it to appear.
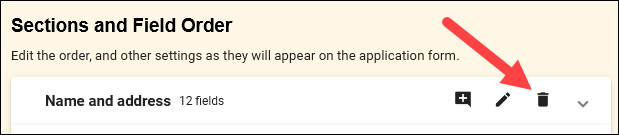
Remove Sections
In some cases, you may want to get rid of a section that is currently shown on your form. To delete a section from the form, click the Remove Section icon. You'll be asked to confirm the deletion. Select Yes to remove the section from your form, or select No if you changed your mind and do not wish to remove the section.
Add & Organize Fields
Now that you've set up your form sections, you can start adding and managing the fields that are included on your form. New applications have some fields included by default (e.g. First Name, Last Name, Email, etc.), but you can add and remove fields as you need.
Remember each field on the application form must be a field on your volunteer records so if you don't see a field for the information you'd like to collect you'll need to create a new field on the volunteer record first. Similarly, if you want to change the name of a field or add new options, you'll need to make those changes to the field itself.
The Field Customization and Configuration help topic has information on creating new dropdown, text, and checkbox fields as well as editing existing fields. There are also Characteristic Fields for multiple choice responses or questions where you'd like a Yes or No response. See the Create a Characteristic Field help topic for information on how to create these fields.
Add Fields
Fields must always be added to a form section, and there are a couple of ways you can do this.
The first option is to click and drag the field from the Available Fields area to the desired section in the Sections and Field Order area. Here are some steps you can follow to do this:
- In the Available Fields area expand the section for the field you wish to add (e.g. Core Fields).
- In the Sections and Field Order area, expand the section you want to add the field to (e.g. Name and address).
- Click and drag the label for the field you want to add and move it into the desired section.
- Release click to drop the field into that section.
The second option is to use the Add field to... button. In the Available Fields area, the label for each field that hasn't been added to a section yet shows a "+" icon. Click this button to add the corresponding field to the currently selected section. The field will be added to the very bottom of the selected section. You can move the field within that section after it is added.

Your currently selected section is indicated with a thin green line on the left side. For example, in the image below, the Demographic Information section is currently selected.
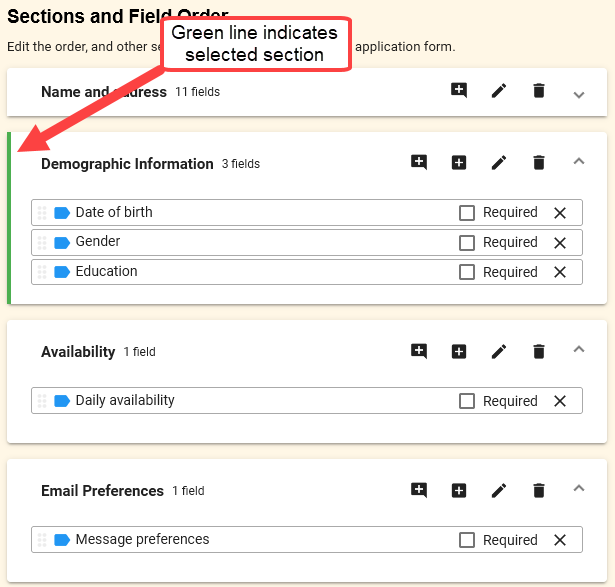
You can change which section is selected by clicking on the heading for the section you wish to select.
Move and Rearrange Fields
Fields can also be moved and reorganized on your form. This is as easy as clicking and dragging the field to the new location you'd like it to appear in.
You can move fields within a form section or even move them from one form section to another. If you drag a field to a section that is currently collapsed, you can hover over that section heading to automatically expand it so you can move your field to that section.
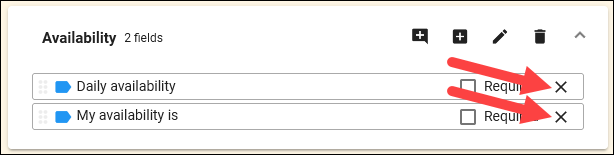
Remove Fields
If your form currently includes a field that you no longer wish to appear on the form, you can remove it. To do this, expand the section the field is in and click the X icon on the far right of the field's label. If you accidentally remove a field, you can always add it back.
Comment Fields
There may be cases where you would like to have applicants provide a more narrative or long form response to a question. For example, you may want applicants to provide more details about their previous experience or explain why they are interested in volunteering with your organization. Comment fields are ideal for collecting these kinds of responses.
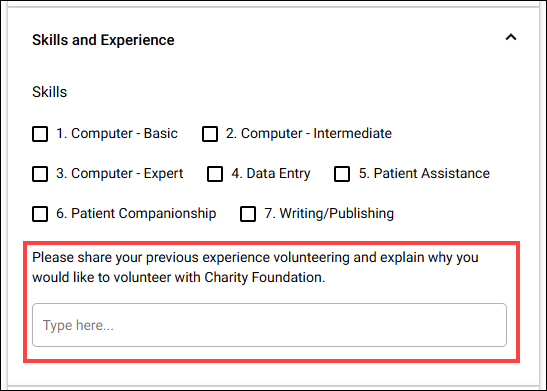
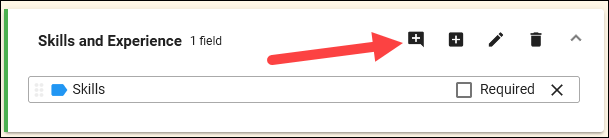
Each of your form sections can include a maximum of one Comment field, and these always appear at the very bottom of the section. You can add a Comment field to a section by clicking the Add Comment button in the section's heading.
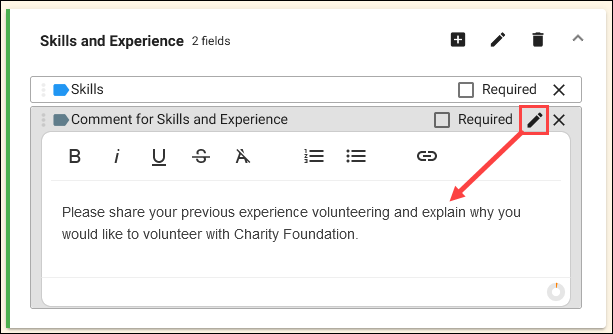
When you click this button, a new item will be added to the bottom of the corresponding section. The label has a gray background because it cannot be moved. If you'd like to add special instructions for the Comment field, you can add these by clicking the Edit Comment button. This brings up a rich text editor that you can use to enter any questions or instructions you'd like to appear above the Comment field.
Additionally, you can make it so applicants are required to make an entry in a Comment field by checking the associated Required checkbox.
Rows
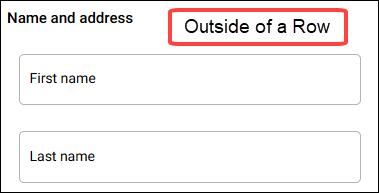
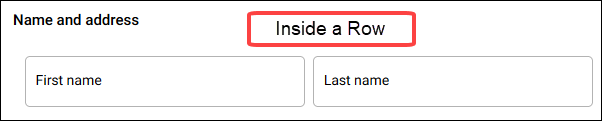
The Rows feature lets you organize fields horizontally on your application form. Typically fields are organized vertically on forms. For example, if you set up a form section so that the First Name field comes first and the Last Name field comes second, the First Name field appears above the Last Name field. However, if you were to place these fields into the same row, they would appear right next to each other with the First Name field coming first followed by the Last Name field.
Rows are useful for grouping related fields together, and they may improve the flow of your form.
You can add a row to a form section by clicking the Add Row button in the section's heading. Once you've added the row, you can move it the same way that you would move a field, and you can add and move fields to the row as if it was its own section.
If you've added a row and decide that you no longer need it, you can delete it from the form by clicking the Remove Row button. However, keep in mind that this will remove all the fields in that row from your form. If you want to keep those fields on your form, you need to move them out of the row before you delete it, or you will need to add them back after deleting the row.

Keep in mind that not all fields can be added to rows. Certain fields cannot be moved (like Comment fields) or require the full width of the form (like Schedule fields), so you cannot add them to a row. If you try to place these kinds of fields in a row, the page will display a warning near the bottom of your screen indicating that the field cannot be moved to the row.
Configure Field Settings
Some fields you add to your application form have additional settings that affect how applicants interact with those fields. Here we explain those settings in more detail.
Make Fields Required
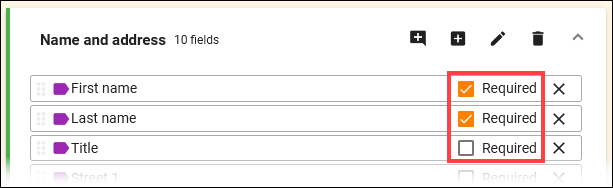
Most fields you add to your application form can be set up as required. When a field is required, applicants cannot submit the form without completing that field. If a field can be set up as required, a Required checkbox will be shown on the right side of the field's label when you add it to your form. While most fields have this option, not every field can be required, and those fields will not show the Required checkbox.
To make the field required, simply check that box. And if you do not want a field to be required, make sure that box is unchecked.
OK to Call
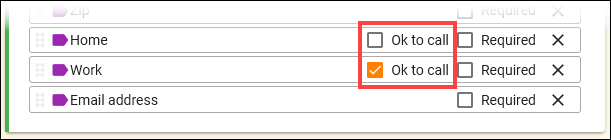
In Volgistics, all of the phone fields you track in your volunteer records have an associated OK to call checkbox. This checkbox is used to indicate whether a volunteer would like you to use that phone number to contact them. In most cases, volunteers only provide a phone number to you if they would like you to use that number to contact them, so you don't necessarily have to use these fields. However, there may be instances where you do want to track this kind of information.
In those cases, you can let applicants indicate whether it is OK to call them at a particular phone number by including the OK to call checkbox for the phone numbers you include on your form. Each phone number field you add to your form has an OK to call checkbox on the right side of its field label. Simply check that box if you'd like to include the checkbox for the corresponding phone number on your form. Leave the box unchecked if you do not wish to include the OK to call checkbox for the phone number.
Date of Birth
You can add the Date of birth field to your application forms to collect age and birthday information from new volunteers. However, depending on the needs of your organization, you may not need or may not be allowed to track your volunteers' full dates of birth. For example, if you just want to know and celebrate volunteer birthdays, you don't necessarily need to track the year a volunteer was born. For this reason, the Date of birth field has several options for you to choose from.
In the Available Fields area under the Profile Fields section, you'll find the Date of birth field. You'll notice that this field label is a larger than most other fields and has other options included on it. These options let you choose whether or not applicants can enter their year of birth. You can make your selection for this field before or after you have added the field to your form. Here is a summary of what each option does:

- Required. Choose this option if applicants must provide their full date of birth including the year. When this option is selected, the Date of birth field is automatically required.
- Omitted. Choose this option if you do not want applicants to provide their year of birth. With this option, volunteers can only enter the Month and Day of their birth.
- Optional. Choose this option if you do not wish to require a year of birth but want to give applicants the option to provide that information if they'd like. With this option, only the Month and Day of their birth must be entered to complete the field, but the Year will still appear as an option.
Message Preferences
You can optionally let applicants choose what kinds of messages they'd like to receive from you as part of their application process by including the Message Preferences field. If you utilize the text messaging feature in Volgistics, you can also let applicants opt-in to receive text messages from you when they submit their form.
In the Available Fields area under the Profile Fields section, you'll find the Message Preferences field. If the text messaging feature is not enabled for your account, you will not see any additional options for the Message Preferences field. In this case, the field only lets applicants configure their email message preferences. However, if the text messaging feature is enabled in your account, this field will include options for allowing applicants to opt-in.

If you want to let applicants opt-in to receive text messages from you through Volgistics, check the Allow text opt-in checkbox. When this box is checked, your form gives applicants the ability to choose whether or not they want to opt-in. If they select Yes, they are presented with all the fields they need to complete to opt-in and choose their text and email preferences. If they choose No, they only see the options to configure their email preferences.
Once you've selected to Allow text opt-in, you can choose whether volunteers see the Email preference options or the Text opt-in options by default. Applicants can still choose whether they want to opt-in or not. These settings simply indicate which option is selected by default.
You can configure these settings at any time (before or after you add the field to your form).
Preference Fields
Collecting applicants' preferences is a helpful way to understand how new volunteers want to serve with your organization. You can add preference fields to your forms in the Profile fields section, and you can choose whether to Include Site and Place Names for the items listed in those fields.

By default, each Assignment listed in the field will indicate which Site and Place it belongs to, which can be helpful if you have multiple Sites or Places with the same kinds of Assignments. However, if this differentiation is not needed, you can keep things less cluttered by unchecking that option so Assignment names are listed without Site and Place distinctions.
Document Links and File Uploads
The Documents section of the Available Fields lets you share documents with and collect documents from applicants.
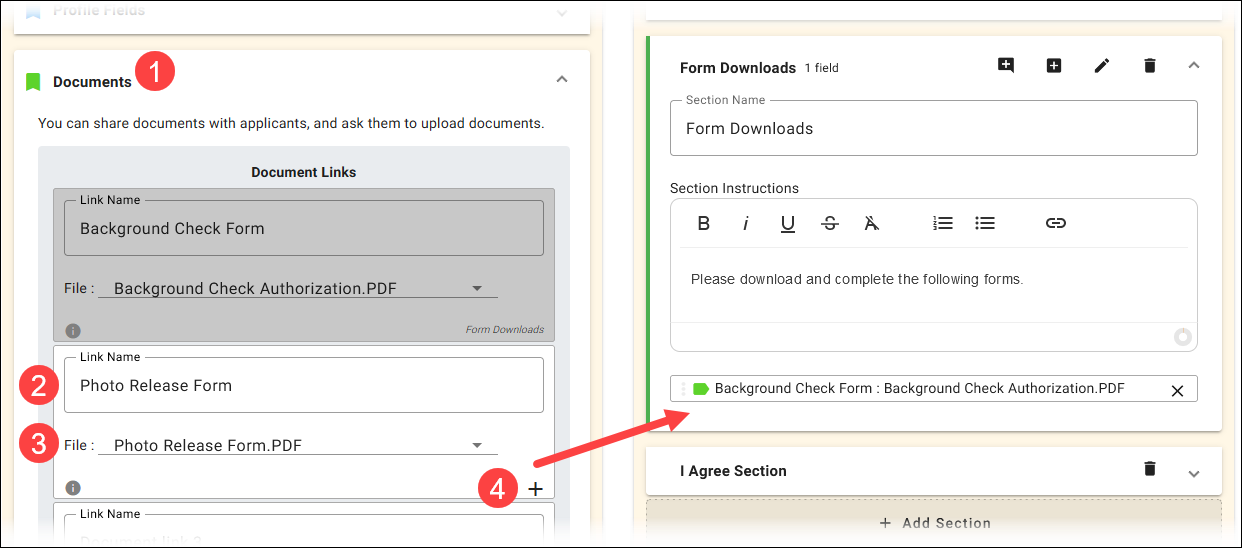
The options in the Document Links section allow you to share documents with applicants for them to download. You can include links for up to four documents on your forms.
To share a document, it must first be uploaded to the Documents tab of the Mailbox under the Attachments sub-tab. Documents Tab of Mailbox explains more about this in the Attachments Sub-Tab section.
Once you have uploaded the files you wish to share with applicants, you can include links to download the documents on your form. To do that:
- Expand the Documents section.
- Find an unused Document Link and use the Link Name field to enter the text you'd like to use for the link.
- Use the File dropdown to select the document you want to link.
- Drag that document link box to the desired section or click the + icon to add it to your currently selected section.
File Uploads
When you include the optional VicDocs document storage feature in your account's service level you can choose to have applicants submit up to four document files with their application. The options to collect files from applicants are available under the File Upload section.
The process to add the document uploads works similarly to how you add other fields to your form.
- Expand the Documents section.
- Find an available File Upload box and use the Upload file dropdown to select the type of document you want to collect.
- Click and drag the File Upload box to the desired form section, or click the + icon for that box to add it to the selected form section.
-
Check the Required box next to the newly added field if you want to require the applicant to submit that type of document.

If you need additional information on how to make Document Types, or how to use this feature, see the Document Uploads on Application Forms help topic.
Schedule Fields
Some organizations may wish to have applicants sign-up for events during the application process. For example, it may be useful to have volunteers sign-up for an orientation session when they are completing their application form. With the Schedule Fields options you can do just that.
You can find the Schedule Fields options in the Available Fields area under the Schedule Fields section. You can configure these options at any time (before or after you have added the Schedule Fields field to a form section). Let's walk through these options:
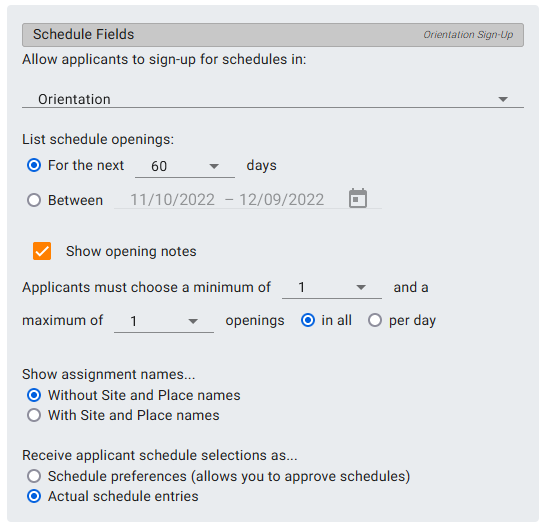
- Allow applicants to sign-up for schedules in. This dropdown lets you select which Assignments applicants can see and sign-up for on the application form. You can choose to make all of your Assignment schedules available, or you can limit scheduling to just one Assignment, just the Assignments in a particular Place, or just the Assignments in a particular Site.
-
List schedule openings. In these options, you can choose the time frame you'd like to include schedule openings for.
-
The first option (For the next X days) lets you set a dynamic date range. You can indicate this date range by selecting how many days into the future applicants can see openings for. For example, you can choose to include shifts for the next 30 days. This is great if you have ongoing shifts, so you don't need to manually update these settings to change the date range.
-
The second option (Between...) lets you set a static date range which you indicate by selecting a start and end date. This is ideal if you have a specific event that volunteers are applying for. The application only ever shows shifts in that specific date range which will not change unless you do so manually.
-
-
Show opening notes. If you'd like your application form to show the schedule notes you've added to your openings, check this box. Otherwise, leave it unchecked.
-
Applicants must choose.... With these options, you can configure the minimum required shifts applicants must sign-up for and/or place a limit on the maximum number of shifts they are allowed to sign-up for. If you do not want to require volunteers to select a shift, you can select none for the minimum, and if you do not wish to limit the number of shifts applicants can select, choose no limit for the maximum. You can have these settings applied for the total number of shifts selected on the form or have them applied for the number of shifts selected per day.
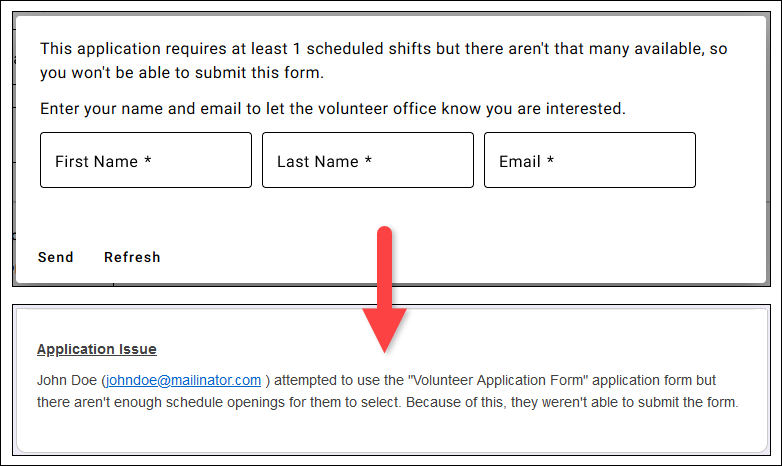
Not enough shifts
If you require applicants to select a minimum number of shifts but the form doesn't have enough shifts for them to reach that minimum, applicants will not be able to submit the form. However, they will be presented with the option to send their name and email address to you. In that case, you'll receive a notification on the In Box tab of the Mailbox with the potential applicant's details and a message indicating that there weren't enough shifts for them to choose or submit the form.
-
Show assignment names. These options let you choose how Assignment names are displayed in the schedule fields. You can choose to include the corresponding Site and Place names for each Assignment, or you can choose to exclude them.
-
Receive applicant schedule selections as. When an applicant makes a selection in the schedule fields, you can choose to have those selections treated as schedule preferences or actual schedule entries.
-
If you choose Schedule Preferences, the applicant's selected shifts won't be added to the schedule automatically. They will show up on the schedule as a potential option for filling those shifts, and you can choose whether or not to add them to those shifts. You can learn more about this in the Working With Schedule Preferences help topic. If you use the automatic schedule confirmation feature, the applicant will not receive the confirmation until you have actually placed them on the schedule.
-
If you choose Actual schedule entries, the applicant's selections are added directly to the schedule as a normal schedule entry once you receive their application into your database. If you use the automatic schedule confirmation feature, and you audit your submitted applications, the applicant will receive the confirmation when you receive their record from the mailbox.
-
Tip!
The names of the Assignments shown in the schedule on the application form are links that will take the applicant to a description or profile of the Assignment. See Get Started With the Opportunity Directory for help with adding or updating the Assignment profiles.
Contact Fields
You may wish to collect contact information for other individuals related to the applicant. For example, you may want to have the applicant provide an emergency contact or include contact information for a reference. In these cases, you can use Contact Fields to collect this information.
You can customize the types of contacts you track using the Kind field on the Contacts tab of your volunteer records. Each type of Contact you've set up in the Kind field has its own set of fields on the Customize Form Content page. For example, if your Kind field has options set up to track Emergency Contacts, Employers, References, and Relatives, there will be an Emergency Contact, Employer, Reference, and Relative section in the Available Fields area.
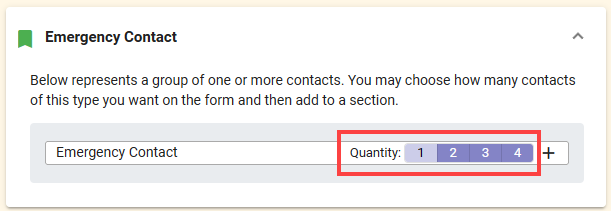
To add Contact Fields to your form, expand the section that corresponds to the kind of contact you want to collect. Initially, there is only one field in that section and its name corresponds to the kind of contact (e.g. Emergency Contact). You can choose how many different contacts of that type you'd like the applicant to provide using the Quantity options that appear on the right side of the field label. You can include fields for up to 4 contacts of a single kind. You can add that field to your form like you would any other field.
Once you've added that field to your form, that field will look and function much like a row, and the Available Fields area will let you choose which specific Contact Fields you'd like to collect for that kind of contact.
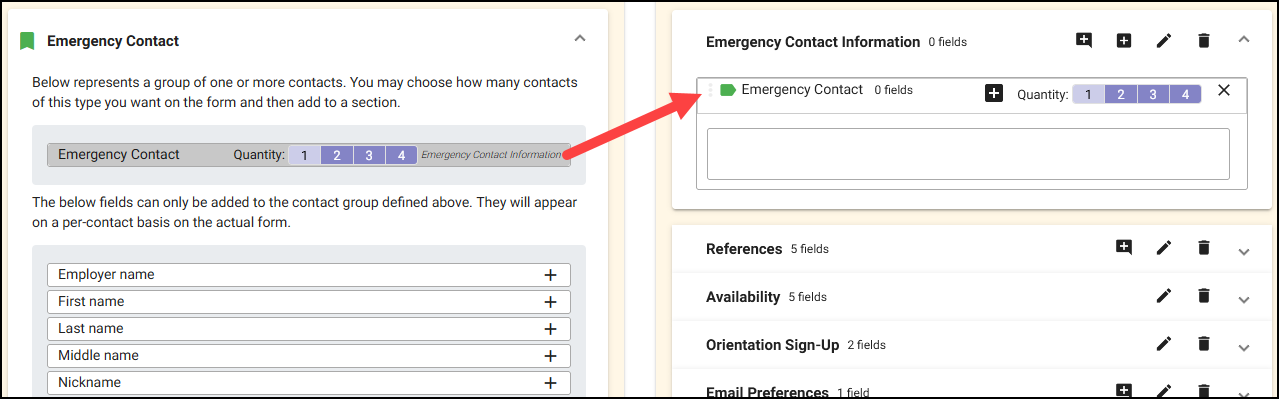
To include a field for that kind of contact, add the field to the contact field area you just added to your form. You can do this like you would add any other field (clicking and dragging it to the form or using the + icon next to the field label). However, you can only add these fields to their associated contact field area.
For example, if you add the Emergency Contact field to your form, the Emergency Contact fields can only be added to that field area. They cannot be added to other kinds of contacts or to other portions of your form.
Additionally, you can place contact fields within rows. Since contact fields can only be added to their corresponding area, you need to click the Add Row button in that contact field area to create a row for the associated contact fields. The Add Row button in the section heading cannot be used for contact fields.
Each of the fields you chose to include appears on the form for that kind of contact. If you used the Quantity options to include multiple contacts of the same kind, your form will include multiple sets of the selected fields. This way the applicant can provide the necessary information for multiple contacts if necessary.
How Multiple Contacts Appear
When multiple contacts are selected for the Quantity the contacts will be stacked in tabs to save vertical space. To enter information for another contact, the applicant will need to click on the other tabs. The first and last name of the contact will appear at the top of each tab as information is entered. Here's an example of how this looks on an application form where the applicant is asked for two reference contacts:
I Agree Section
Lastly, you can add the I Agree section to your form if you'd like applicants to review and acknowledge volunteer policies, waivers, or any other kinds of statements. This section always appears at the very bottom of your form. You can configure this section to include an I Agree checkbox or an electronic signature field that the applicant must complete in order to submit their form.
To add this section to your form, go to the very bottom of the Available Fields area and click the Add Section to Form button next to I Agree Section (this appears as a "+" icon).

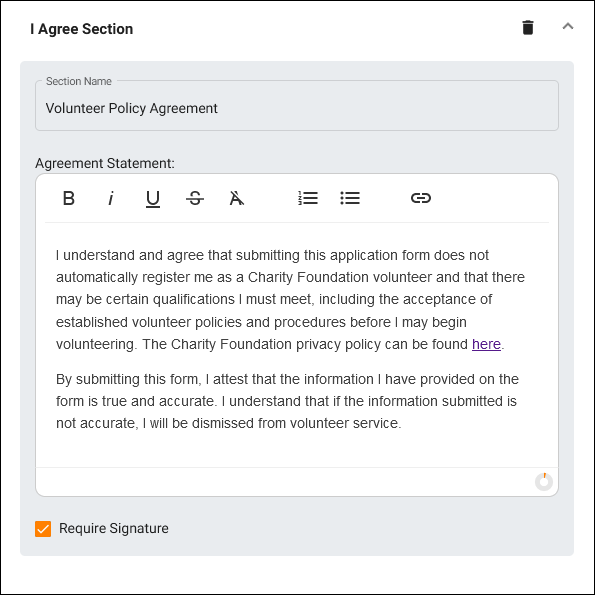
Once you've added it to your form, you can expand that section and add a Section Name and Agreement Statement. The Agreement Statement should include any of the content you want applicants to review and acknowledge. This text field uses a rich text editor so you can add formatting to the contents of the agreement if you'd like.
By default, this section includes an I Agree checkbox that applicants must check in order to indicate that they have read and agree to the statement you included. But you can check the Require Signature checkbox at the bottom of this section to have an electronic signature field appear in this section instead. In this case, applicants must provide an electronic signature to submit their form rather than just checking a checkbox.
Customize Application Form Content
Related Help
- Getting Started With Application Forms
- Customize Themes for Application Forms
- Document Uploads on Application Forms