Volunteer Profile Fields Tab
The Fields page appears when you create a new report or modify an existing report. Use the Fields page to choose the fields you want to appear on this Volunteer Profile report.
Instructions
Use the Instructions field to enter any directions or comments that should appear on the page before each volunteer's information.
In some cases a Volunteer Profile report will be used to create a printable version of a volunteer's profile. Or, an organization might use it to provide a printed version of a statement the volunteer agrees to such as a Photo Release Policy. Fields for signatures can be included in the Signature Fields section at the bottom if the report is used for that purpose.
You can add some basic rich text elements to your instructions to make them easier to read. When you use the Enter key to add a line break to your content, the rich text editor will automatically apply extra space between the original line and the new line. This is done to help break up your content and make it more readable. If you do not want to include extra spacing between lines, hold down the Shift key and then press Enter. See the Using the Rich Text Editor help topic if you need more help adding rich text to your instructions.

Volunteer record fields
After completing the Instructions field section, mark the boxes next to each field tracked in the volunteer record that should appear on the Volunteer Profile report for each volunteer. You can refer to the Volunteer Profile Report Overview help topic for examples of how the fields on the report will be formatted.
Signature fields
Use the Signature fields to include a signature section at the bottom of the Volunteer Profile report. This is especially useful if you're using the report to get a signature showing the volunteer agrees with a policy or statement your organization requires as a condition of volunteering. When you're using the Volunteer Profile reports to collect a signature, be sure to set the Options tab to start each volunteer record on a new page if you're running the report for more than one volunteer at a time.
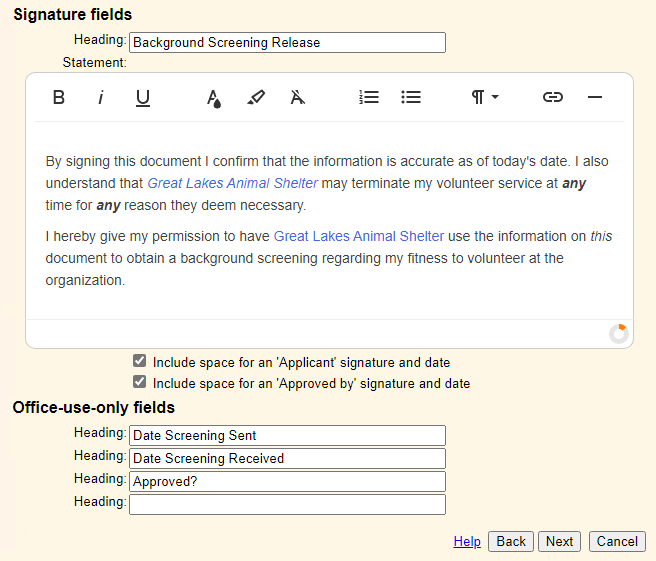
Enter a heading in the Heading field to separate this section from the rest of the report. For example, if you're using the report to show the volunteer gives permission to have a background screening, the heading might be Background Screening Release.
Enter a statement in the Statement field. This will appear above the signature box on the report when it is finished. You can add some basic rich text elements to your statement to make it easier to read. When you use the Enter key to add a line break to your content, the rich text editor will automatically apply extra space between the original line and the new line. This is done to help break up your content and make it more readable. If you do not want to include extra spacing between lines, hold down the Shift key and then press Enter. See the Using the Rich Text Editor help topic if you need more help adding rich text to your instructions.
Mark the Include space for an 'Applicant' signature and date box if an applicant or volunteer will be signing the document. Note: The word Applicant will not actually appear on the finished report so the person signing is not limited to just new applicants.
Check the Include space for an 'Approved by' signature and date box if a supervisor or staff member will also be signing.
If the Signature fields section of the Fields page is left blank, no signature fields will appear on the Volunteer Profile report.
Office-use-only fields
The Office-use-only fields section provides space for the organization to make up to four notes or comments on the report. Enter a heading for each necessary office-use-only field.
Example of Signature fields and Office-use-only fields
Here's an example of what the completed Signature fields and Office-use-only fields might look like on the Fields tab of the report template.
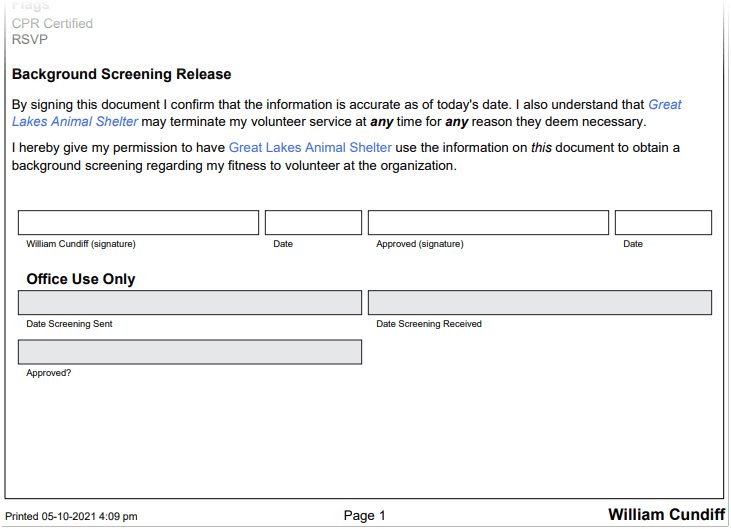
The PDF file for a report configured like the example above will look something like this. Notice that the name of the volunteer is automatically inserted into the spot designated for the volunteer's signature.
When you're finished choosing the Fields for your report, click Next to continue to the next step.
Related Help
- Using the Rich Text Editor
- Volunteer Profile Options Tab
- Volunteer Profile Include Tab
- Volunteer Profile Page Design Tab
- Volunteer Policy, Confidentiality, and Release Agreements
- Create Custom Reports
- Volunteer Profile Report - Volunteer Profile-Individual (stock)
- Volunteer Profile Report - Volunteer Profile-Group (stock)
- Volunteer Profile Report Overview