Service Summary Include Tab
The Include page appears when you create a new report, or run a stock report. The page has settings to select the format of the report, as well as choose which volunteer records will be included on the report. In the case of reports with service information, the Include page also allows you to select the time period the report covers or limit the report to just service in a certain Site, Place, or Assignment.
This help topic explains the Include page options specifically for the Service Summary report style. If you want information about the Include page of a different style of report, look for the Help link at the top or bottom of the Include page of the report you're using.

Select Format
Use the setting under What format do you want for this report? to choose between creating a PDF file, or a Microsoft Excel spreadsheet file.
Select Time Period
Your volunteer service information is associated with date records. This section of the Include page allows you to report on just the service given in a certain time period. The settings in this section will change depending on how you choose to summarize the report on the report's Options page.
Which fiscal year(s) do you want to include in this report?
This option appears if the report is summarized by fiscal year.
Choose Start with the earliest year that has service, end with the current year if you would like the report to include a column for every fiscal year beginning with the earliest fiscal year for which your Volgistics database has a service entry, and ending with the current fiscal year. Intervening fiscal years appear on the report even if there are no service entries for that year. This option is appropriate if you want a historical report showing all recorded service.
Choose Start with the fiscal year that begins in and End with the fiscal year that begins in if you do not want to include every year in the report. Select the fiscal year with which you would like the report to start, and the fiscal year with which you would like the report to end using the dropdown lists provided. If you want the report to include just one fiscal year, choose the same year in the dropdown lists.
Which calendar year(s) do you want to include in this report?
This option appears if the report is summarized by calendar year.
Choose Start with the earliest year that has service, end with the current year if you would like the report to include a column for every year beginning with the earliest year for which your Volgistics database has a service entry, and ending with the current year. Intervening years appear on the report even if there are no service entries for that year. This option is appropriate if you want a historical report showing all recorded service.
Choose Start with and End with if you do not want to include every year in the report. Select the year with which you would like the report to start, and the year with which you would like the report to end using the dropdown lists provided. If you want the report to include just one year, choose the same year in the Start with and End with fields.
A calendar year begins on January 1st and ends on December 31st.
Which quarter(s) do you want to include in this report?
This option appears if the report is summarized by quarter.
Use the Start with the quarter that begins on dropdown lists to choose the month and year of the quarter on which you want the report to begin. For example, if you want the report to begin with the second quarter in calendar year 2024 you would choose April 2024. One quarter is a three-month period that may begin on any month you choose. The quarter that begins with April 2024 includes April, May, and June 2024.
Then use the Include x quarters dropdown to choose the number of quarters you want to appear on the report. Choose 1 if you would like the report to include just one quarter.
Which month(s) do you want to include in this report?
This option appears if the report is summarized by month.
Choose All of the months so far in the current calendar year if you would like the report to include each month that has passed so far in the current calendar year, including the current month. Your report will begin with January and end with the current month no matter which month it is when you run the report.
Choose All of the months so far in the current fiscal year if you would like the report to include each month that has passed so far in the current fiscal year, including the current month. Your report will begin with the first month of your organization's current fiscal year and end with the current month no matter which month it is when you run the report.
Choose Start with and End with if you would like to select a specific range of months for your report. Using the dropdown lists provided, choose the month and year of the month you want the report to begin with in the Start with field, and the month and year of the month you would like the report to end on in the End with field. If you want the report to include just one month, choose the same month and year in the Start with and End with fields.
Additional Options
There are additional options below the settings for selecting the time period the report covers. These allow you to have more control over what information the finished report contains.
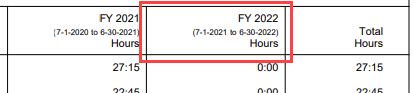
Include full date range for each fiscal year column
This setting will only show if the report's Options page is set up to summarize the report by fiscal year. Checking the box will make the columns in the report include the month and year for the fiscal year. For example, if the account's fiscal year begins in July, the column headings for the fiscal year that begins in 2021 will show like the one in the image below:
Only include service for this Directive
This option appears only if you track Mandatory Service in Volgistics.
If you track mandatory service in Volgistics you can make this report include only the service volunteers performed toward the completion of their service mandate for a particular program. Choose the Mandatory Service program from the dropdown list provided beneath the checkbox.
By checking this checkbox and choosing a Mandatory Service program, only service entries that list the selected program will appear on the report.
Select this option if you need to assess or report service performed in a specific mandatory service program. For example, if you require summer interns to perform 80 hours of service each summer, you can use this option to produce a report that includes only the service summer interns performed as part of this program. In addition to the report, you can also use the Sets feature in Volgistics to search your database for volunteers who have, or have not, completed a program. The Search Based on Mandatory Service help topic explains more.
Only include service in...
If you want this report to include only volunteer service performed in a specific Site, Place, or Assignment, check this box and choose the Site, Place, or Assignment from the dropdown list beneath the checkbox.
By checking this checkbox and choosing a Site, Place, or Assignment, only service entries that list the selected Site, Place, or Assignment in the Assignment field appear on the report.
Active vs. Inactive Assignments
By default, Service Summary reports include service information related to both active and inactive Assignments. You can change the report to only include service information for active, or inactive, Assignments by selecting Active assignments only or Inactive assignments only instead of the default, which is Both active and inactive assignments.
Which volunteers do you want to include in this report?
Your volunteer records can be identified based on certain fields that appear on the records. The settings in this section can be used to limit which volunteers are used to produce the report's contents.
Archived Volunteers
Service Summary reports will always include archived volunteers if they meet the criteria selected below and have service to report.
Tagged volunteers
This checkbox is disabled unless you previously tagged one or more volunteer records. Check this checkbox if you want the report to include volunteer service performed by the tagged volunteers.
These volunteers
Check this checkbox if you want the report to include service for all of the volunteers you specify using the fields listed below. If you want this report to include service for all volunteers be sure to check this checkbox.
Uncheck this checkbox only if you selected the Tagged volunteers checkbox, and you want this report to include only volunteer service performed by the tagged volunteers.
Keep in Mind!
The settings in the These volunteers section work together to control which volunteer records are used for the report. For example, if you use the Status section to limit the report to volunteers with the Active Status, and use the Set section to limit the report to volunteers who are in a certain Set, the report will only include service information for volunteers who meet both requirements. They must have the Active Status and they must be included in the Set.
Status
Choose Any if you want this report to include volunteer service performed by volunteers regardless of their current Status.
Choose Any of these if you want this report to include only volunteer service performed by volunteers whose current Status is one of those you check, then check the Statuses you want to include.
As a general rule you should always choose Any volunteer Status (not Any of these) in service reports. This option is based on a volunteer's current Status, which is not necessarily what their Status was at the time they performed their service. Suppose, for example, you're running a 2022 service report. George Bailey's Status may have been Active when he performed service in 2022, but his Status might currently be Inactive. If you include only volunteers whose Status is currently Active, your report would not include George Bailey's 2022 service (nor service for anyone else who is now Inactive). For this reason, you should never exclude volunteers based on their Status unless you have a specific reason for wanting service reported only for volunteers who currently have a particular Status.
Type
The Type field appears in the Name box on the Core tab of volunteer records. It can be used to classify volunteers by major programs or categories such as Adult, Junior, Student, Regular, Occasional, Auxiliary, and so forth. Ultimately, each organization decides what the Type field in their account contains.
Choose Any if you want this report to include volunteer service performed by volunteers regardless of what their Type is currently.
Choose Any of these if you want this report to include only volunteer service performed by volunteers whose Type is one of those you check, then check the Types you want to include.
Remember that you may have volunteers who do not have any Type selected on their record. So even if you select every Type the report still may not include all of your volunteers.
Kind
The Kind field is located on the Core tab in each volunteer record. It is used to show if a volunteer record is for an individual person or a group that volunteers.
Select Both individuals and groups if you want the report to include both individuals and groups.
Select Individuals only if you want the report to only include individual volunteer records.
Select Groups only if you want the report to only include group volunteer records.
Flag
Flags appear in the Flag box on the Core tab of volunteer records. Flags are typically used to classify volunteers into groups that may overlap such as Board of Directors, Donor, Sponsor, Day of Caring, Red Team, and so forth.
Choose Any if you want this report to include volunteer service performed by volunteers regardless of what Flags appear on their Core tab.
Choose Any of these if you want this report to include only volunteer service performed by volunteers who have at least one of the Flags you check, then check the Flags you want to include.
Choose All of these if you want the report to include only volunteers who have all of the Flags you select. When this is selected, your report will not include all volunteer service, but only the volunteer service performed by volunteers who have all of the Flags you selected.
Keep in mind that this setting may be too restrictive if you check more than just a few Flags. For example, if you check five Flags and it is rare for a volunteer to have all five Flags at once, your report may be blank.
Choose Not any of these if there is volunteer service you do not want to include on the report. For example, you may track both paid staff and volunteers in your account and you use an Employee Flag to show which records are for staff members. If you want your report to include just hours from volunteers, you can select Not any of these and then check the Employee Flag so hours served by your staff are not included in the report.
Site
This option only appears if you use Site Level Access in Volgistics, and you are a headquarters operator who has access to the volunteer records for all of the Sites in your account.
Note that this filters results based on the Site to which the volunteer is assigned (on their Core tab) not based on the Site that service entries are associated with. To filter based on the Site where service was performed, use the Only include service in... option above.
Choose Any if you want this report to include volunteer service performed by volunteers regardless of which Sites they serve at.
Choose Any of these if you want this report to include only volunteer service performed by volunteers who serve at at least one of the Sites you check, then check Sites you want to include.
Set
You can use the Sets feature in Volgistics to query the database to find volunteers who meet certain requirements that are not options on the Include tab. For example, you may want your report to include just the service hours of volunteers who have been at your organization less than a year. In this case, you'd create a Set to locate the volunteers based on their start date first. Then, to limit the report, check the box by This set and pick the name of the Set you created from the dropdown list.
If your report is blank, it is most likely due to one of two things. It may be the other Include tab selections are too restrictive as described in the Keep in Mind call out box above. Or, it may be that the Set itself is not set up correctly to identify the volunteers you want included in the report. One way to check if this is the case is to view the volunteers in the Set.
Complete Report
When you're finished choosing the Include options for your report click the Next button to continue to the next step if you're creating or modifying a custom report. If you're running a custom report that you already made, or using a stock report, click the Run Now button when you're ready to have the system create the report file. This file will be sent to the In Box of your Volgistics Mailbox when it is complete.