Mark Checklist Items Complete
If you use the Volgistics Checklist features to track volunteer requirements, you can update volunteer Checklist items on the History tab of their volunteer record, the Checklist page, or using Tags. This help topic has information about how to do this.
To mark an item complete for an individual volunteer:
If you need to mark a Checklist item as complete for one volunteer, you can do that from the History tab of the volunteer's record.
- Choose Volunteers from the menu.
- Locate and click the volunteer's record.
- Select the History tab.
-
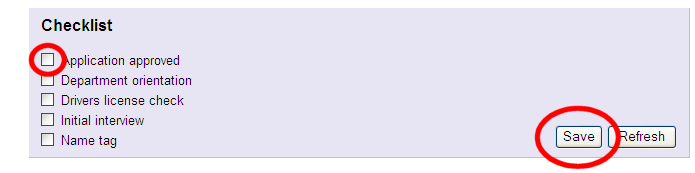
Items the volunteer is due to complete will show in the Checklist box at the top of the page without a checkmark. Check the box next to the item the volunteer completed.
-
Click the Save button.
When you mark a Checklist item as completed, Volgistics displays the item in the Checklist box with a checkmark (showing that it has been completed). Volgistics also inserts a date entry in the Dates box below to track the date the item was marked complete.
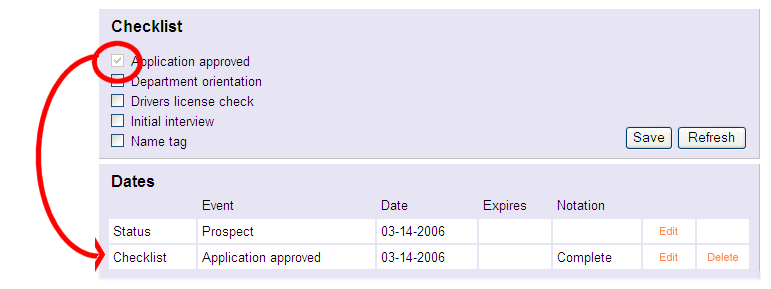
If you want to change this date, click the Edit button for this entry in the Dates box (shown below), enter the new date, and then click the Save button.

If you mark a Checklist item as completed and the item is set up so it must be renewed or performed on a regular basis, the volunteer's record will show the next date the item is due.
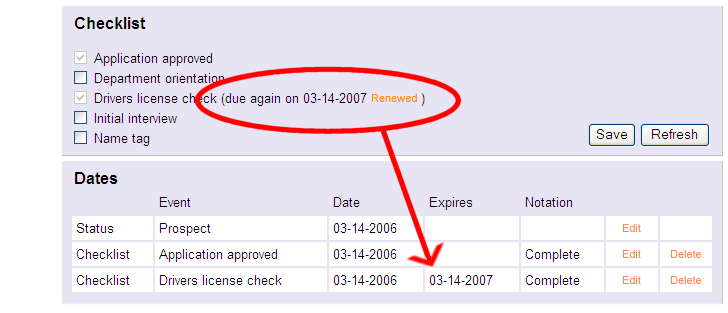
If the volunteer completes the item again before it expires, simply click the Renewed link in the Checklist box. If the volunteer does not complete the item again before it expires, the item will be unchecked when the expiration date arrives.
Expiration Dates Based on Birthday
If a Checklist item is set up to repeat annually based on the volunteer's birthday, and the volunteer does not have a date of birth recorded, you will not be able to mark the item complete as shown above. In this case, you can either go to the volunteer's Profile tab and enter a date of birth, or you can enter a completion date for the item using the Add box below the date grid. In this case, you'll need to enter an expiration date for the item also.
To mark an item complete using the Checklist page:
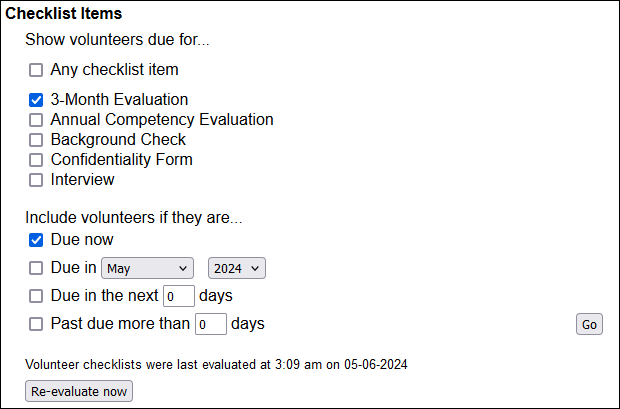
The Checklist page lets you search for volunteers that are due (or coming due) for Checklist items and mark those items as complete for multiple volunteers at a time.
-
Choose Checklist from the menu.
-
Under Checklist Items, select each item you would like to use to find volunteers.
- Under Include volunteers if they are, choose a time frame option.
- Click the Go button.
-
In the results that are displayed, check each item you would like to complete. You can also use the Check All option at the bottom of the page.

-
At the bottom of the page, enter a completion date.
- Click the Save button.
To mark an item complete using Tags:
You can also mark a Checklist item as complete for multiple volunteers using Tags. If you have several specific volunteers in mind and they all completed the Checklist item on the same day, this is a good option.
- Tag the volunteers.
-
Choose Tags from the menu.
-
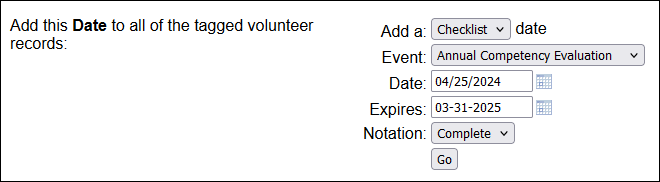
Next to Add this Date to all of the tagged volunteer records, use the dropdown menu to select Checklist Date.
- Select the details you would like.
- Use the Event dropdown to select the Checklist item you would like to mark as complete.
- Enter the Date the item was completed by these volunteers.
- If the item is configured to expire, enter an Expires date. Otherwise, leave this field blank.
- Next to Notation, choose Complete.
- Click the Go button.
Running Checklist Reports
You can run reports such as the Volunteer Date History (stock) report, or certain custom reports, that include Checklist date information. These reports can be limited to include just dates for a certain Checklist item (or items).
Related Help
- Background Screening With Verified First
- Checklist Expiration Date Calculation
- Track Vaccine Compliance
- Checklist Overview
- Create a Checklist Item
- Make Checklist Items Apply to Only Certain Assignments
- View a Volunteer's Checklist Items
- Find Volunteers Due for a Checklist Item
- Track TB Test Requirements
- Delete a Checklist Item
- Combine Checklist Items
- Volunteer List Report - Volunteer Checklist Report (stock)
- Volunteer List Report - Volunteer Date History (stock)
- Filter Reports for Specific Checklist Dates